Is your fintech startup still using Google Sheets?

When launching fintech startups, founders often resort to the simple, free tools they know best. When it comes to organizing and analyzing data, the first stop is usually Google Sheets. This choice makes sense; Google Sheets makes it easy to collaborate, track changes, leave comments, and move data around. However, as fields, sheets, and users multiply, startups need an easy way to improve functionality.
Catalyst Fund’s tech expert, Kevin Rejko, guarantees that upgrading is easier than you think. He knows, because in just a few short weeks, Kevin took Catalyst Fund portfolio company Spoon Money from using Google Sheets and WhatsApp to manage their 300+ lending groups, to having their own customized app.
The new app leverages AppSheet to convert Spoon’s multitude of Google Sheets into an operating system that enables, rather than impedes, the business. For example, Spoon’s new app allows CEO Nicky Swartz and COO Lorna McLaren to access and edit their company’s data from the field, to easily stay in touch with their users, and to search for information from their phones and personal computers.
Since Spoon Money has been growing rapidly, Nicky and Lorna had already realized that Google Sheets was a problem; staff couldn’t access information from the field since files were too heavy in low connectivity areas; edits were becoming cumbersome; and too much activity was concentrated on Nicky and Lorna’s personal phones. In addition, data quality was starting to suffer as edits – like address or phone number updates – needed to be changed in multiple places. However, they also worried that creating a new backend would disrupt operations just when the business needed their full attention. Although they were frustrated, Spoon’s leaders did not know where to start, who to trust, or how to assess the various tech options out there.
In these situations, Kevin recommends AppSheet. Although there are a number of solutions available, AppSheet is inexpensive, flexible, easy to learn, and — importantly — easy to fix when things go wrong. AppSheet connects a startup’s existing Google Sheets workbook, and organizes the selected rows/columns into an app interface that makes it easy to view, edit, and search the entire database, rather than having to sort or scroll sheet by sheet. It also has a number of possible integrations, many seamless since their recent acquisition by Google, so that founders can eventually add SMS functionality or other types of features to their systems.
Founders, either with the help of a tech expert or even on their own, should expect five key steps to move their businesses from a “Google Sheets fintech” to an “advanced tech fintech”. Knowing how simple it truly is, maybe more founders can finally make the leap to upgrade their tech!
1. Understand the data
The first step to understanding the data is to understand how your organization uses data and what sorts of functions you need from a backend.
A critical step in understanding the data is to zero in on the key identifier, or the central piece of data around which the system is organized. In the case of Spoon, a group lender, Kevin realized that the group number was the core identifier; all other pieces of data, from phone numbers to payments to meeting dates, were all associated with a unique group number.
As part of this process, Kevin recommends considering the following questions to understand data needs, users, sources, as well as pain points:
- What are the different jobs performed by the current system, and what information is needed to complete each job?
- Who in the organization will be performing each job?
- How is the data structured, and what are the relationships between different data points?
- Where does the data come from? Do you type in your data manually or from a different program?
- Where and in what format is the data currently stored?
- What are the pain points of the current system? What is needed that currently can’t be delivered by the existing system?
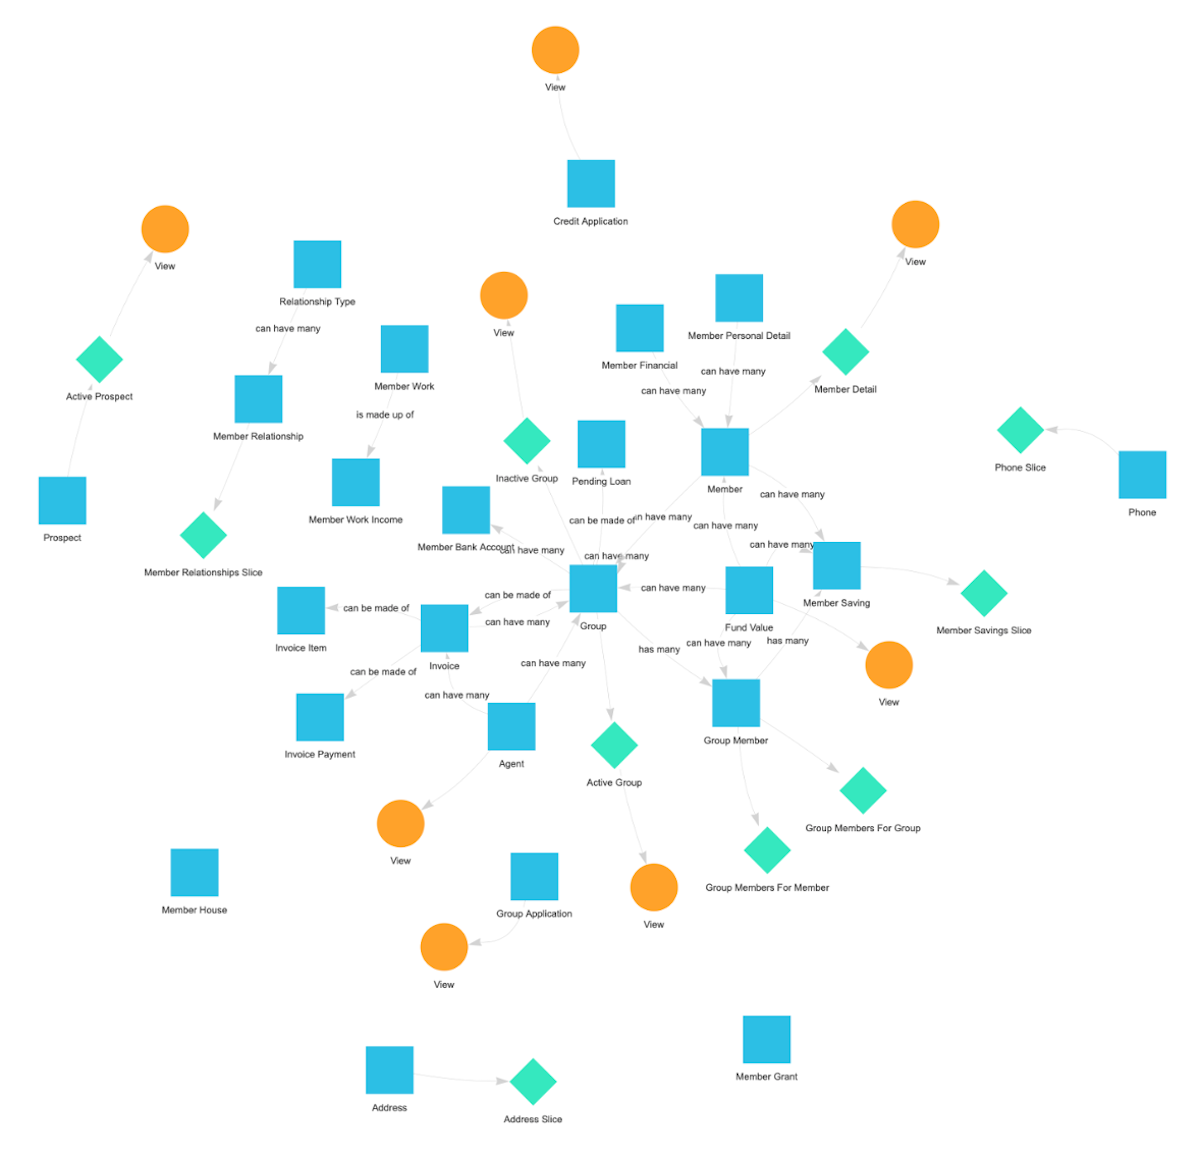
These responses can form the basis for data maps or blueprints that outline the current as well as the desired functionality, like the one below:
2. Clean the data & identify duplications
Once Kevin understands the various data fields and how each is used during business operations, he prepares the data to be linked with AppSheet. This involves easy fixes like cleaning errors, ensuring that formatting is consistent, and recognizing/assigning unique identifiers, but also some heavier lifting in identifying duplications in the data.
Identifying duplicates can be difficult because it requires some digging. To start, there are two main types of duplications that should be identified before preparing the data for AppSheet:
- Where a single value is duplicated across many rows in the same sheet
- Where there are many columns for the same type of data in the same sheet
In the first type, where a single value is duplicated across many rows in the same sheet, it is usually the case that that table should actually be two separate tables. In the case of Spoon, Kevin encountered this type of duplication with group members. Spoon’s master sheet had a row for each member that included a column with the details of their group. As a result, group information was replicated in the row of each member of that group, and a single member could not be represented in multiple groups. Moreover, it meant that when a group’s information changed, the Spoon team had to update each group member’s rows. Such duplications are a pain point with Sheets as they are often the source of errors and inconsistencies.
Spoon also faced the second type of duplication — in which there are many columns for the same type of data — with regards to phone numbers. In their contact information worksheet, there were several ‘phone number’ columns each with a different label such as ‘main phone’, ‘alternate phone’, and ‘WhatsApp number’. Sometimes multiple phone numbers were stored in a single cell, or a label value was also included such as “mom’s phone: XXXXXXXXXX”. So many columns and formats added complexity and errors.
3. Prepare the data
To de-duplicate the data, Kevin linked each row to a static key value, a single non-changing piece of data that can uniquely identify a single row. This value allows AppSheet to connect data from different tables. In some cases, this value can be a piece of real data, such as a member’s ID number, or it can be a randomly-generated unique value. For Spoon, Kevin created randomly-generated ID numbers to serve this purpose. While phone numbers could have worked, members sometimes share a phone so those numbers were not unique.
Once he created the numbers, Kevin then used these ID numbers to address the duplications in the data. For example, for group member information, Kevin pulled the group information into its own table and linked to the members’ information via their ID numbers. With an app interface, users only need to add or edit data once and the software can link it to many other fields, without the limitations of a two-dimensional worksheet. Kevin created a separate table for phone numbers where each row had a single phone number alongside the ID of the member who owns the phone number. Additionally, he added a ‘label’ column to capture contextual information, such as if a phone number was for a member’s mom.
4. Create & organize the app
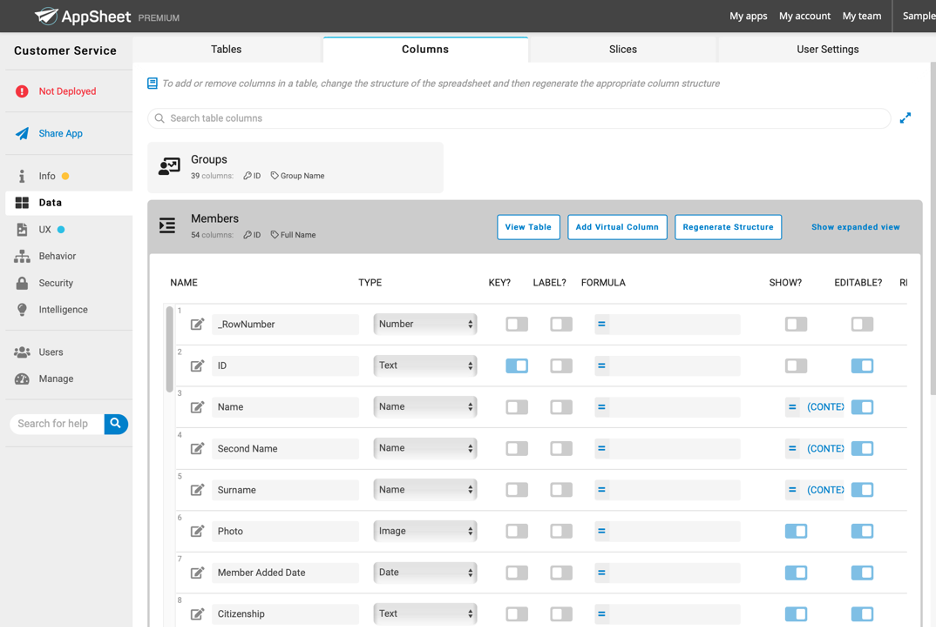
Once the Google Sheets have been cleaned and modified as described in the three previous steps, Kevin creates an account in AppSheet and imports the data. In this step, Kevin ensures all the auto-populated data types are correct, sets up the data rules, and customizes how the data is displayed to users.
AppSheet will automatically assign format types (e.g., text, number, date). Although this work is automatic, he double-checks each column uploaded to ensure its type and format are correct. For example, in case of a phone number, it is common for AppSheet to classify these fields as “numeric” type, when it should be “phone”.
This is also the time to add a few cool functionalities. For example, tagging a field with “phone number” will allow you to call that number from within the app. Other features to consider include being able to see addresses on a map, or being able to take a photo, make a drawing, or capture a signature for certain record fields.
Next, Kevin sets up the rules of the app and determines which columns should be visible in the app. All fields have generalized rules, like whether it is editable or required, and there are some additional rules for specific types of data. For example: “number” fields can have a minimum and maximum allowed value, price fields can have their currency set, or an enum can specify a list of valid options for a dropdown. Additionally, each field can have a formula added to support certain analysis. For Spoon, this involved making sure all the price fields had the correct currency.
Once all of the data has been formatted properly, rules added, and appropriate columns set to display, the final step is to configure how the information is displayed to users. AppSheet will create a set of views for each table added to the app, but these views don’t always give the full set of information needed. To improve on the default views, new views can be created, and view type (table, deck, map, card, chart, dashboard – to name only a few) can be selected as well as display options on how the data should be grouped or sorted. For Spoon, this involved ordering the fields on each of their views so that the most important information was located at the top of the screen.
5. Try it out
The real test is to try your new app out! You can try editing data and playing around with functions to see what works best for you. You can update the validation rules or add additional virtual columns. The measure of success that really matters is if the app helps your team do their job better and/or more effective than before.
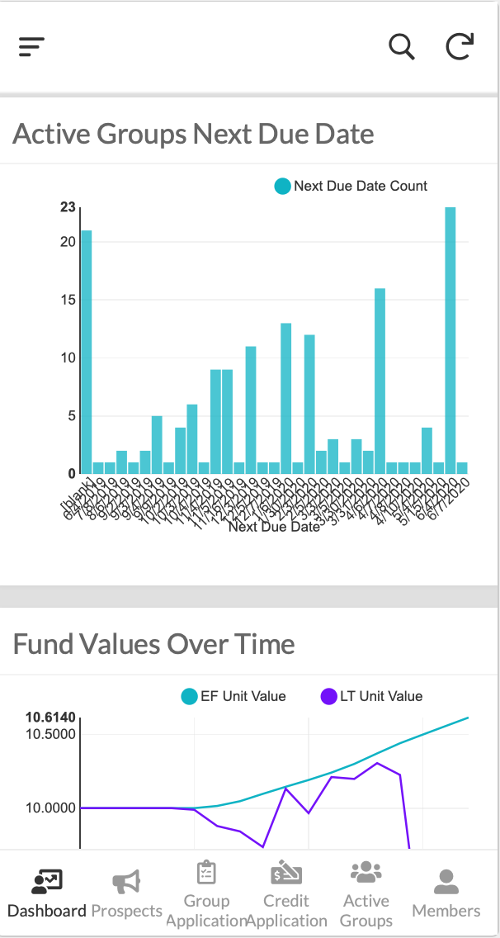
In Spoon’s case, this process lasted a couple of weeks as Kevin made adjustments to which fields were set as required, updated ‘enum’ data types to a more complete list of dropdown options, and added a few charts to their ‘dashboard’ view to provide better high-level insights into their data.
Bonus: Go pro!
Once you have been using the app for a few months, it might be time to consider some integrations. Some popular ones to consider adding include:
- Zapier to trigger AppSheet actions and/or automate data pipelines
- Twilio to automate SMS communication with customers or staff
- Facebook Messenger chatbot