Serverless USSD with Africa’s Talking — Part 1
USSD provides digital services to those without smartphones
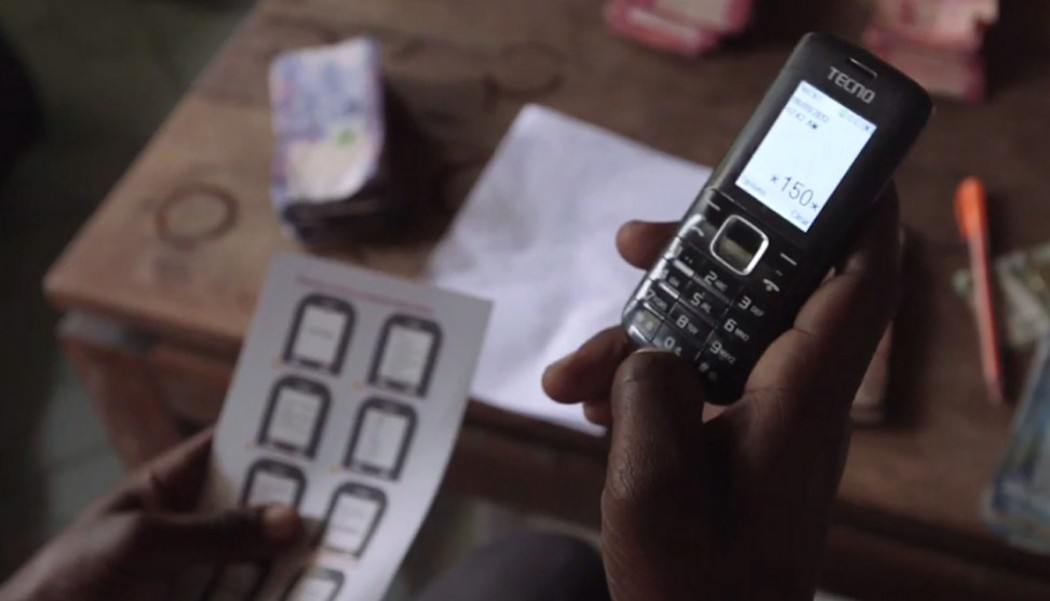
I have recently been using this amazing protocol called Unstructured Supplementary Services Data (USSD) that lets feature phones interact with information systems through a series of prompts. While, initially, this might not sound super exciting, it can let millions of people access information relevant to their daily lives directly on their feature phones. From internet banking, to paying bills and updating their social-media status, the best way to make information accessible in emerging markets is to use USSD.
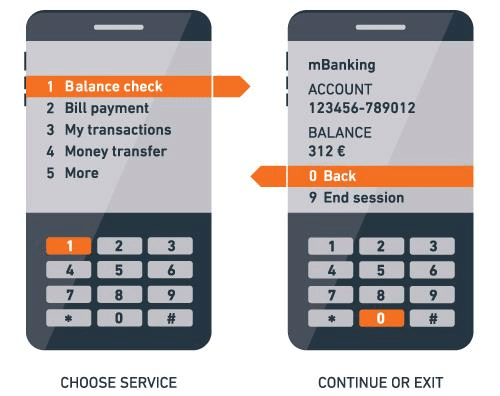
USSD was originally developed by mobile network operators (MNOs) as a way for customers to perform account self-management such as checking account balance or activating a prepaid SIM card. But over the past decade, this protocol has become a widely popular way to provide mobile applications to place all over the globe where smartphones are not yet standard.
To use a USSD app, a mobile phone user dials a special phone number called a short-code (ex: ‘*123#) and they are presented with a list of menu options. When the user places this call, some additional information such as their phone number is included in the request for the menu, so the information and options presented to the user can be tailored to their own needs.
So, given its capability to facilitate a digital interaction with practically any person on the planet who has a mobile phone, I thought it would be worth figuring out how it works. And the best way I know for us do that is to build one ourselves.
10,000 Feet
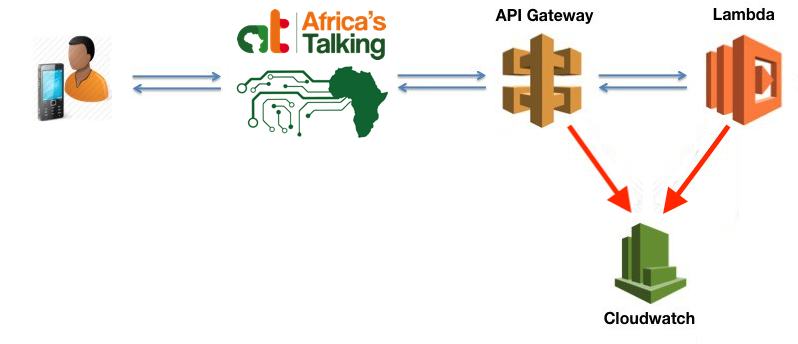
Before diving in too deep in the details, it’s worth first reviewing at a high level what pieces are involved with making USSD work and how they all interact with each other.
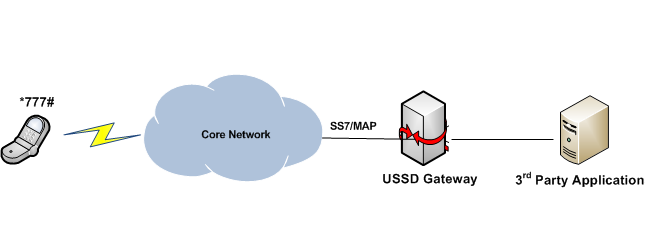
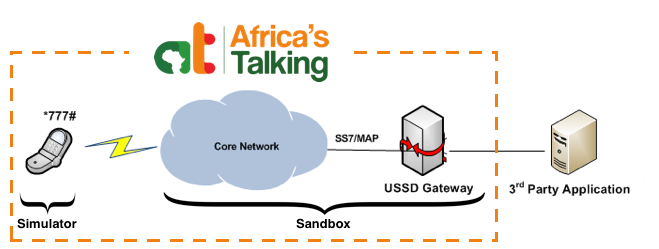
When someone dials a USSD short-code they are making a request to start a session with an information system. That request is facilitated by a mobile network operator (MNO), such as MTN or Airtel (AT&T or T-Mobile for anyone in the states). Once received, a MNO will forward the request to a 3rd party application server registered with that short code. This connection opens a bridge of communication that will last until the session is terminated or times out. In the diagram above, these components are represented by the ‘Core Network’ and USSD gateway icons. These components are typically owned and operated by the MNO.
A USSD gateway is a routing server that directs information sent from a mobile phone to a third party application (such as the service we are going to build). An application can register with a gateway so that when information is passed to a short-code it is forwarded to a URL via a HTTP POST request.
This is simple in theory, but becomes more complicated when you factor in multiple different competing networks in an area, each with their own USSD Gateway. We want our application to work with all networks in an area which means we must register our shortcode with each MNO our users might have.
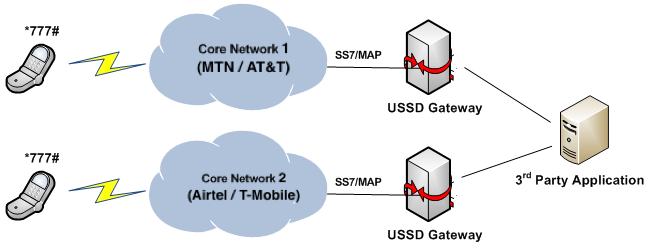
To prevent us from needing to manage our application gateway registration for each network provider individually, we can use an aggregation service. Typically your aggregator would be determined by which companies have integrated with the MNOs in your area. However for this exercise, we will be using Africa’s Talking aggregation service because they provide a wonderful (and free) sandbox/simulator environment and there are some great tools available to simplify the integration.
With the phone, network, and USSD gateway registration provided by Africa’s Talking, all that is left is the 3rd party application; our HTTP application.
Overview of Our Application
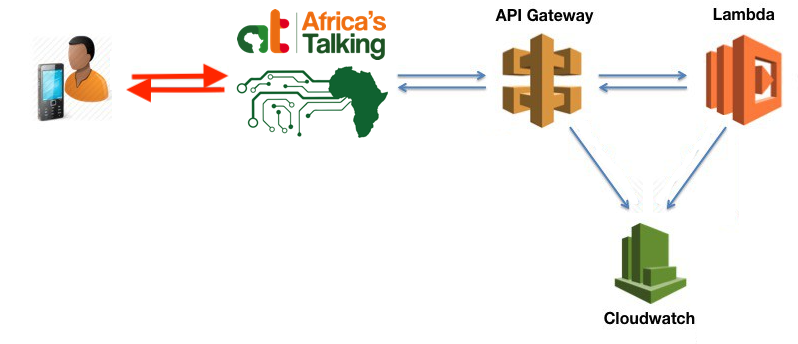
Application Architecture
Each short-code typically only interacts with one API endpoint. Due to the ease in which small applications can be deployed using the serverless model we are going to build this piece using Amazon Web Service’s (AWS) API Gateway and Lambda. We will also use AWS’s Cloudwatch service to view the activity logs created by our application.

What is a ‘Serverless’ Application?
In a traditional web-hosting model, servers must be purchased or rented to increase capacity. Instead, Amazon provides routing (API Gateway) and function execution (Lambda) as a service, each of which automatically scale to meet demand. This combination is called ‘serverless’, not because there aren’t servers involved, but because it removes the burden of provisioning additional server hardware as an application’s user-base grows.
Pricing
Using AWS is especially great because unlike owning or renting servers, you only pay when the services are being used. And AWS provides an extremely generous free tier for your first year that should be well within the limits necessary for building and testing our application. For API Gateway and Lambda, the first one million requests a month are free with each million requests after the first costing $3.50 for API Gateway and $0.20 cents for lambda(API Gateway pricing, Lambda pricing). To put this into context, if our longest USSD menu flow had 10 different states and we followed that flow for each session, we would still be able to test our application 100,000 times each month before needing to pay for the service.
Getting Started
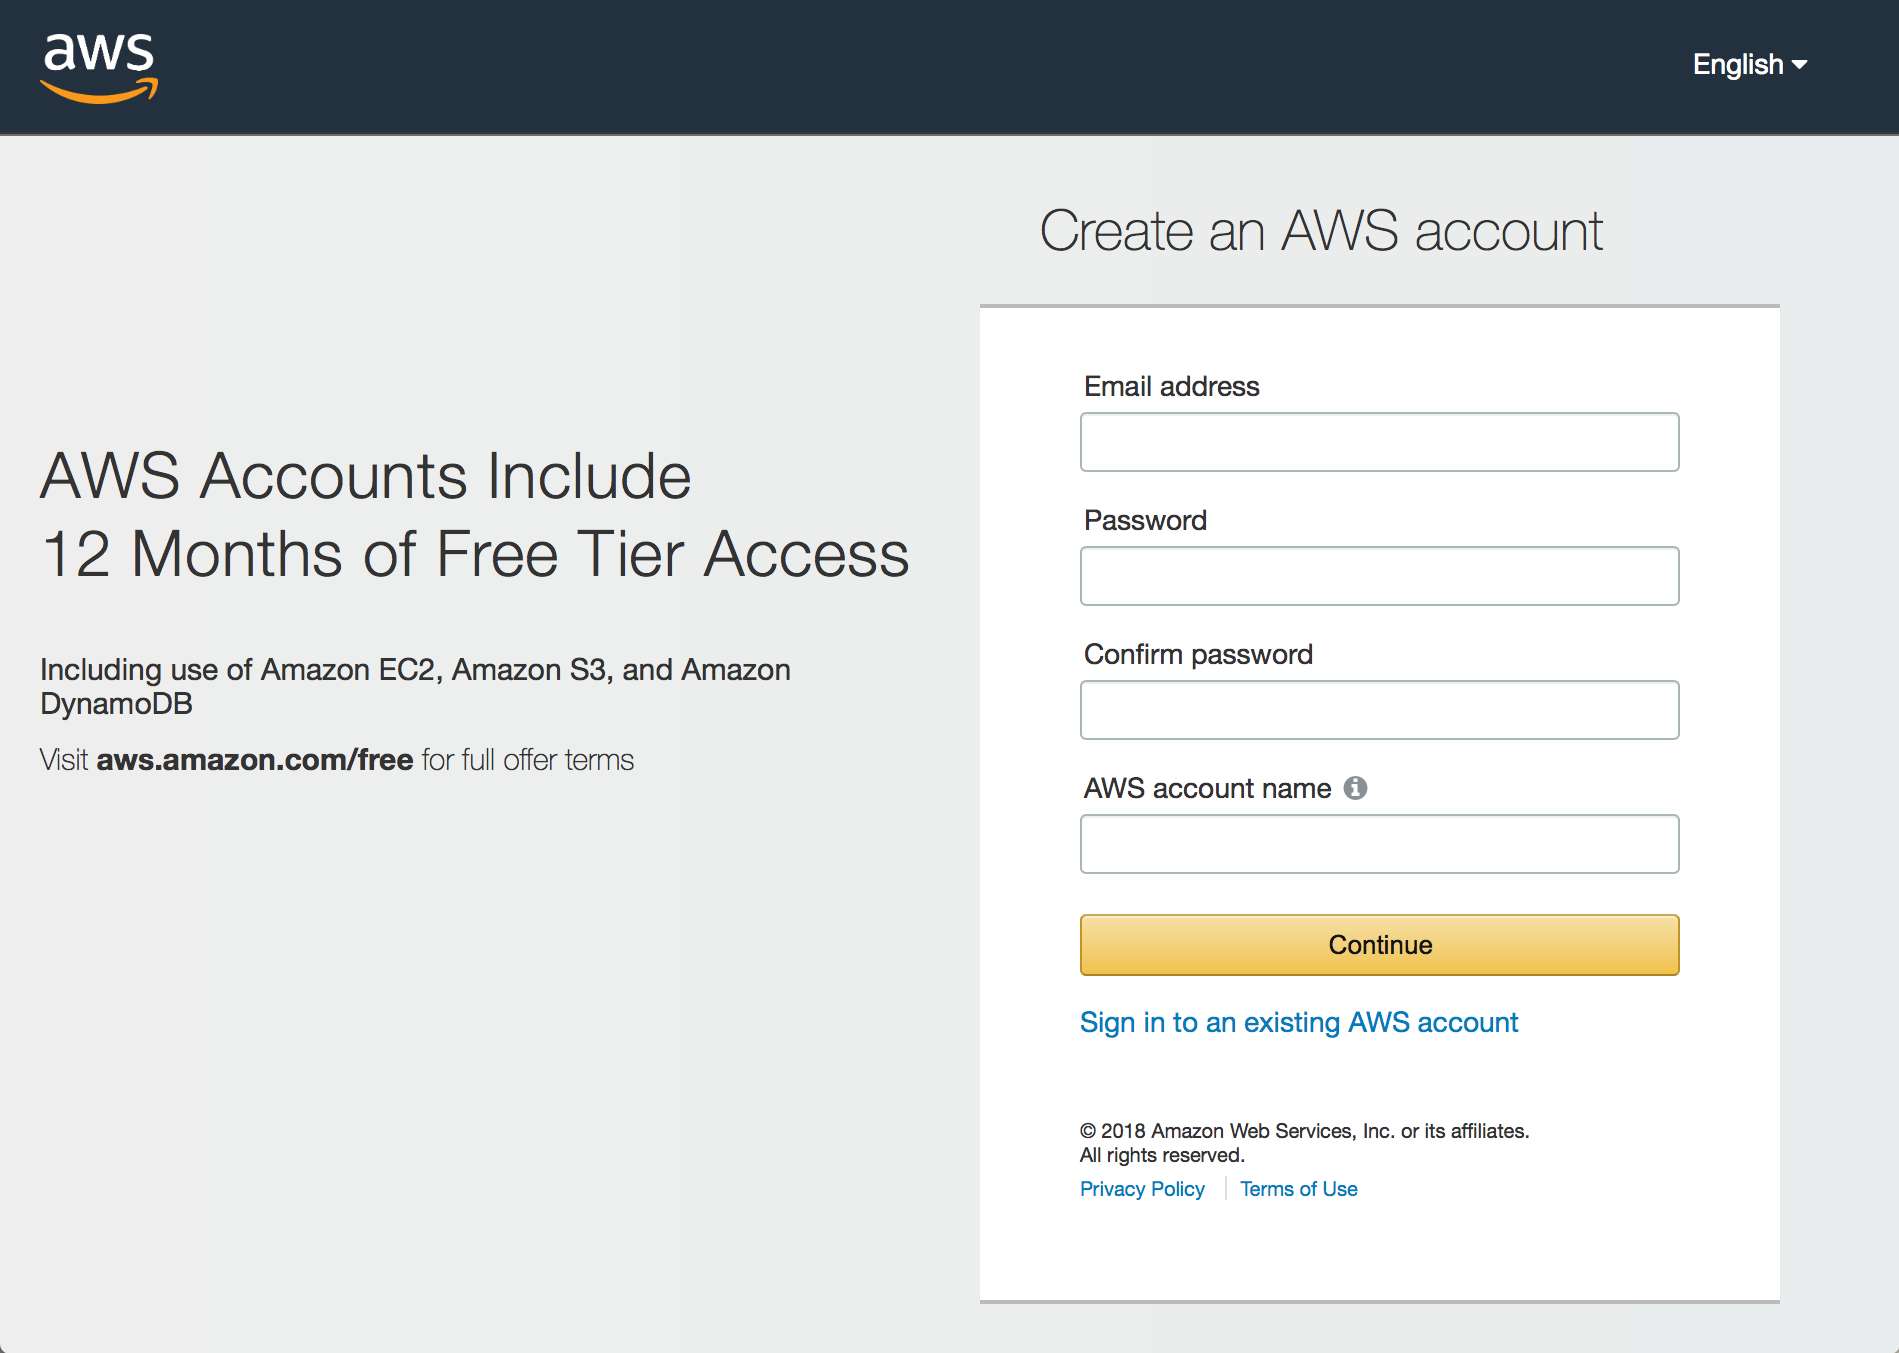
The first step to getting started with AWS is to sign in to our account. If you don’t already have one, an account can be created here.
Once we are signed in to AWS, our first goal will set up just enough of our Lambda and API Gateway services so that we can begin to observe the USSD menu requests that are coming from Africa’s Talking.
Setting Permissions
Before diving into setting up our integration, we first need to define the permissions that our services will have. By default, AWS restricts the access of its services so that it is impossible for one service to unintentionally make a change in another. This makes sure that users cannot take advantage of the system using it in unexpected ways and it also reduces the chance of creating bugs that are incredibly difficult to track down.
Permissions are defined in AWS’s Identity and Access Management (IAM) service. We will need two different roles, one for API Gateway and one for Lambda. Each of these roles will only grant enough permissions for our services to record their activity logs in cloud watch so we can have a window into what is going on inside of our application.
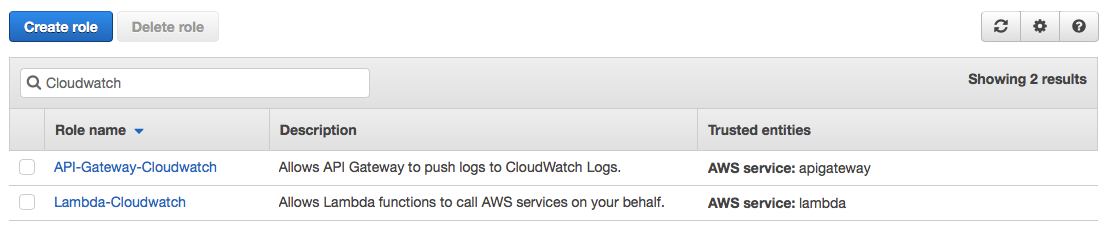
We will start by heading over to IAM and selecting the ‘Roles’ subsection. The first role we will create is for API Gateway. Click the ‘Create role’ option, verify that the trusted entity is an AWS service, and select ‘API Gateway’ as the service. For this role, the only permission we will need to add is ‘AmazonAPIGatewayPushToCloudWatchLogs’. Lastly, we will assign a name to this role. I will be calling this role ‘API-Gateway-Cloudwatch’.
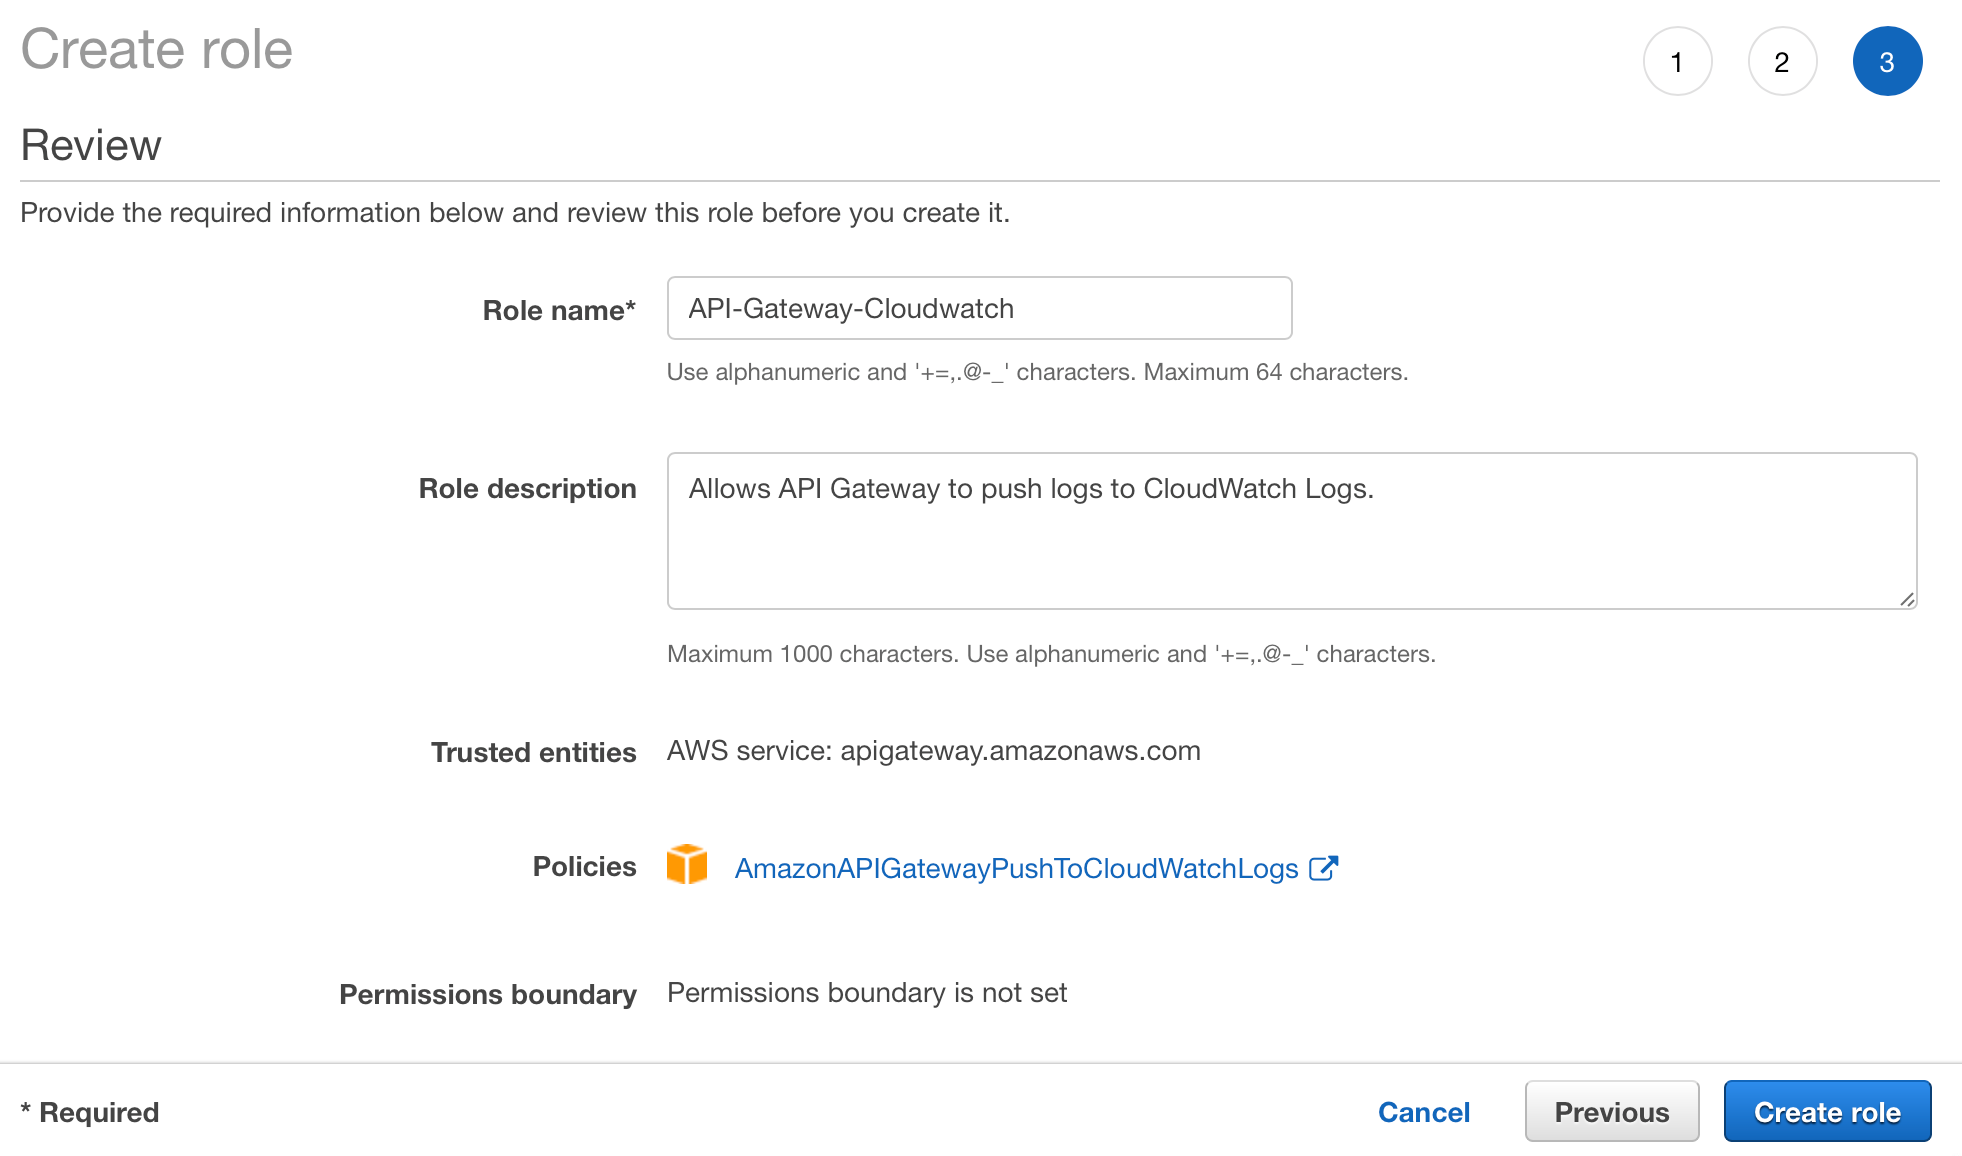
Once this role has been created, we can select it from the list of roles to view its details. Most importantly, we should take note of API-Gateway-Cloudwatch’s ‘Role ARN’ (Amazon Resource Name). Copy this value to a temporary document. We will need this information later when we are setting up our API Gateway.
Next, we will follow the same process for Lambda. Select the ‘Create role’ option, also using AWS service as the trusted entity, but this time we Lambda will be the selected service. For the permissions, we will select ‘AWSLambdaBasicExectuionRole’. Finally, we will assign the name ‘Lambda-Cloudwatch’.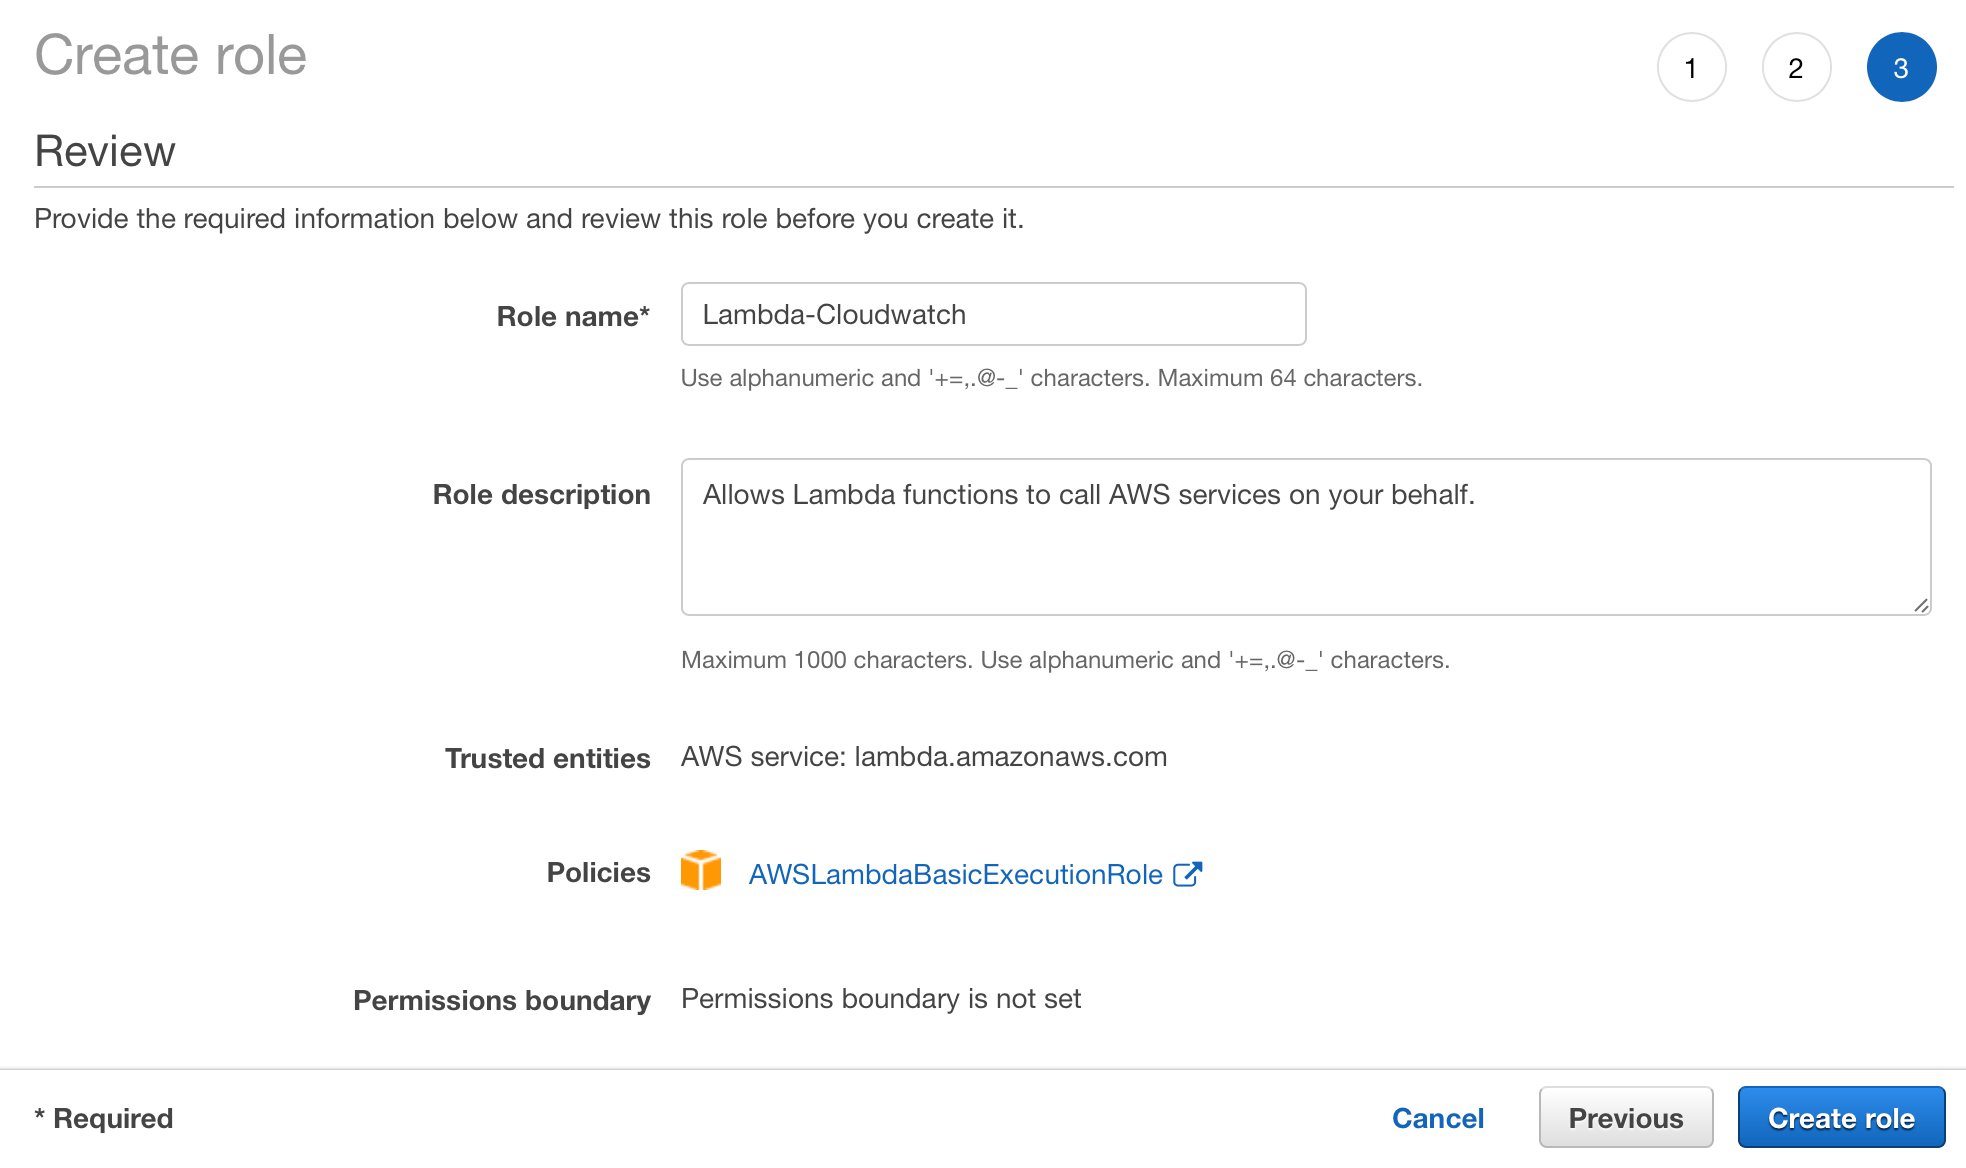
Be sure to verify that both roles were successfully created before continuing.
With this, we have enabled our API Gateway and Lambda services can record information with our CloudWatch logging service (once these roles are assigned of course).
Setting up our initial Lambda function
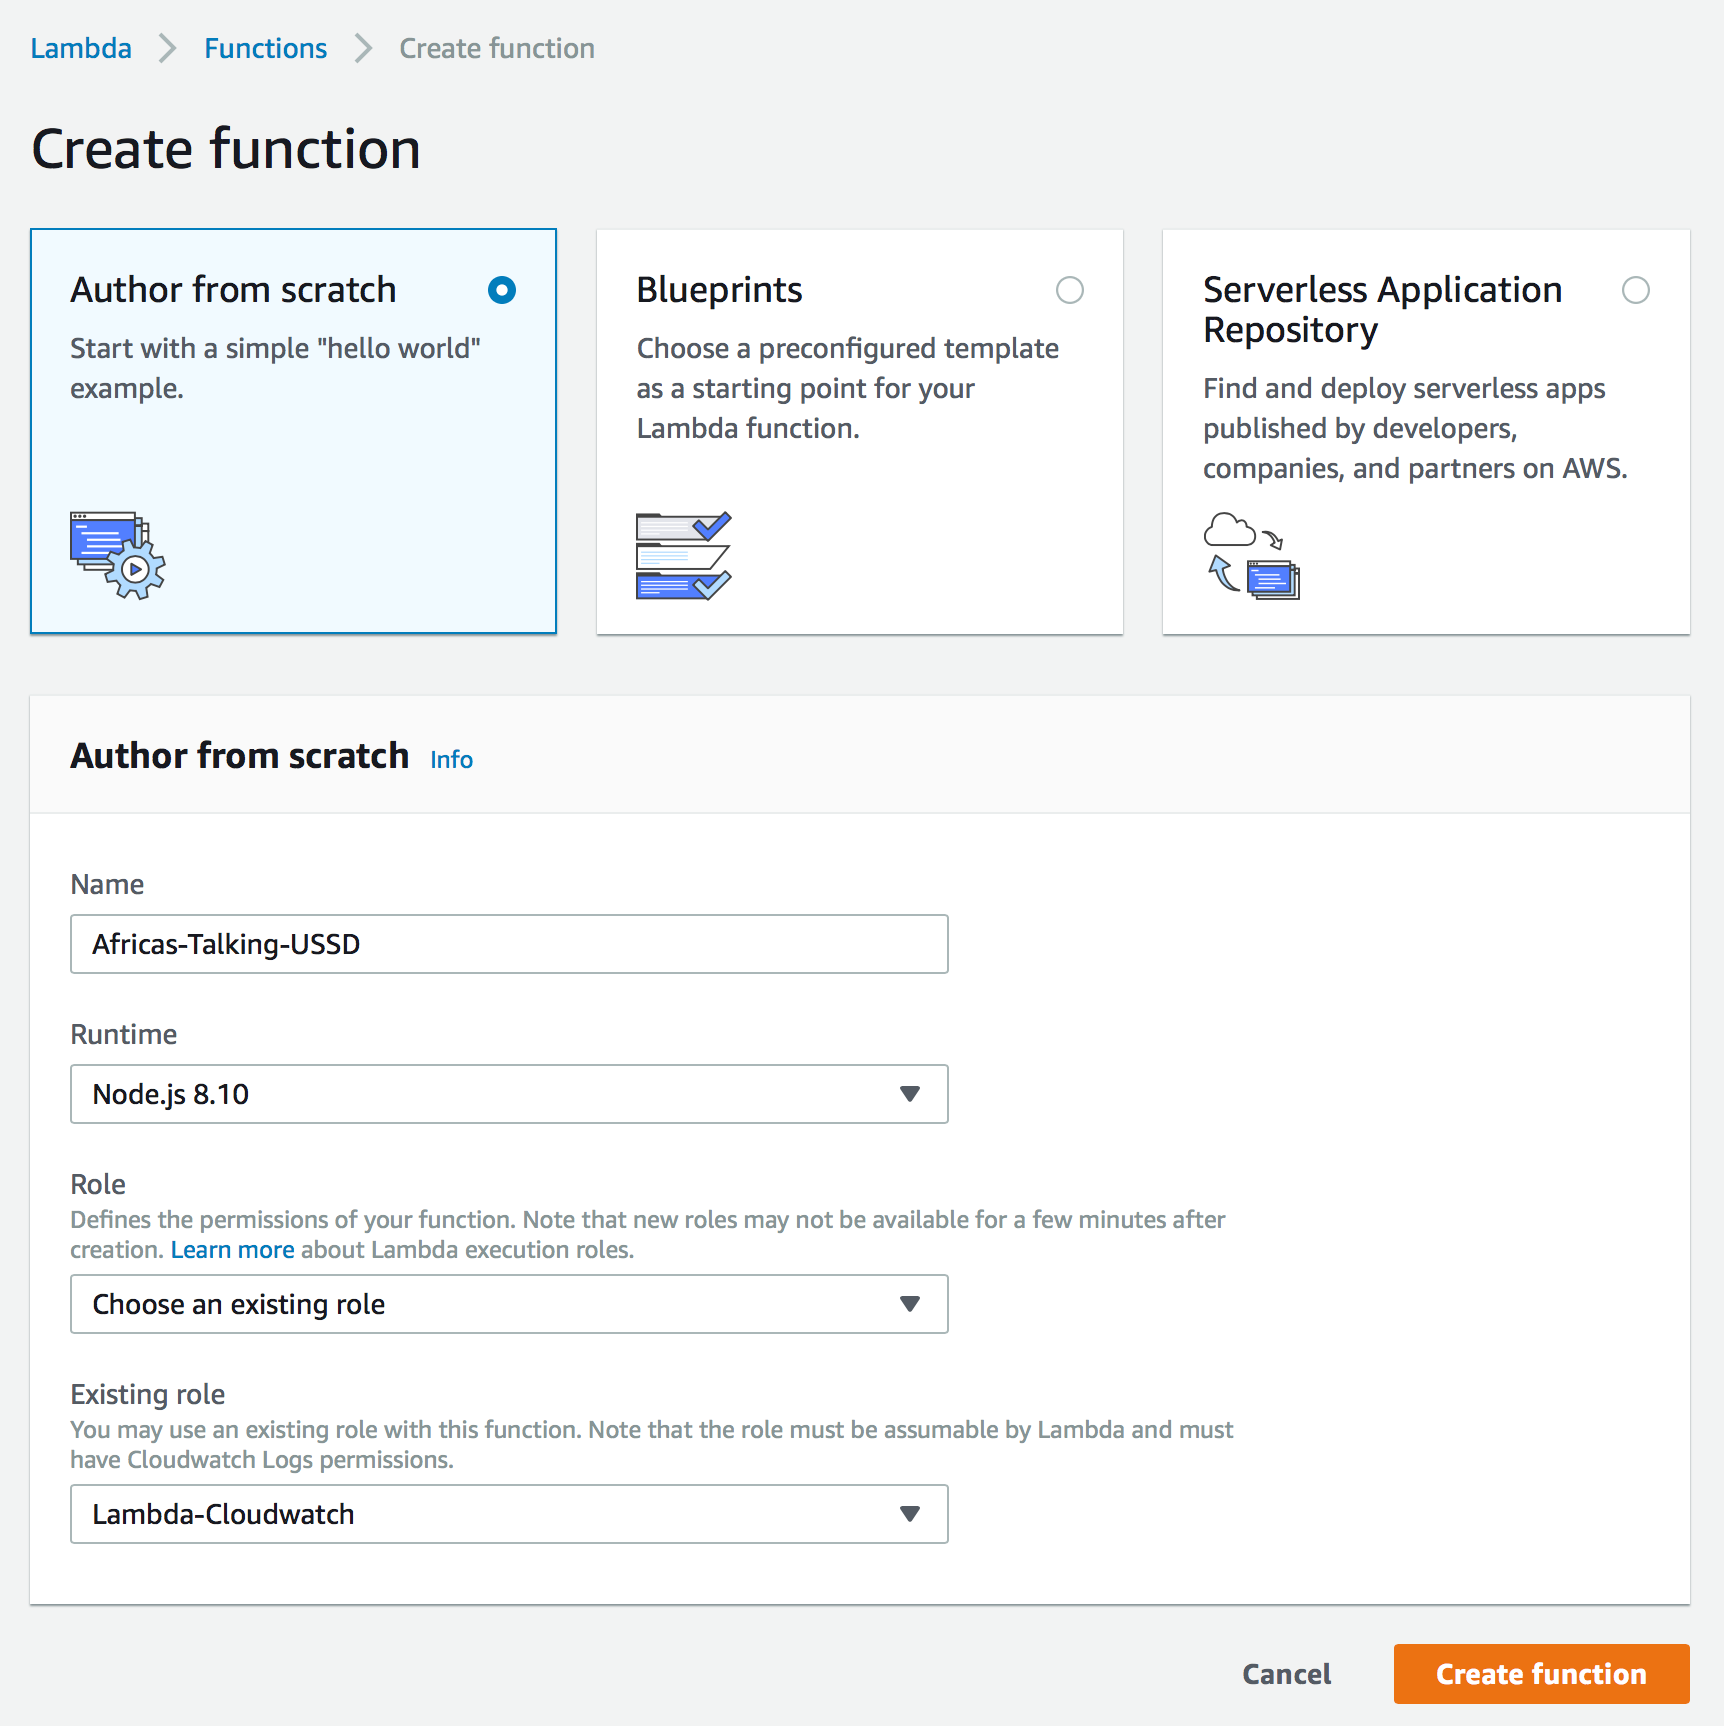
Head over to Lambda and select the ‘Create function’. We are going to create a new empty function using the ‘Author from scratch’ select. I will be using the name ‘Africas-Talking-USSD’, but this can be any name that you will recognize later when we hooking into API Gateway. For the runtime environment, ‘Node.js 8.10’ will be best for our purposes because there are some modules available that can really simplify our application’s architecture. Lastly, we will need to assign the Lambda-Cloudwatch role that we had just created in the previous step so our function has the permissions necessary for us to inspect its operations via CloudWatch.
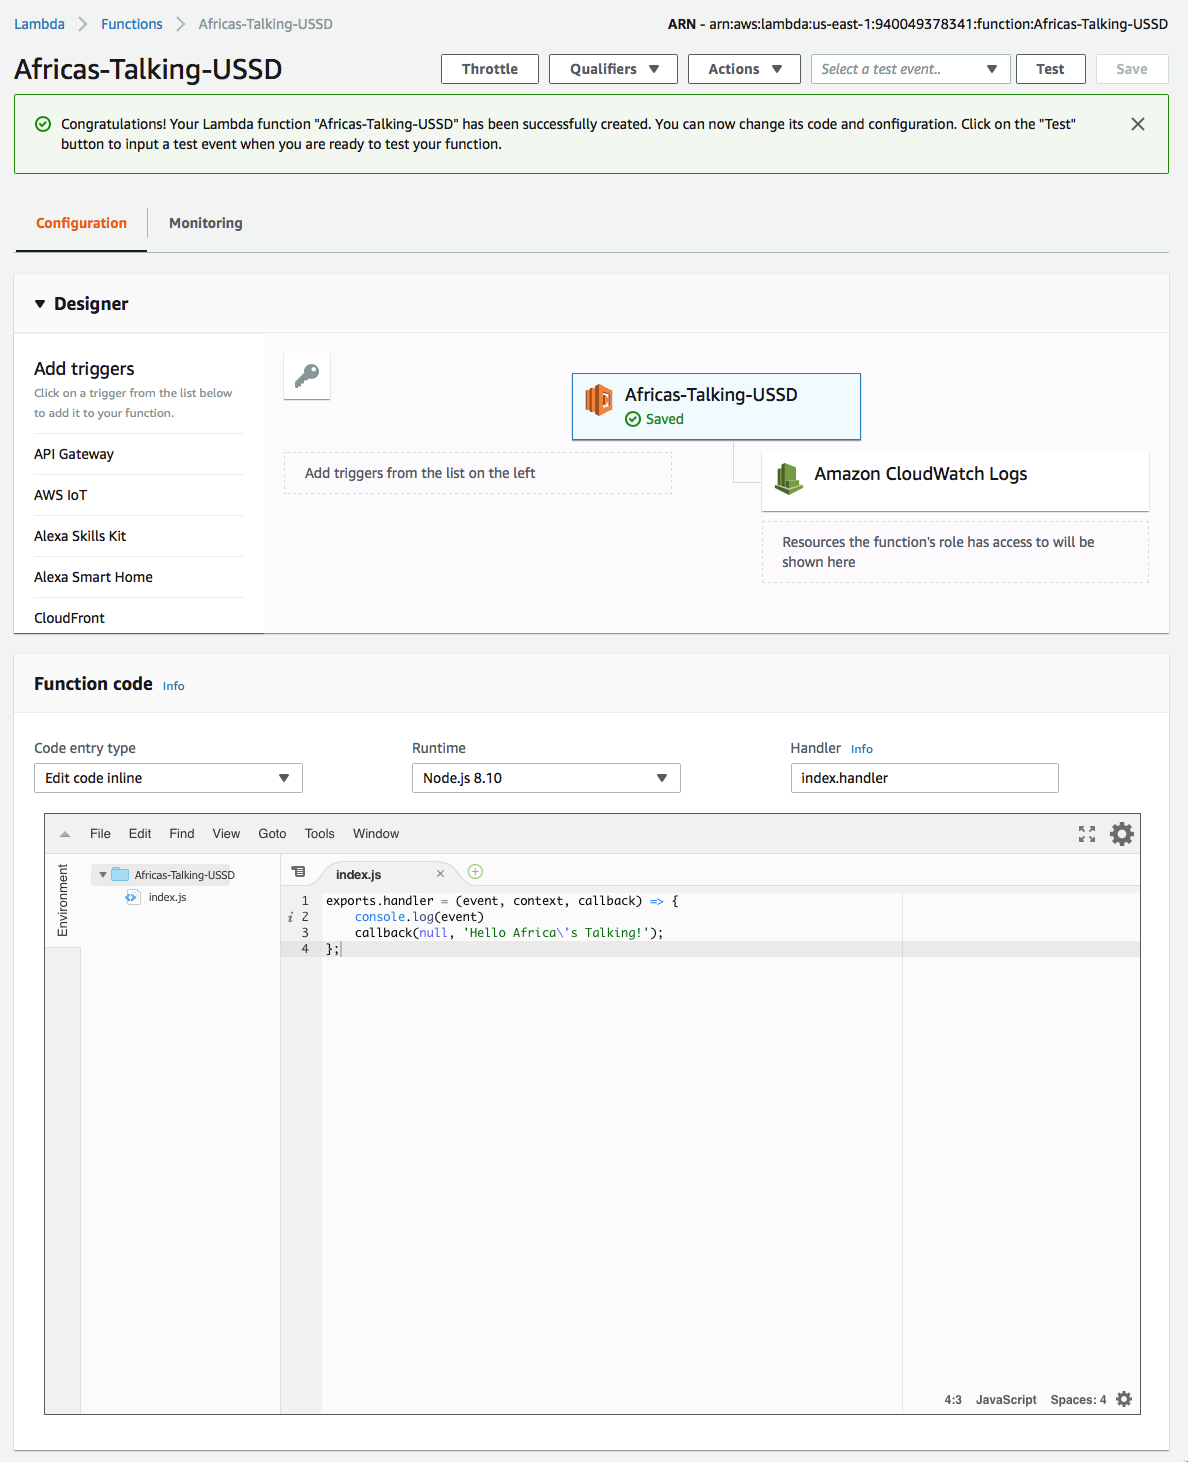
Once our function is created, at the top we will be able to see an overview of which services the function has access to. We should verify that our function has the permission to access CloudWatch. If not, check the correct role is assigned and that role has the ‘AWSLambdaBasicExectuionRole’ in AWS’s IAM service.

Below the function’s access is a javascript editor that lets us define the behavior of our function. At this point, we are only interested in logging to CloudWatch the request that was forwarded to us from the USSD gateway. Logging this request will show us the information provided by Africa’s Talking that we can later use to build the functionality of our different prompts. Lastly, we will need to make sure we are executing the callback() function so that API Gateway knows the result from running our Lambda function.
exports.handler = (event, context, callback) => {
console.log(event)
callback(null, ‘Hello Africa\’s Talking!’);
};
It’s important to note that this callback function accepts two different parameters. The first is first an error that indicates why the request cannot be completed successfully. The second is the data generated from successfully processing the response. For this reason, you will notice that the first parameter in the callback is null because we don’t want to generate any errors.
Be sure to click the orange ‘Save’ button in the top-right corner once the function has been updated.
API Overview
Before we begin our building API in API Gateway, let’s quickly discuss what exactly an API is.

An Application Programming Interface, or API, is a definition of how other computer applications are going to be allowed to communicate or interface with a server application.
Each API has unique address that identifies it on a network such as the internet. This is called the Base URL. One base URL you should recognize from this page is https://medium.com.
Following the Base URL is a route that typically refers to a particular collection of information called a resource. To build on or Medium example, if you wanted to view a collection of articles that relate to technology, we can ask for that information by using the route/topic/technology, or altogether combined with the base url: https://medium.com/topic/technology.
Lastly, each resource has a set of defined actions or ‘methods’ (such as get or delete) that can be performed on our collection of resources (such as users or orders). To provide a few examples, each time you request to load a page in a browser you are using a GET request to download that site information. And each time you submit information to a website you are using the POST method to request that the server save your changes. Because we can both get a list of technology articles and create a new technology article, we must be explicit which action we would like to perform. We do this by prefixing a URL with the uppercase name of the method:
GET https://medium.com/topic/technology
Creating our USSD API.
Next, we will define the API and resource that Africa’s Talking will use to send data to our Lambda function. If we reference the documentation, we can see that Africa’s Talking will POST our USSD requests to our API, so we must create a resource with a POST action to handle these requests.
Navigate to API Gateway and select the “+ Create API” button. If this is your first time visiting API Gateway, please note you may have a ‘Get Started’ button instead. We can give our API the name of “USSD” and then select the “Create API” button.

Next we must select our resource, in this case the root, ‘/’, and then select the ‘Create Method’ option from the ‘Actions’ dropdown.

This will display a dropdown box beneath the root that contains the various method types supported by AWS. Select ‘POST’ followed by the checkmark to the right of the drop-down. Lastly, we must tell API Gateway to send these requests to our lambda function by specifying it both as the integration type, and the particular Lambda function to load.
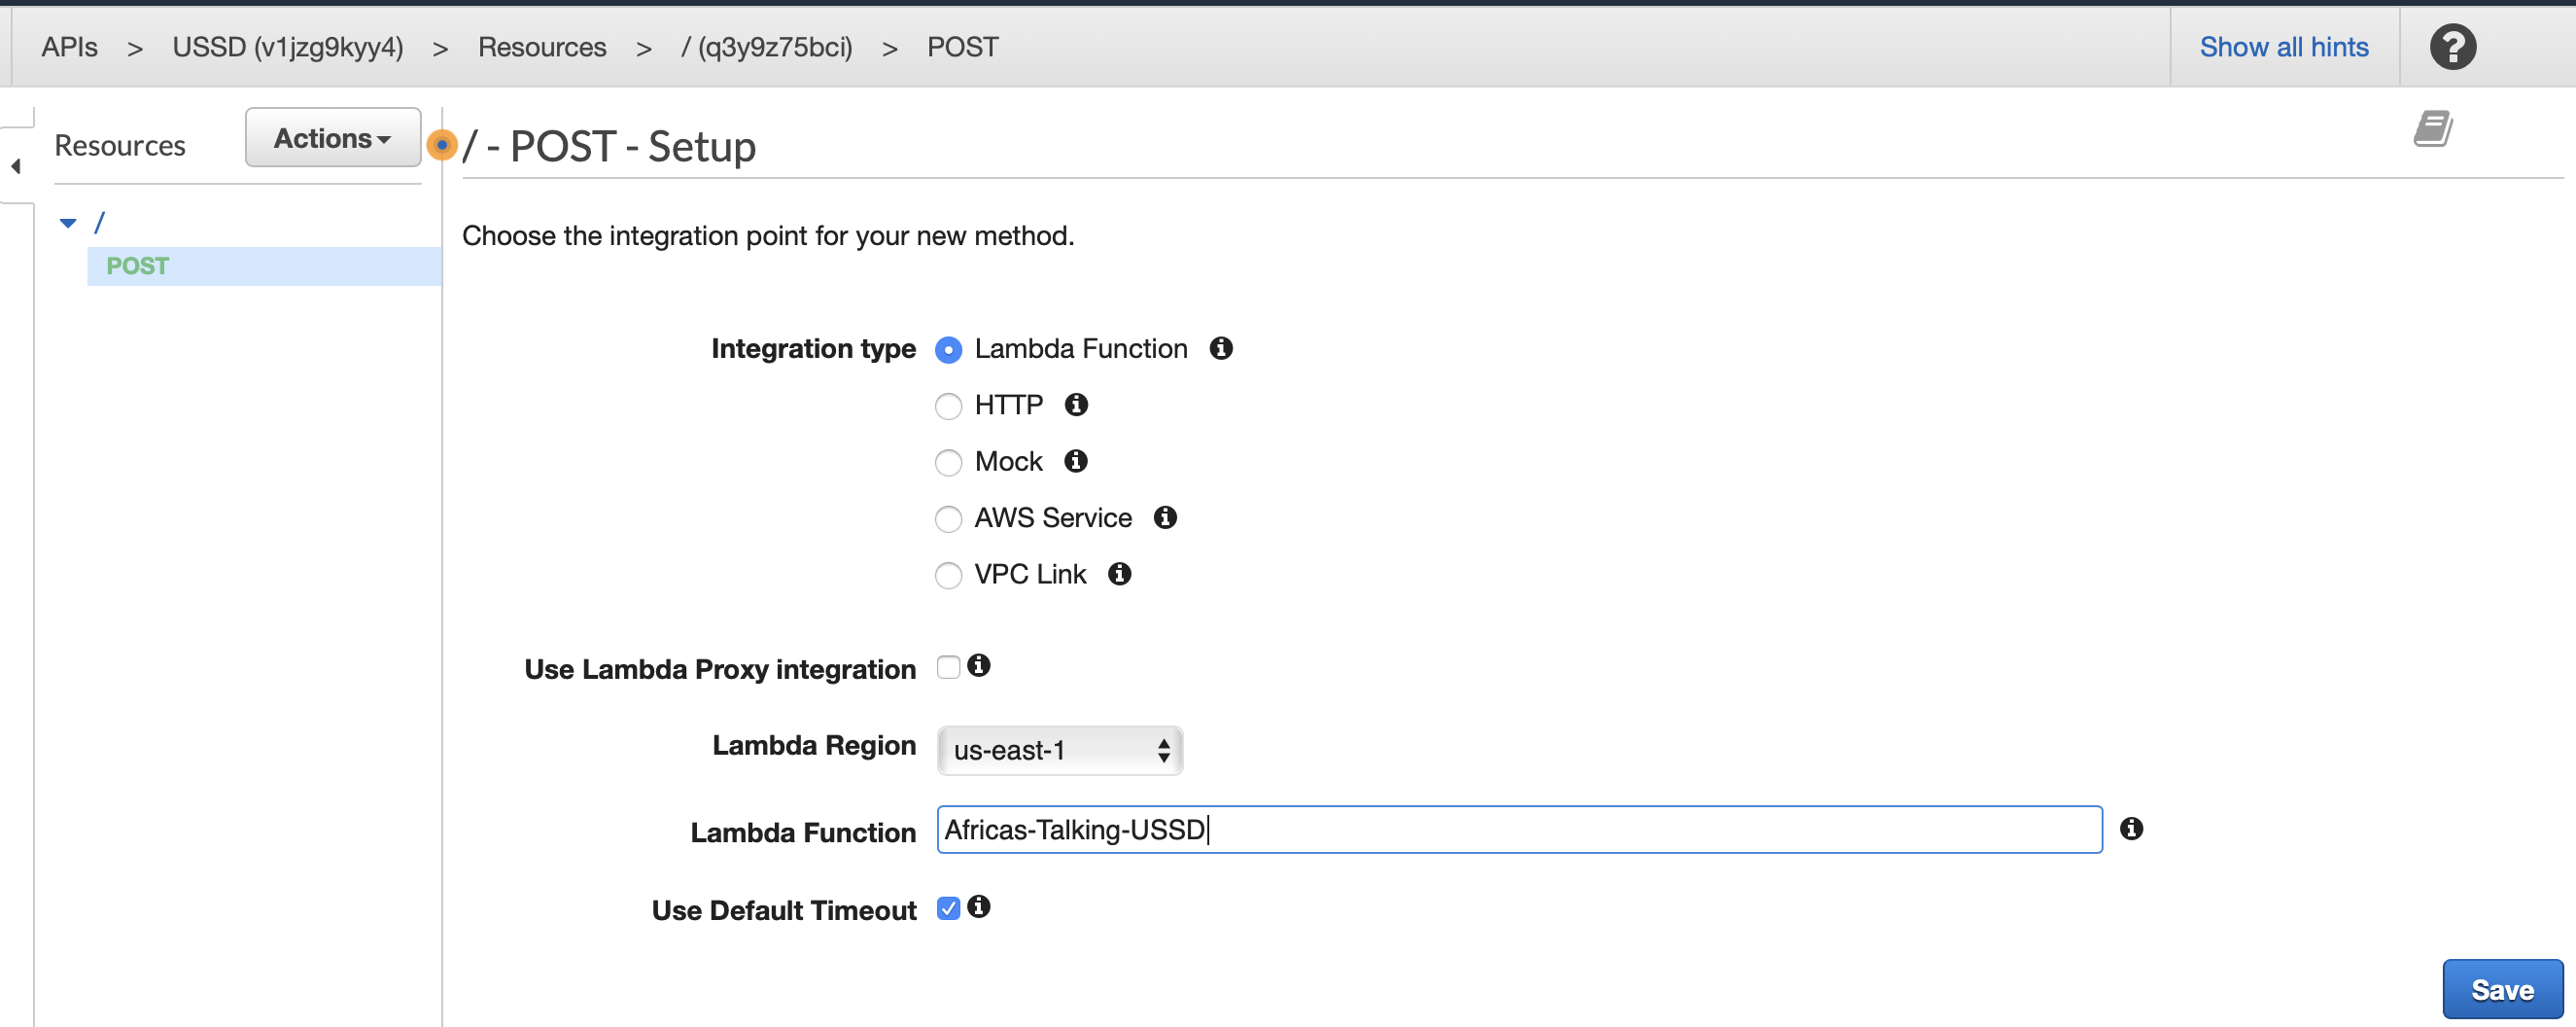
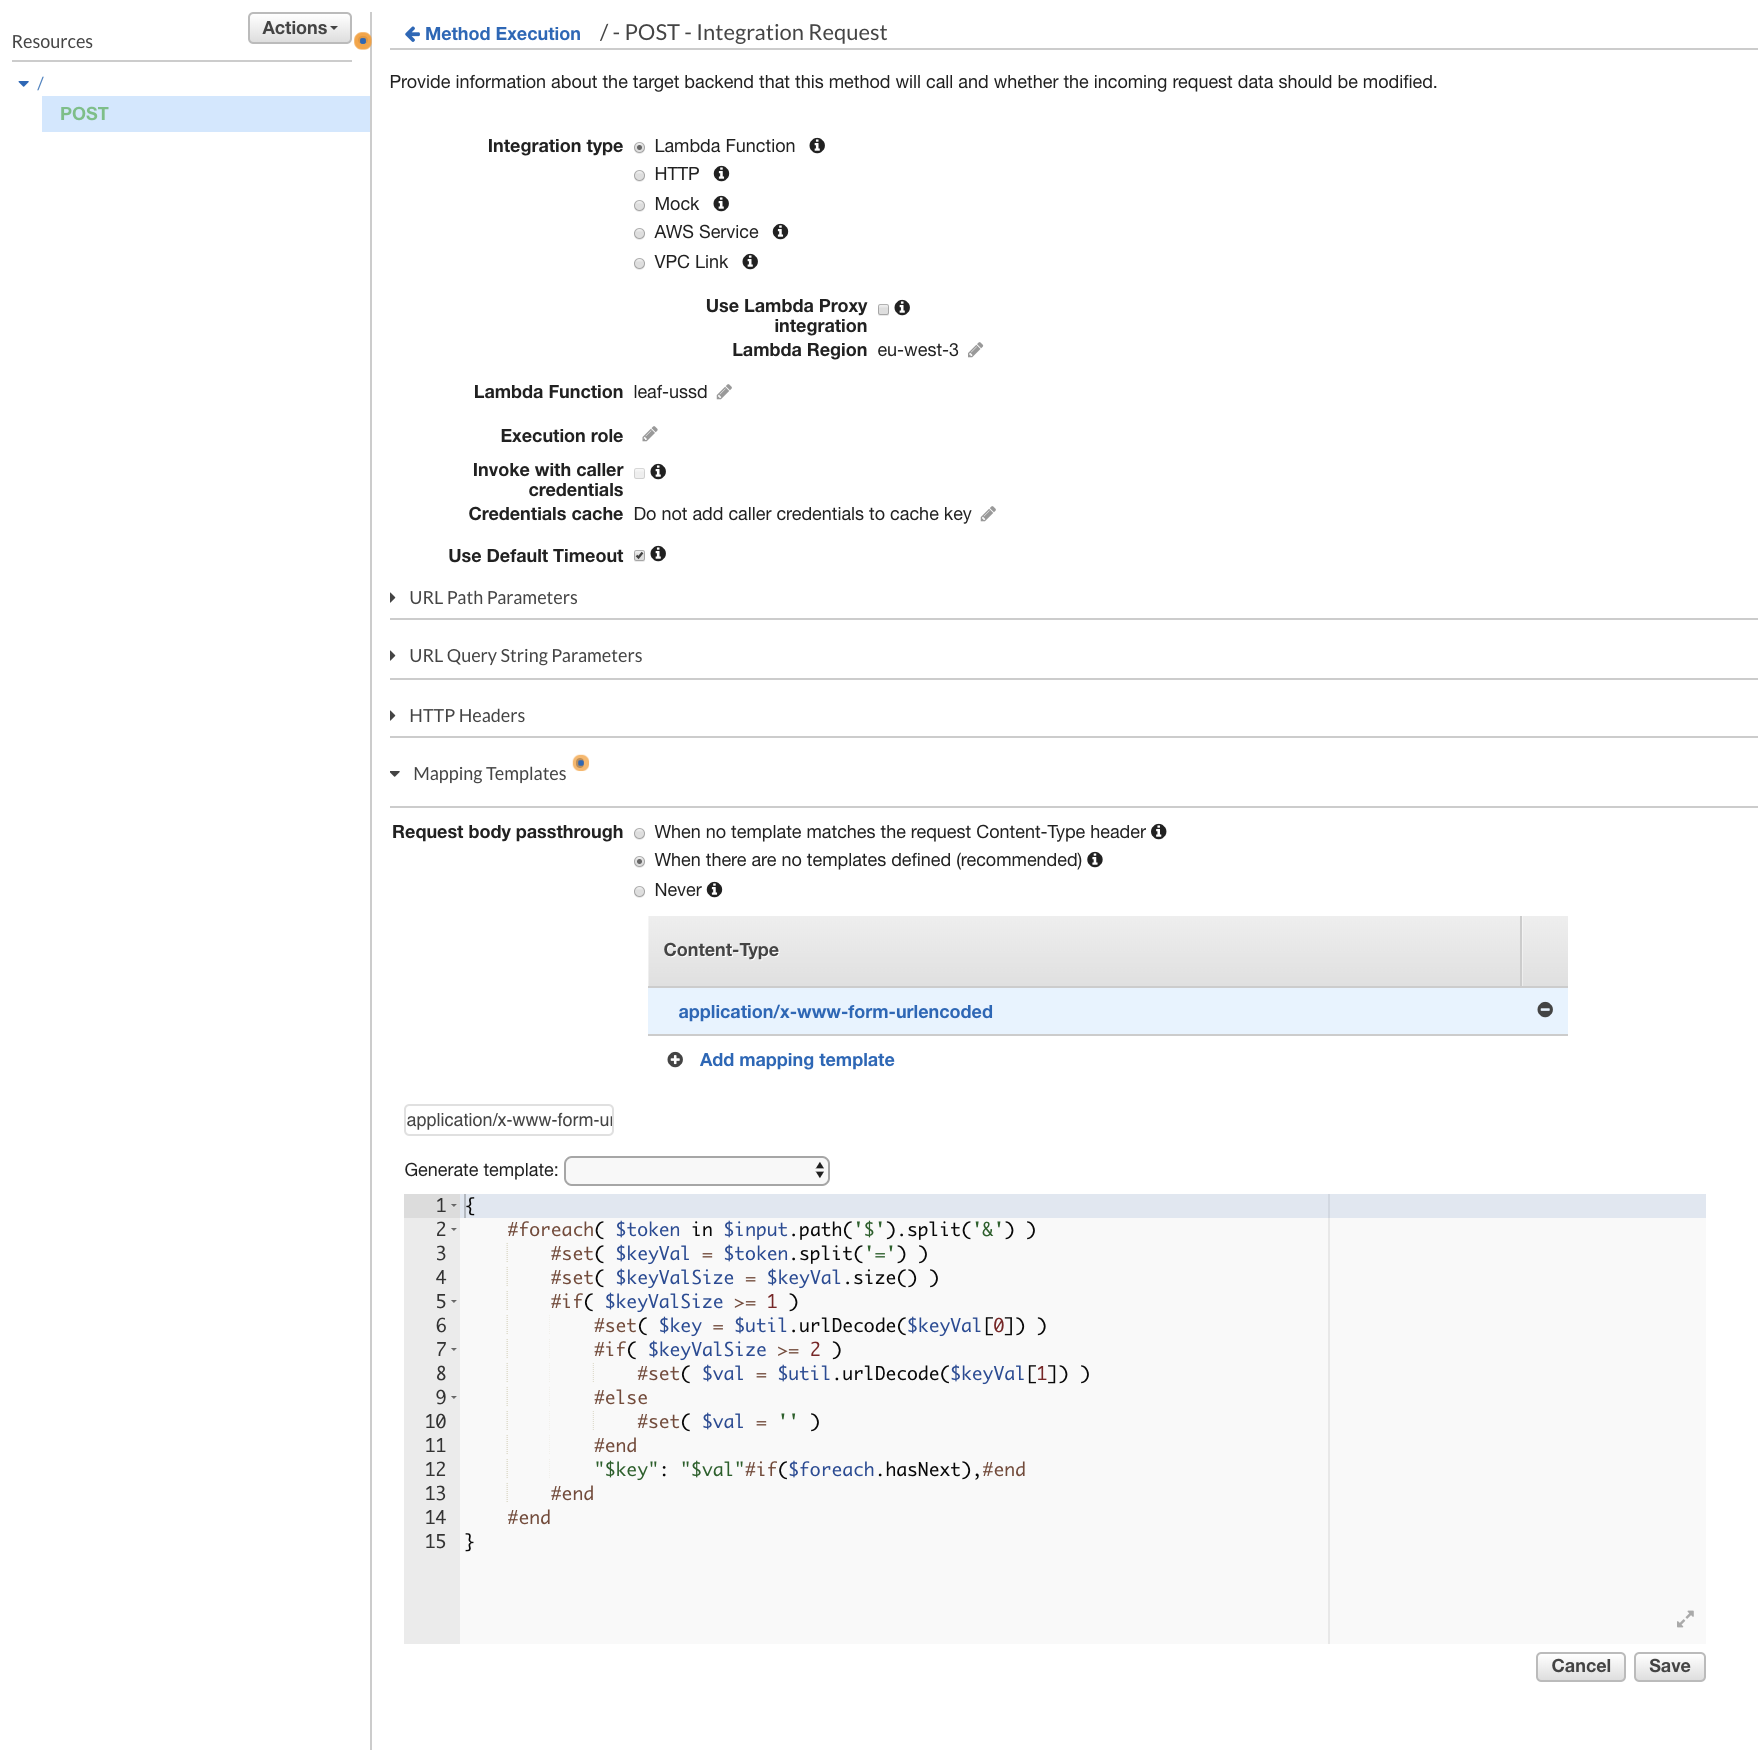
After confirming that API Gateways has permission to invoke your lambda function, you will be presented with the ‘Method Execution’ screen.
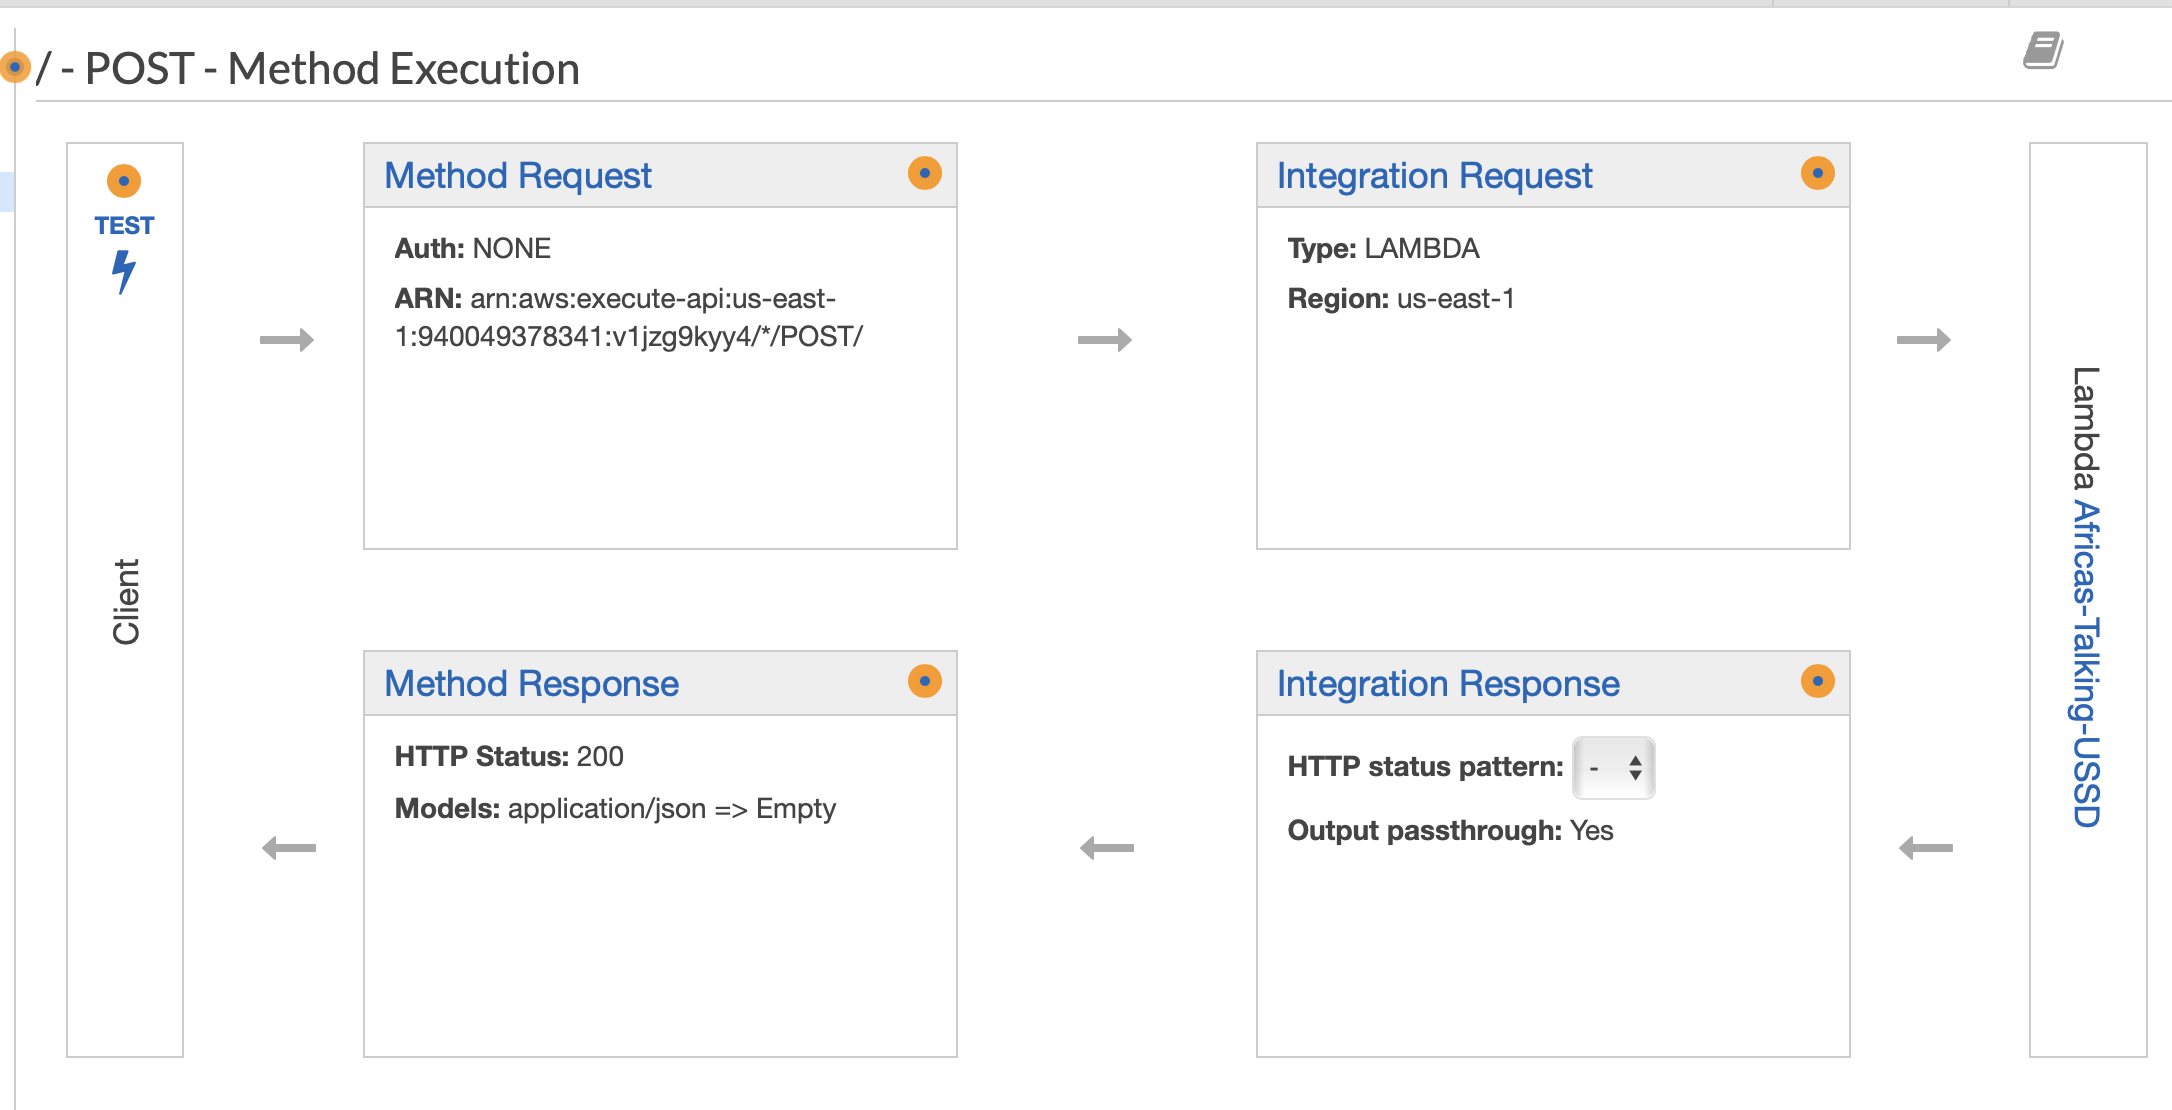
API gateway gives us the opportunity to validate and format our requests coming in from the client (top row from client following the arrows right towards Lambda), and then again from our lambda fuction back to the client (bottom row, right to left).
One setting we will need to update is the formatting used by our Integration Request to translate the data into someting usable by Lambda. Without this step, our request will fail because it will not match the format Lambda is expecting. To set our formatter, we must select the ‘Integration Request’ header and unfold the ‘Mapping Templates’ section. First we should select the “When there are no templates defined (recommended)” radio option. Next we must indicate the ‘Content-Type’ to be mapped. We will use the ‘application/x-www-form-urlencoded’ content type to match the content-type Africa’s Talking will send us in the POST request. Be sure to click the light gray check check box to the right of this field after the value has been entered. If it does not show up automatically, select the newly-created Content-Type to reveal a text editor. This is where we can provide code to reformat the request for Lambda. Lucky for us, someone has already written a formatter we can use for the ‘application/x-www-form-urlencoded’ content-type:
{
#foreach( $token in $input.path(‘$’).split(‘&’) )
#set( $keyVal = $token.split(‘=’) )
#set( $keyValSize = $keyVal.size() )
#if( $keyValSize >= 1 )
#set( $key = $util.urlDecode($keyVal[0]) )
#if( $keyValSize >= 2 )
#set( $val = $util.urlDecode($keyVal[1]) )
#else
#set( $val = ” )
#end
“$key”: “$val”#if($foreach.hasNext),#end
#end
#end
}
Once this has been entered, press the “Save” button located below the text field. Our Integration request should look like image below.
Now that we have a route (‘/’, the root), a method that forwards our requests to a lambda function, and we have the values in the post request parsed for use by lambda, the last thing we need to do is to deploy our API so it can be available to receive our requests from Africa’s Talking. To deploy our API, select the Actions menu again, and this time click ‘Deploy API’ from the dropdown list. You will be presented with modal overlay asking you to select which ‘stage’ you would like to deploy to. Stages are useful for allowing you to build and test changes without breaking a live app people are currently using. We haven’t deployed this API previously, so we must select [New Stage] from the dropdown list. Because we are still developing this application, we will name this stage ‘dev’ and then select the deploy button at the bottom of the overlay.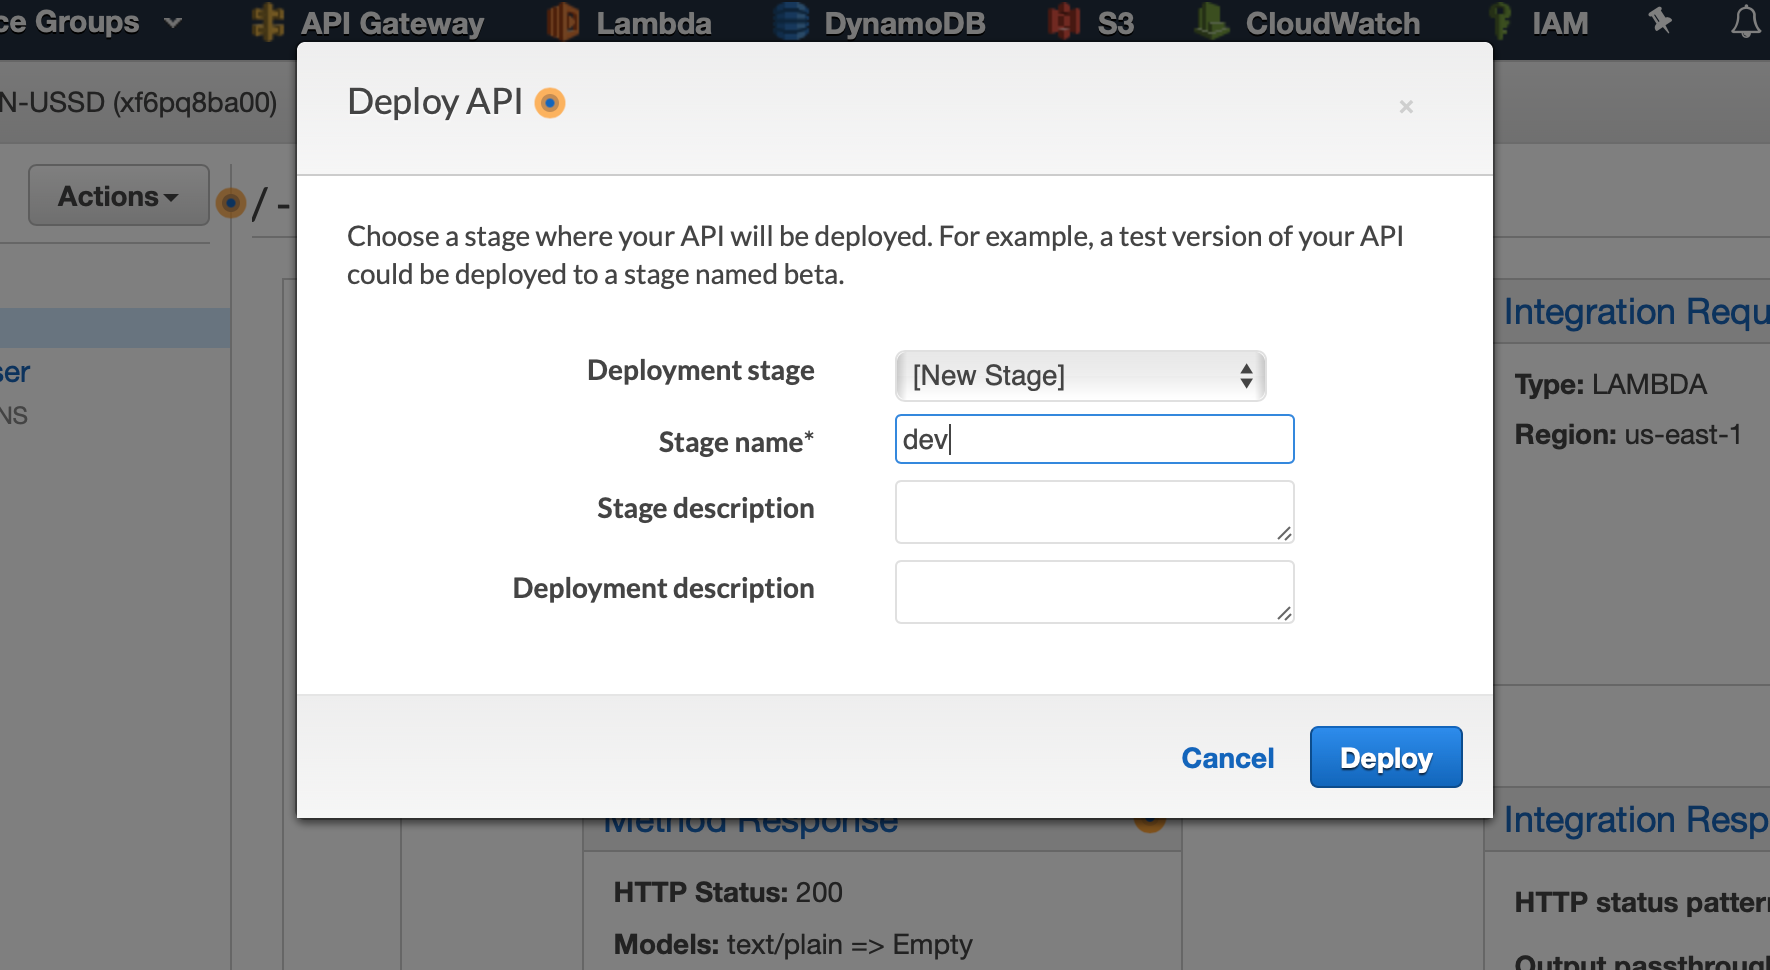
Once our API has been deployed, AWS will show us a summary of the routes that are live on the left, and our publicly available ‘Invoke URL’ (Base URL + ‘dev’ route) on the right. This Invoke URL is exactly what we will need to tell Africa’s Talking where to send our USSD requests.

The last step for configuring API gateway is to try and gain some transparency into what it is doing behind the scenes.
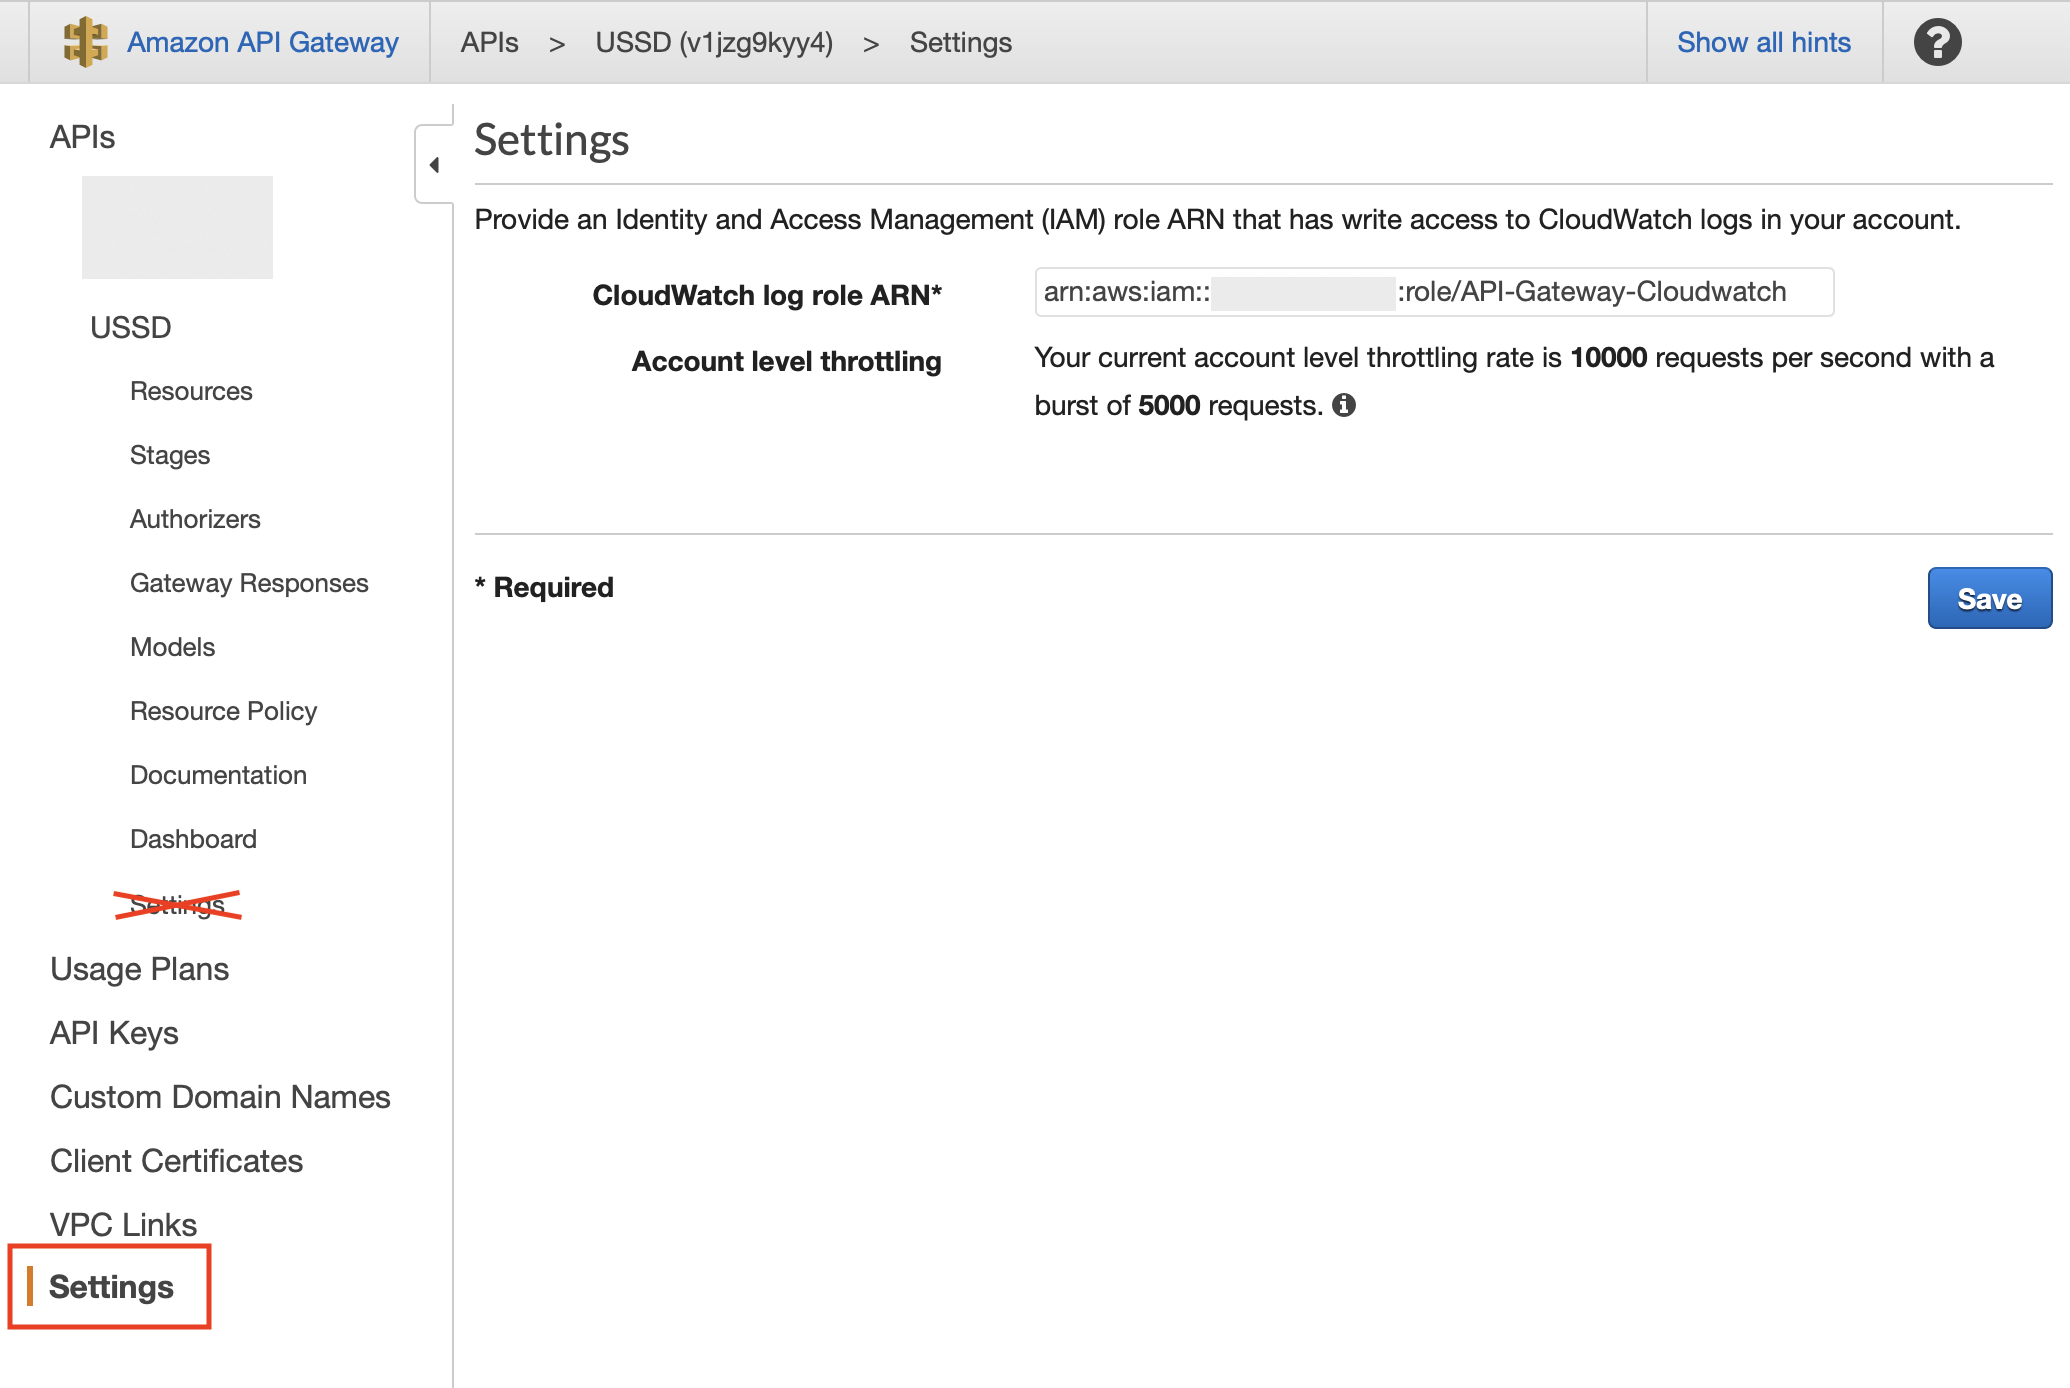
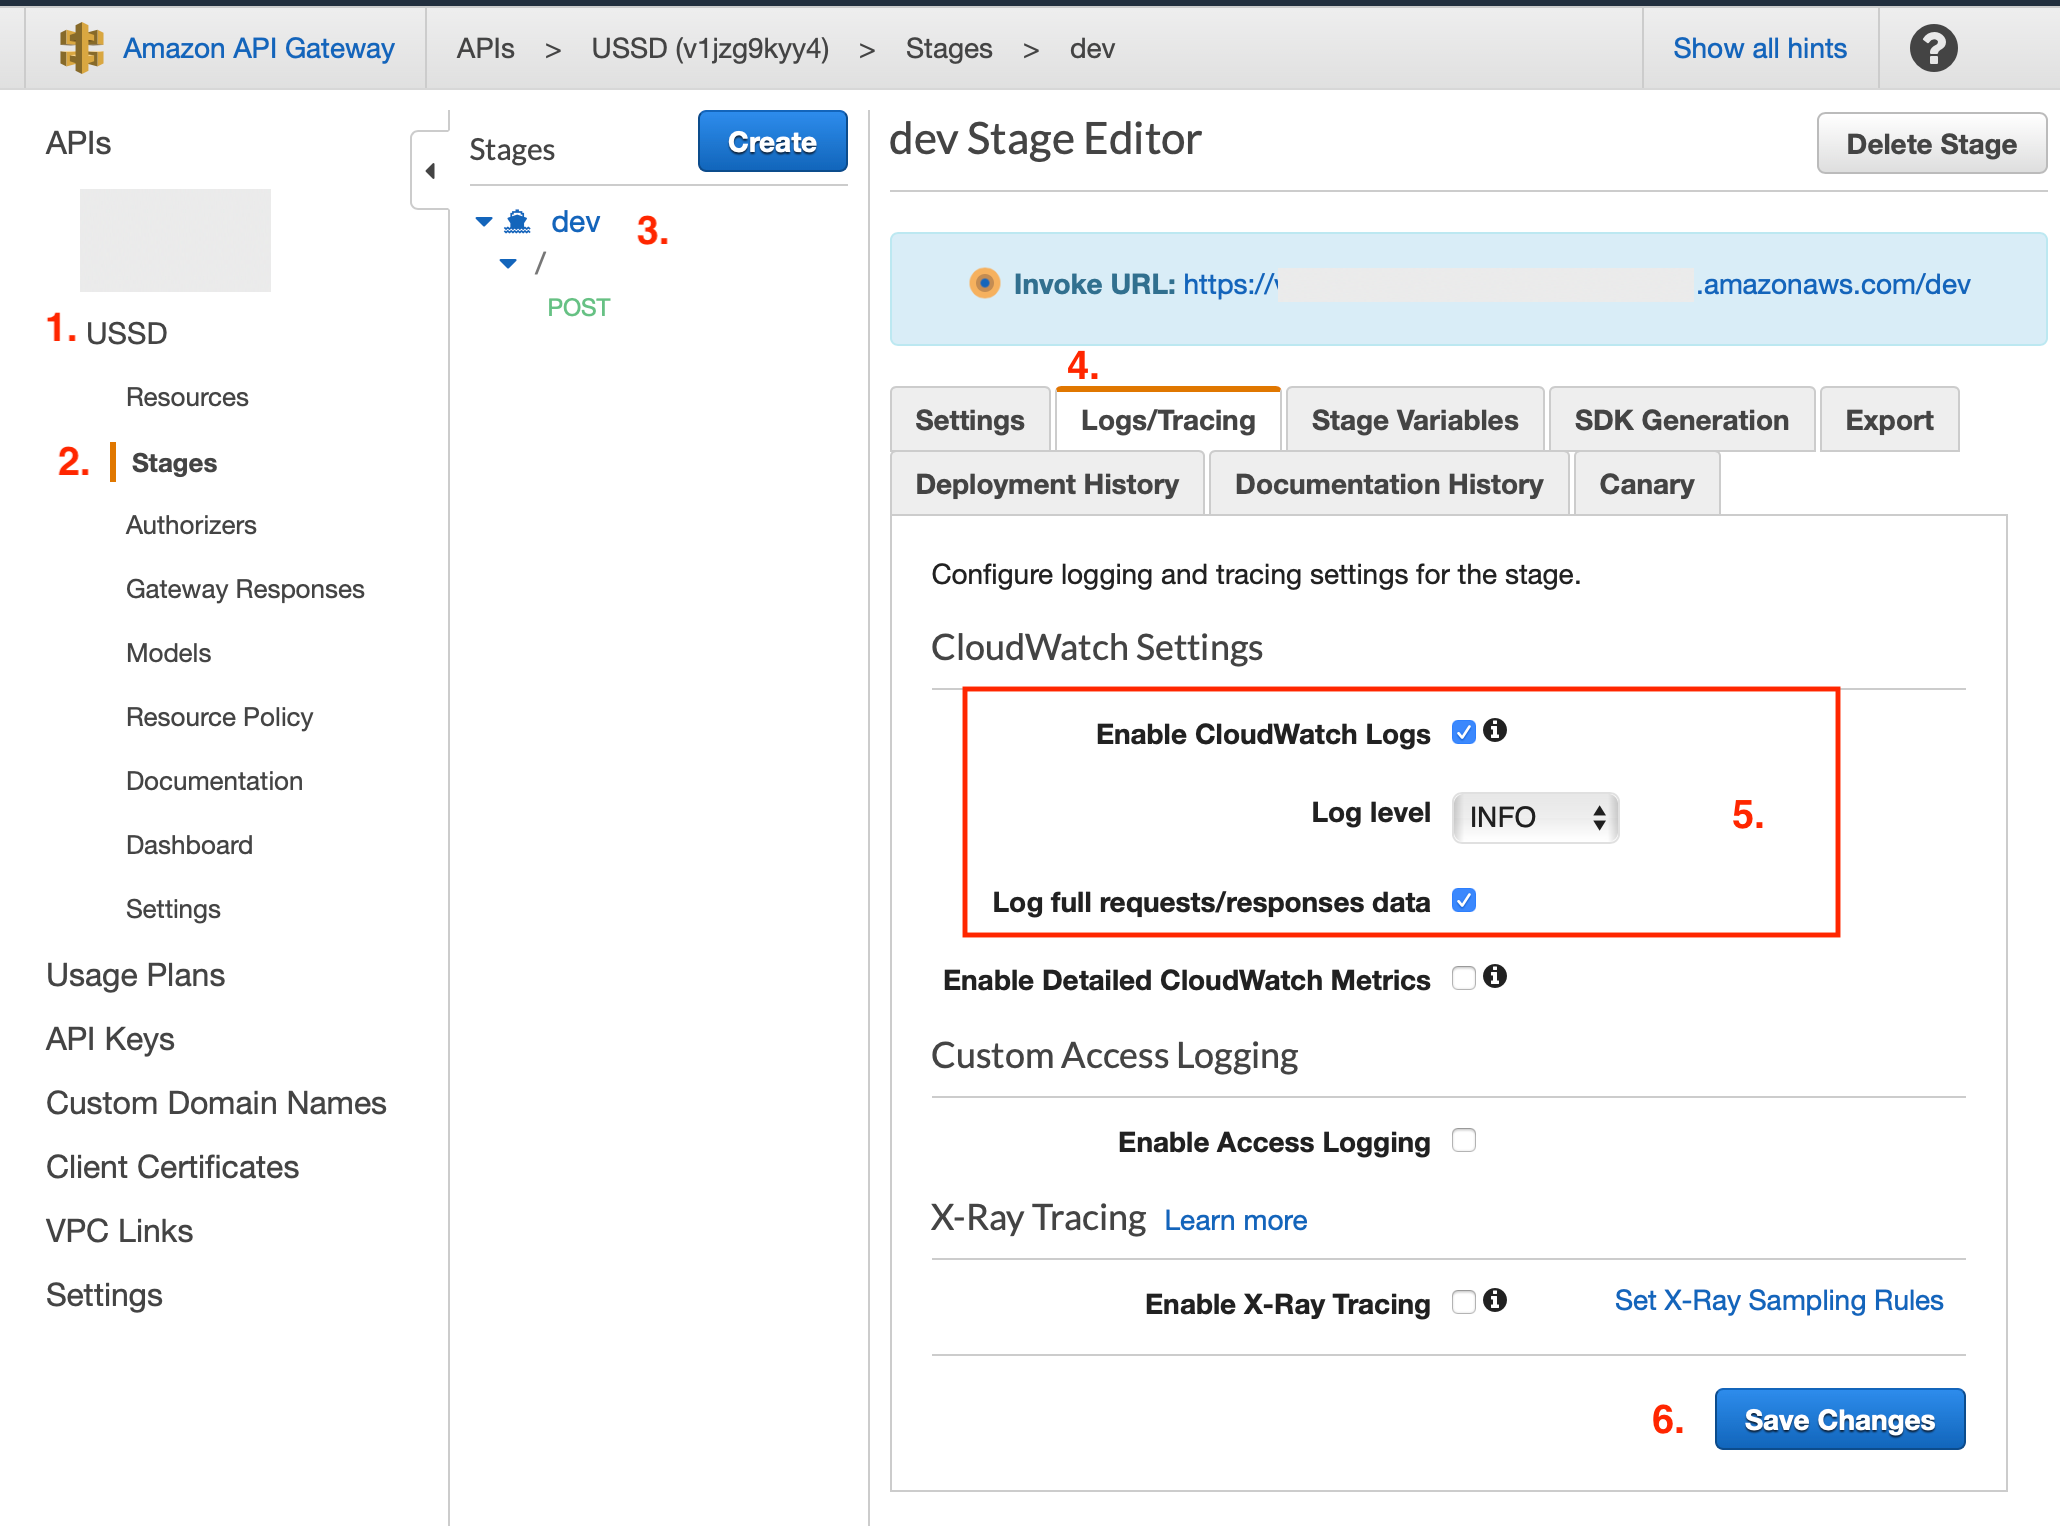
Click ‘Save’. The last step to setting up our API is to make sure that it is using this role by enabling logging on our newly deployed API. Select our new API from the list, following the ‘Stages’ sub-option. Next click on the ‘dev’ stage and then the ‘Logs/Tracking’ tab. We will want to make sure that ‘Enable CloudWatch Logs’ and Log full requests/responses data’ are both checked, and the ‘Log level’ is set to ‘INFO’. Press ‘Save Changes’ to persist these changes.
We can confirm that these services have been connected by navigating back to our USSD Lambda function and observing that API gateway is now listed as a trigger.
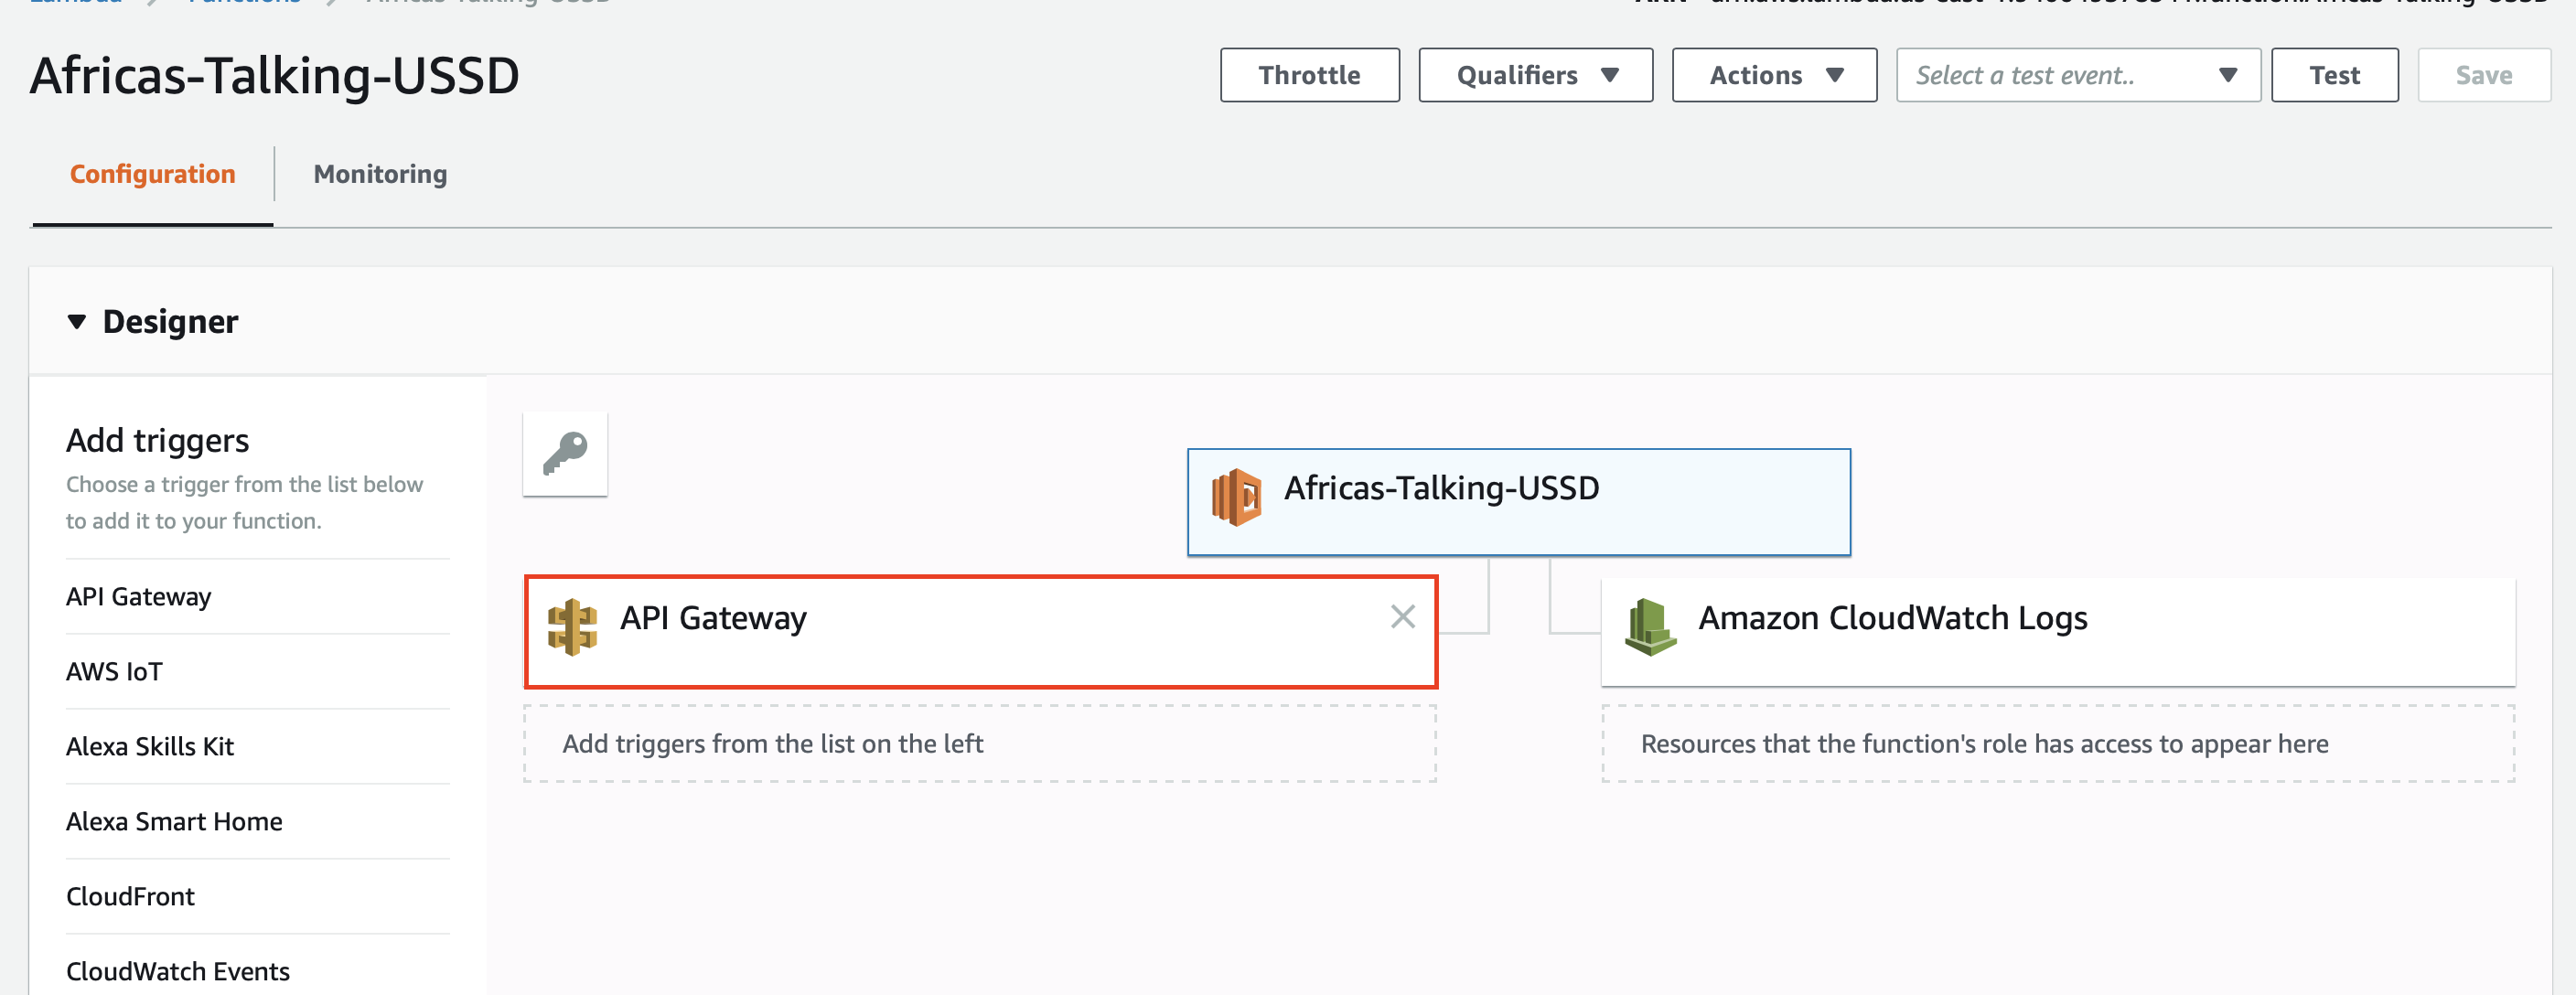
And with this, we have enabled our API Gateway and Lambda services to communicate with each other.

Next up, sending requests from Africa’s Talking to our API Gateway.
Africa’s Talking
Unsurprising, the first step to use Africa’s Talking, is to create and sign into an account. Once authenticated, you will be brought to Africa’s Talking’s account portal.
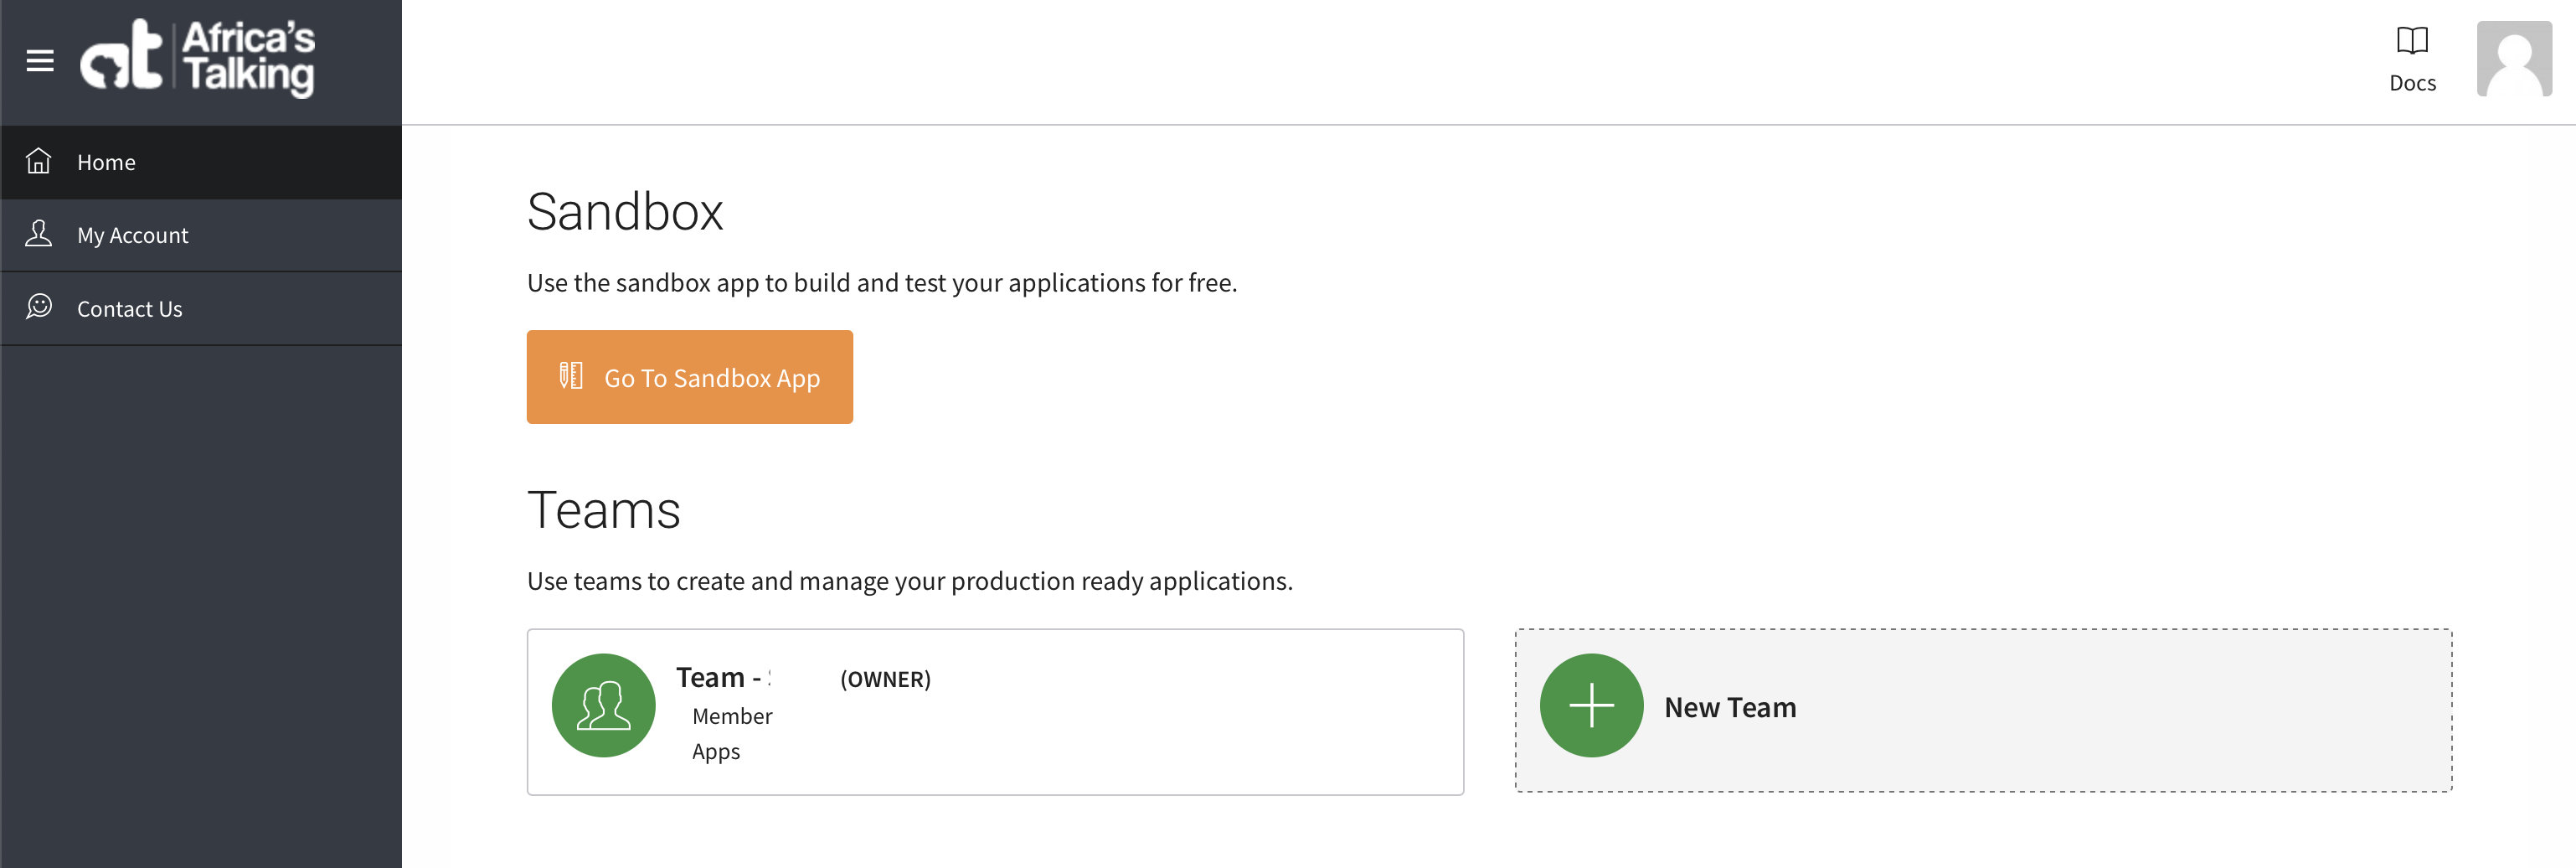
From here, you will be able to manage all of your account settings including billing, teams, live apps, and more. To get us started, we are going first set up our app in Africa’s Talking testing sandbox. This will let us build and test our USSD app without the complexity or cost of mobile network operator integration.
To create our sandbox app, let’s first enter the sandbox by clicking the ‘Go To Sandbox App’ button. When this pages loads, you will be presented with a menu containing all of the different services that Africa’s Talking provides. This is a lengthy list including SMS, Voice, and Payment. Because we are interested in using their USSD service, we will unfold that option from the menu and select the “Service Codes” option.
This page lets us configure our page’s short code(s), which are also sometimes referred to as “Service Codes”. To quickly recall, each short code is a phone number that once called from a mobile device, will send a POST request to our API’s URL or “Callback URL”.
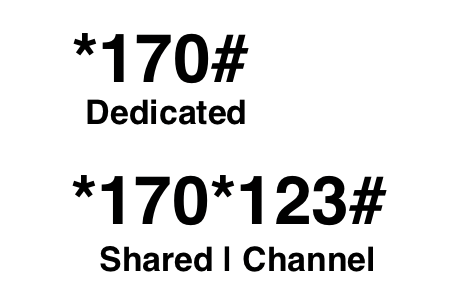
Before we continue, there is one small caveat to bring to your attention relating to short codes. There are actually two different types of short codes; dedicated and shared. A dedicated short code is typically a 3 digit phone number (such as *170#) that will immediately send a request to the specified application. These are the easiest for users to remember because of how short they are but are also the most expensive because there is a finite number of them available. On the other hand, a shared short code is when multiple different applications use the same one dedicated short code, where each app instead gets a ‘channel’. A channel is an additional set of numbers added to the end of the dedicated short code(ex: *170*123#). Due to the additional length, these are often more difficult for users to remember, but are more plentiful which reduces the price significantly.
 For our testing in the sandbox, Africa’s talking provides free shared short codes which will work perfectly for us at the moment. We will, at a later point, have the option to lease a dedicated short code when we finish our application and submit a request for Africa’s Talking to integrate our USSD app with the mobile network operators.
To set up a new short code, we must tell Africa’s Talking what we would like our shared short code’s channel to be, and where the POST request should be sent when this number dialed. We can do this by selecting the ‘Create a channel’ button located directly above the empty table of currently configured codes. This is the underlined button in the photo above. On this page, we must provide a unique channel number, and our ‘Invoke URL’ from when we deployed our API to our dev stage.

Press ‘Create Channel’ to save the configuration. With this we have enabled Africa’s Talking to send our USSD requests to our API Gateway.

The next step is to validate that we can send receive requests sent from Africa’s Talking.
Sending our first USSD Request
To send a USSD request, we must launch Africa’s Talking simulator. This can be done by selecting the ‘Launch Simulator’ button at the bottom of Africa’s Talking list of services on the side menu to the left.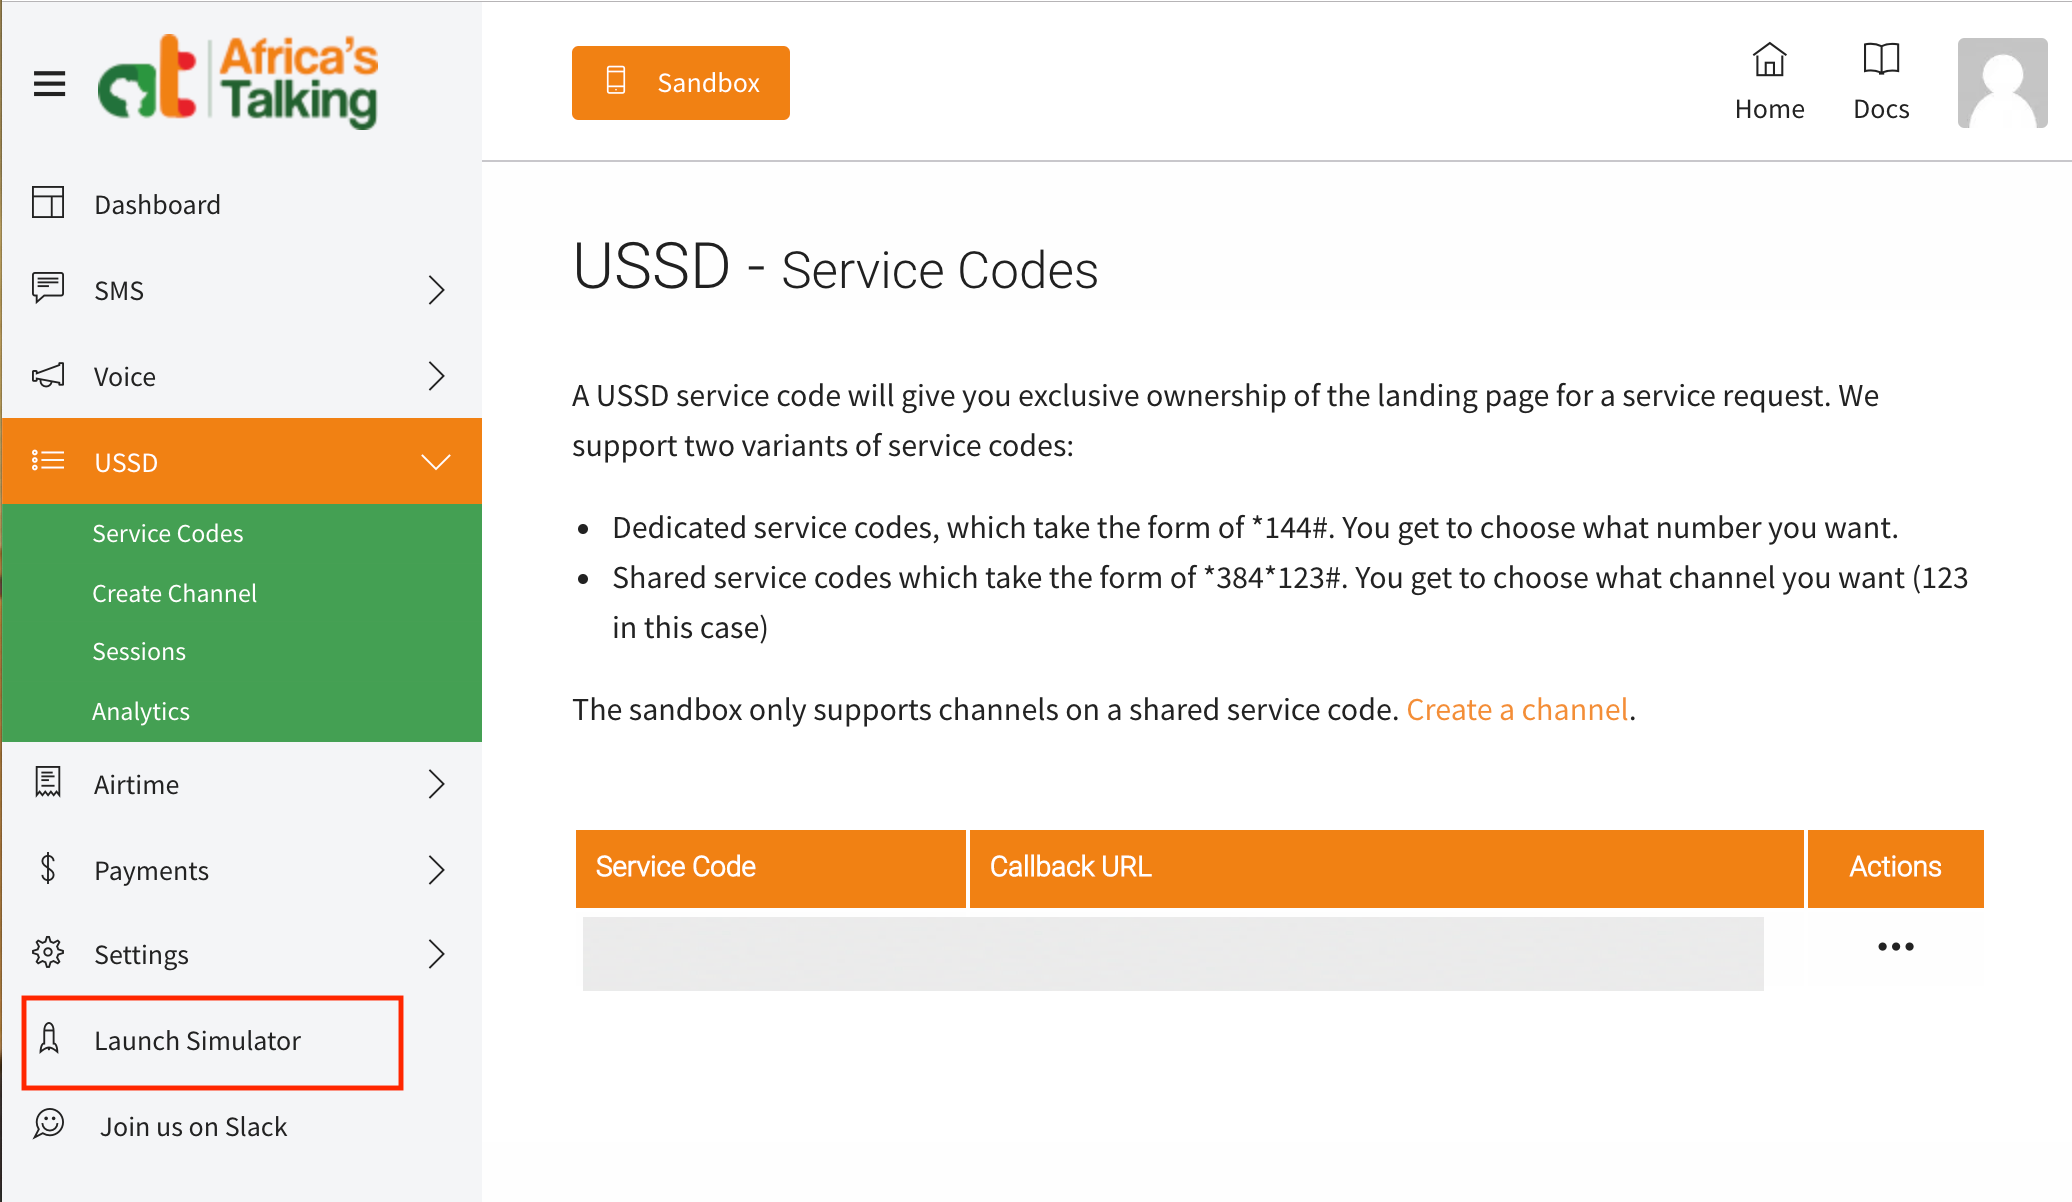
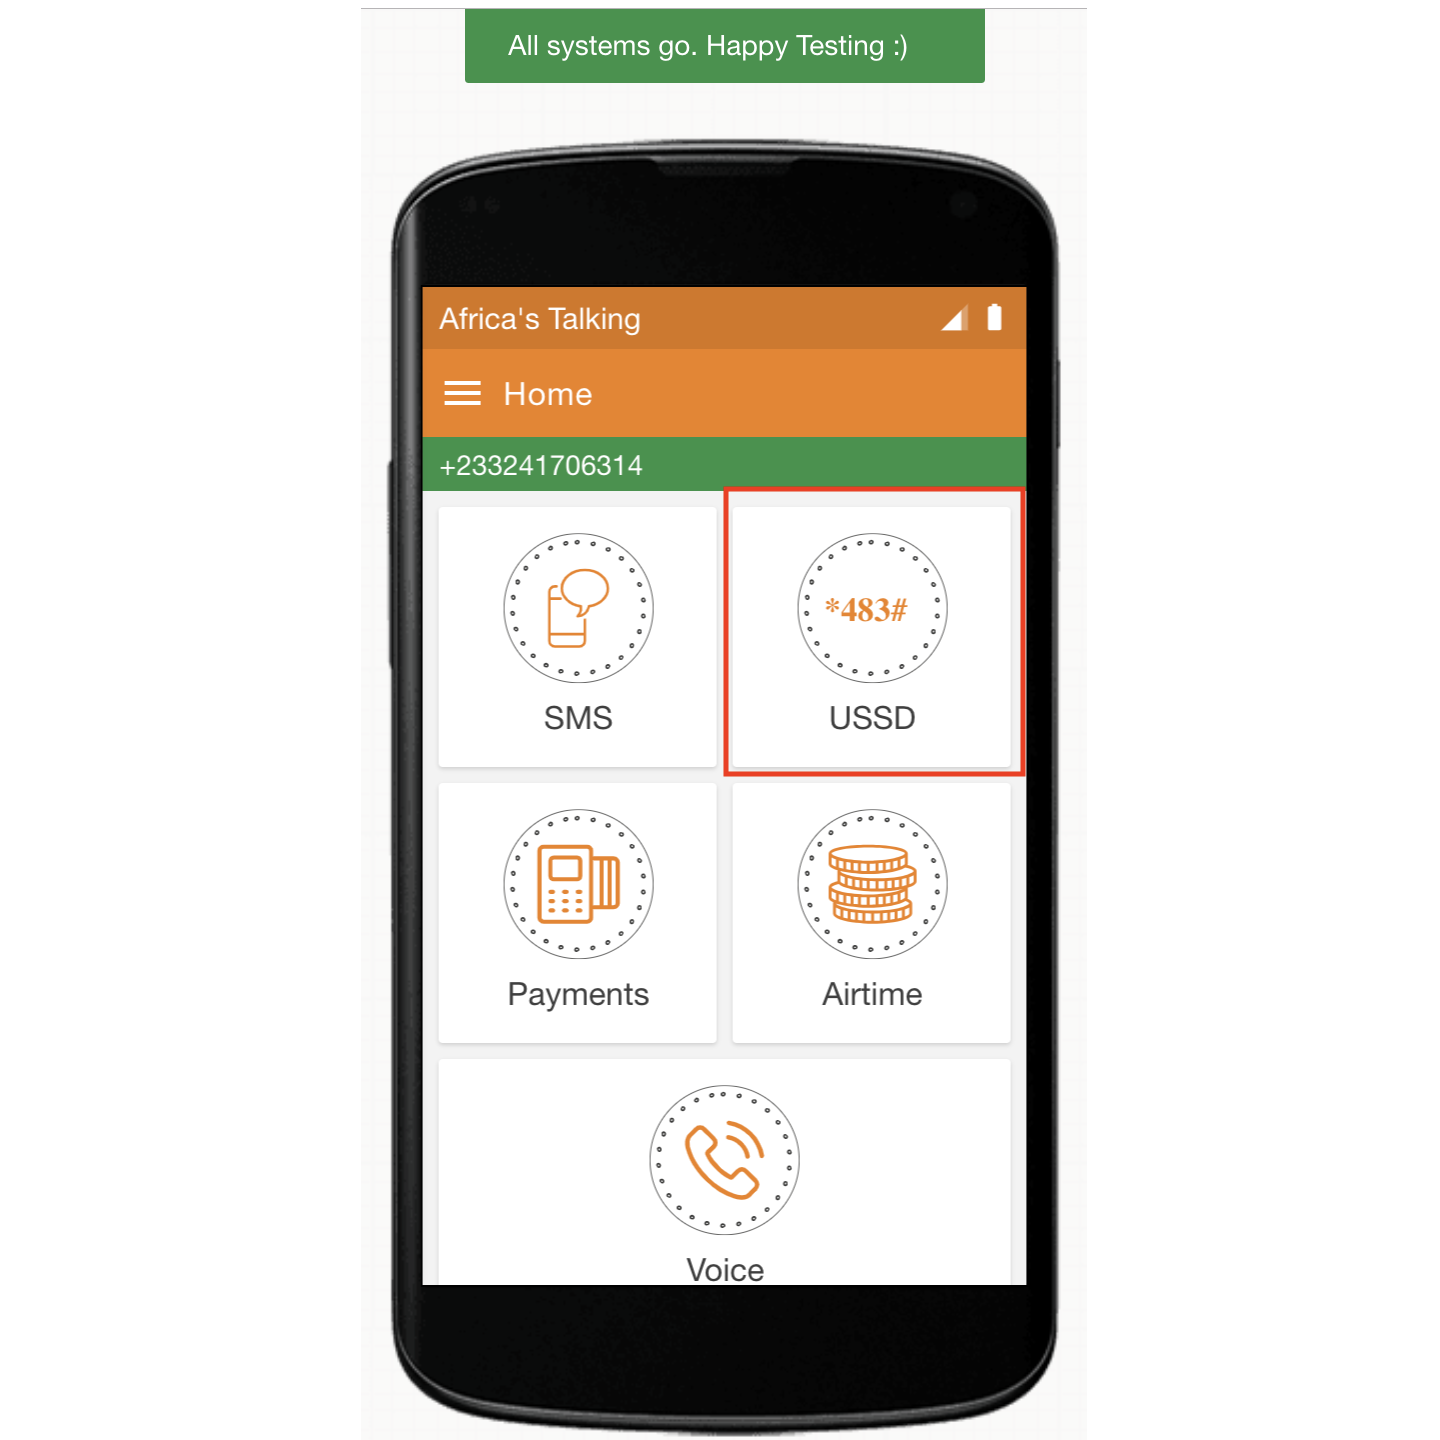
The first step to launching the simulator is to provide the phone number for the simulated device we would like to call from. This can be any valid telephone number of your choosing so long as no one else is currently using testing with that number. If an invalid number is provided, the simulator will report that the phone number provided is already in use. Once the simulator accepts the test telephone number, it will display a list of options for testing in what appears to be a web-based android application. We want to test our USSD application, we will select that option from the list.
Next, we dial the shared short code and channel that we had set when configuring our USSD app. Be sure that this value starts with an asterisk (*), has an asterisk (*) separating the shared short code and the channel, and ends with an octothorpe (#) (also sometimes called a pound or hash symbol).
Before we press the “Call” button, it’s worth noting that at this point, we should expect our USSD app to return an error message. If you recall from reading the Africa’s Talking Documentation, it clearly states:
-
- You will need to let the Mobile Service Provider know whether the session is complete or not. If the session is ongoing, please begin your response with CON. If this is the last response for that session, begin your response with END.
- If we get a HTTP error response (Code 40X) from your script, or a malformed response (does not begin with CON or END), we will terminate the USSD session gracefully.
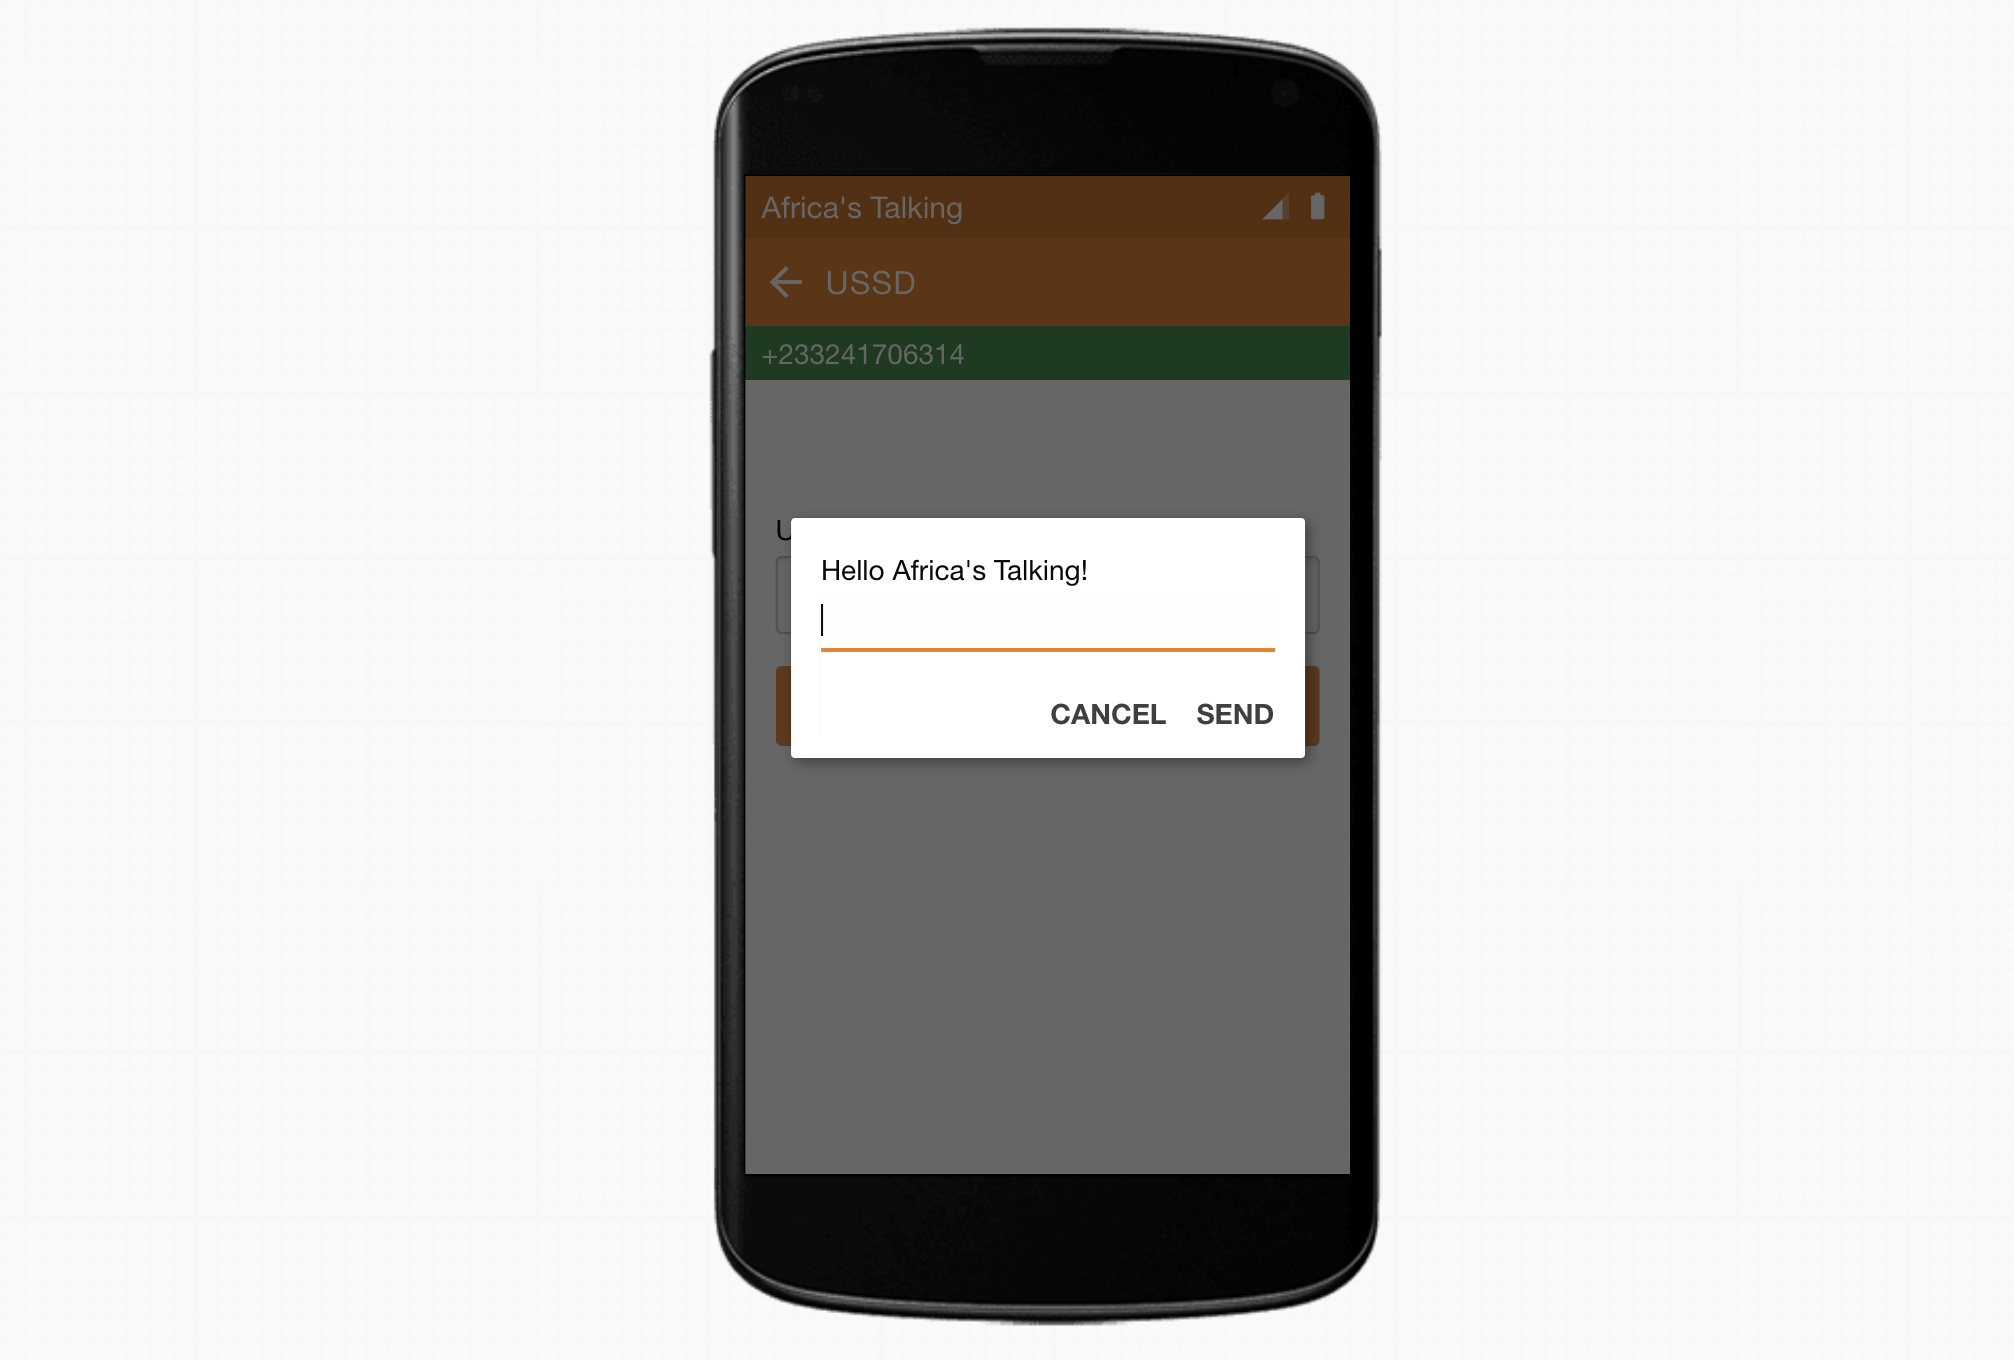
Because we are only returning a response with “Hello Africa’s Talking” as the content and not beginning our message with CON or END, we know that this does not meet Africa’s Talking requirements. However, using CloudWatch and Africa’s Talking session manager, we will still be able to validate that our request was successfully sent from Africa’s Talking simulator, received by our API Gateway, processed by our Lambda function, and then returned back to the simulator.
So with this in mind, let’s hit the “Call” button and view our error.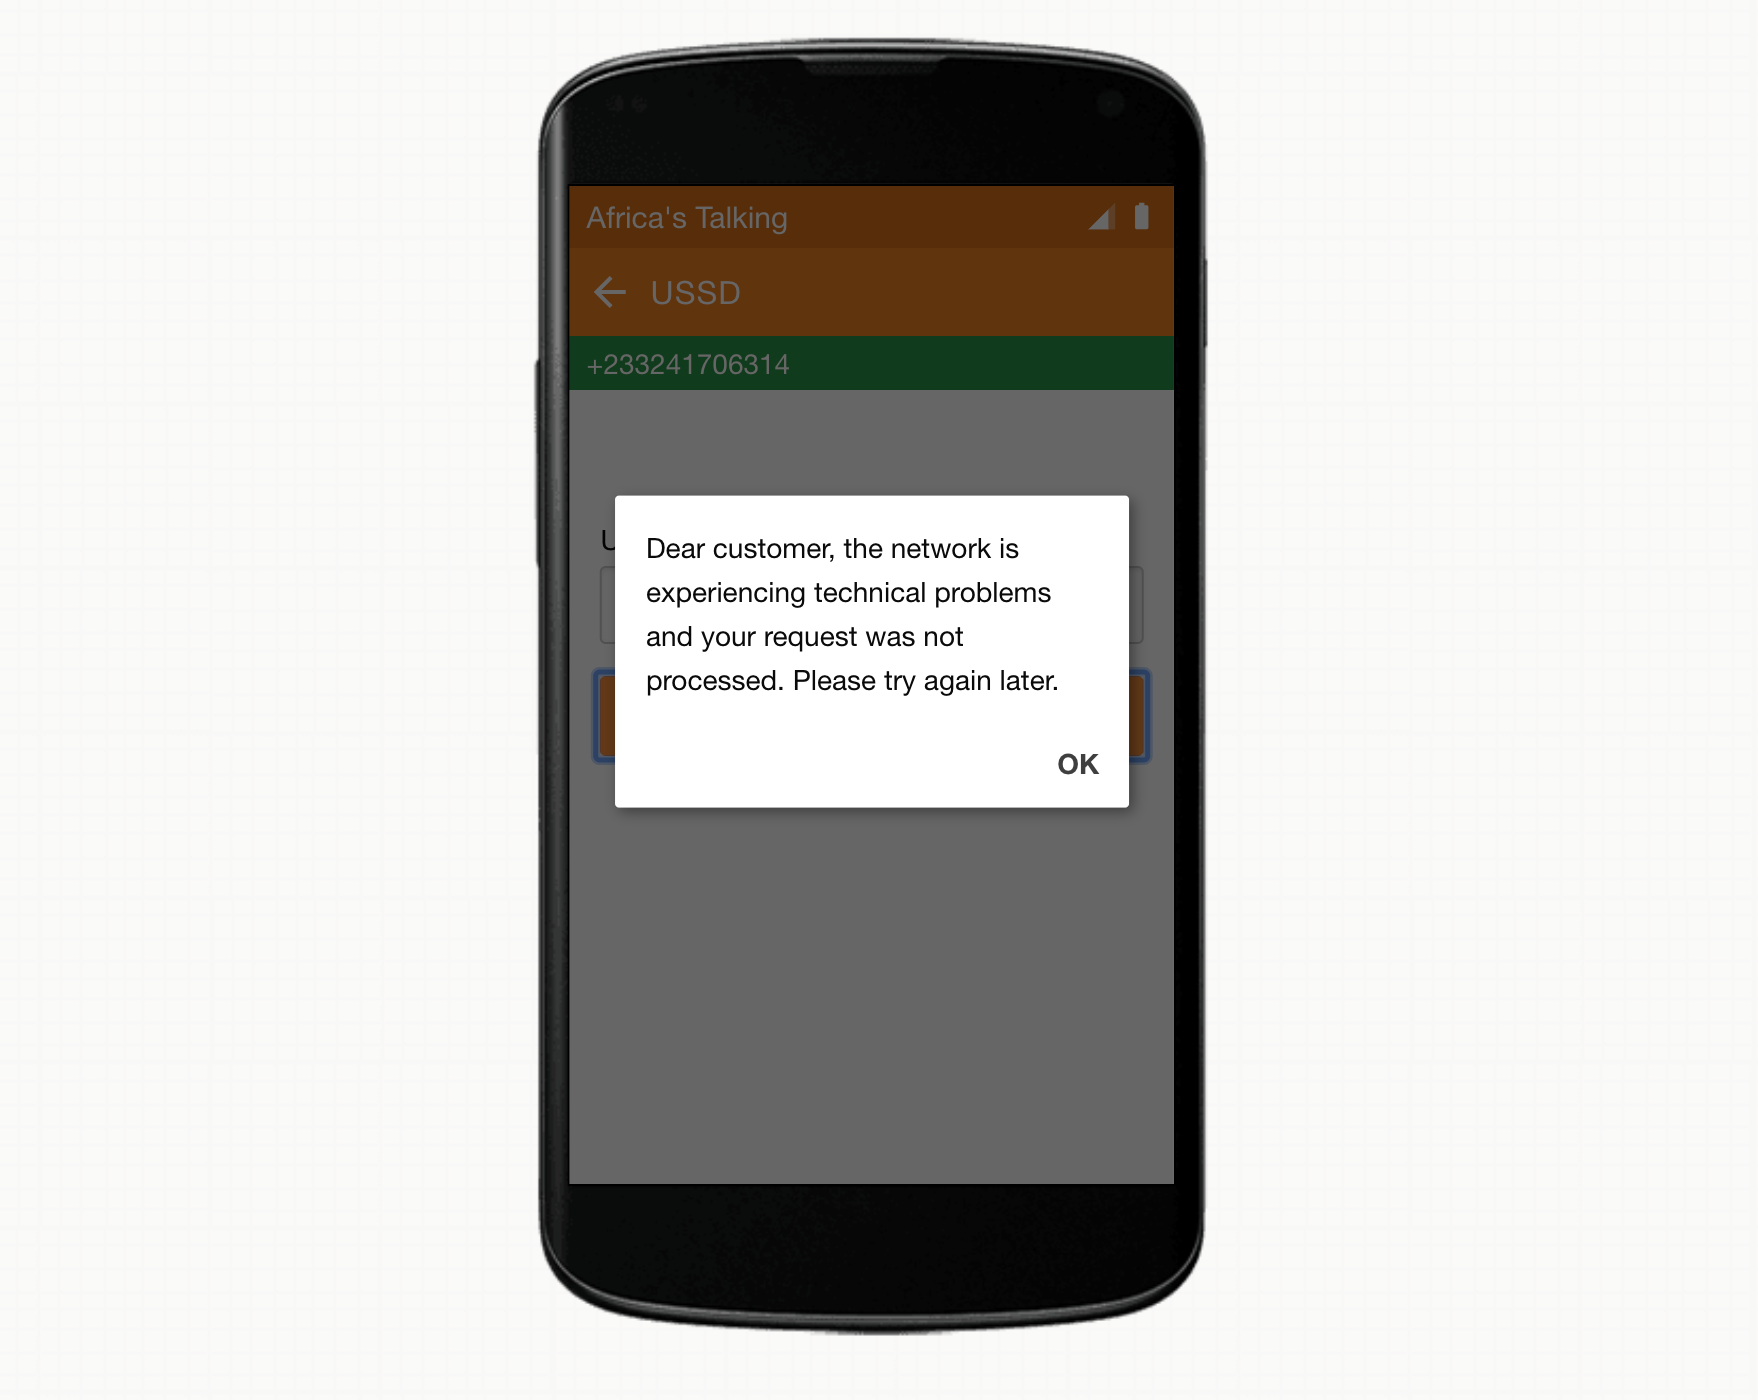
Excellent. Exactly as expected.
To make sure everything went according to plan, let’s navigate to AWS’s CloudWatch service and select the “Logs” option at the bottom of the side menu. You should see at least two different log groups:
- /aws/apigateway/welcome: from enabling CloudWatch logging
- /aws/lambda/Africas-Talking-USSD: from making our ussd request

If we select our Africas-Talking-USSD log group, we should see at least one Log Stream. Selecting the most recent (top) log stream should show each of the steps on our request’s journey through AWS.
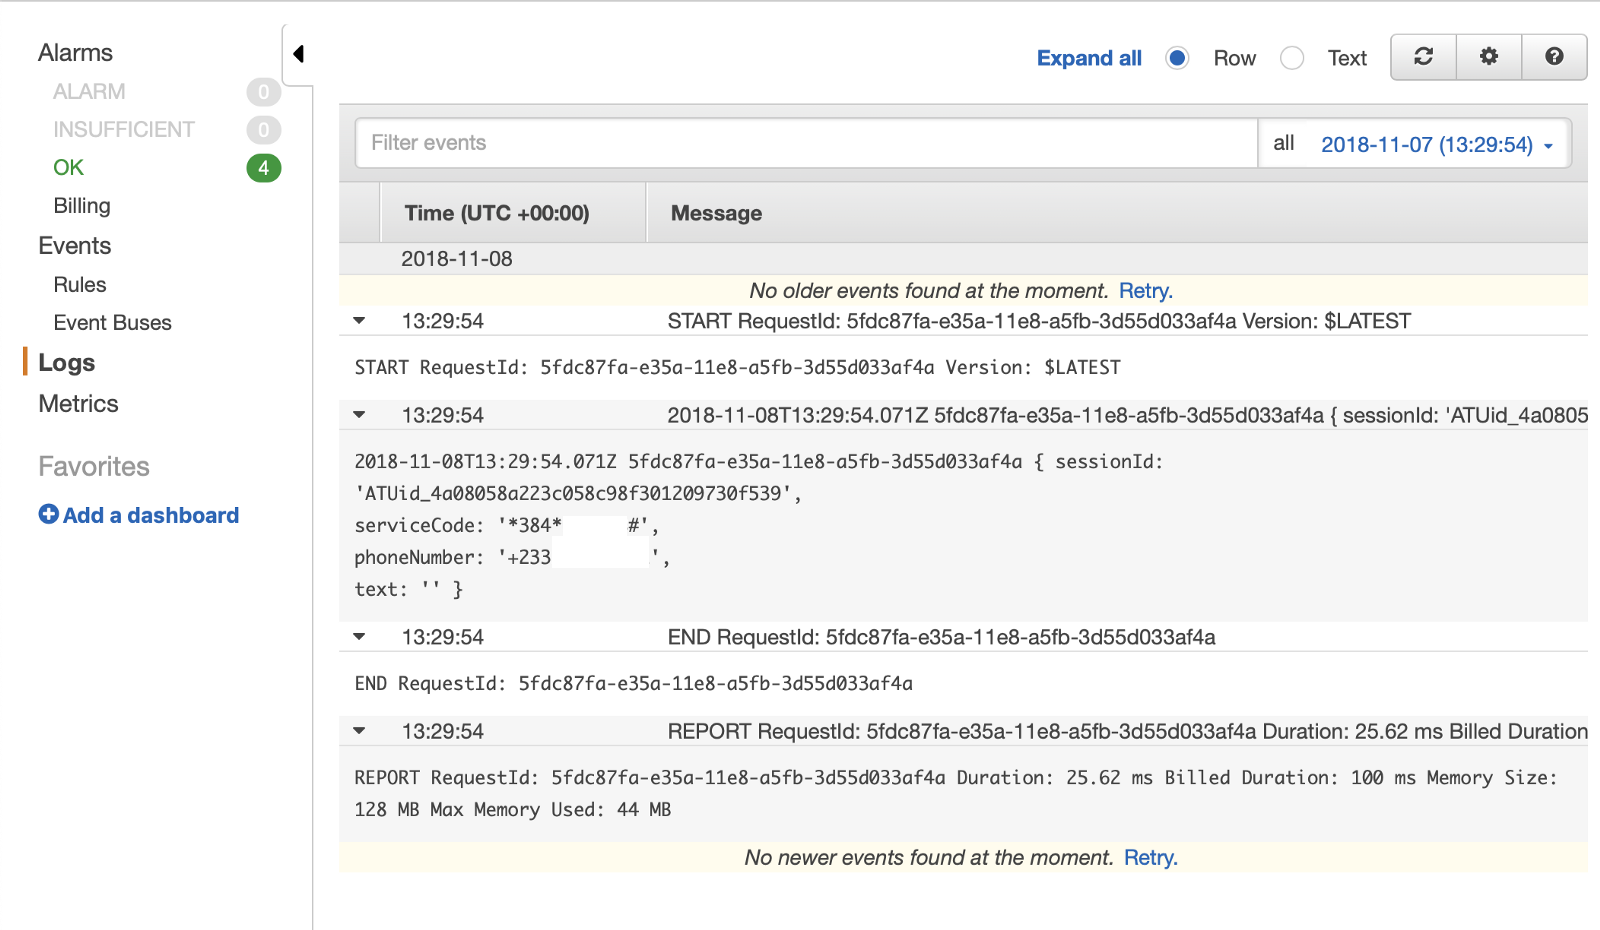
At the top, you will see the “START” log which indicates that the request was successfully received by API Gateway. Under that, we can see the formatted data being printed from inside of our Lambda function. Take note that the ‘serviceCode’ is the short code that we dialed and the phone number is the number we provided to the simulator. These values can be really helpful later if we ever wanted to display account specific information for a particular user. Lastly, you will notice there is a text field. After we are able to successfully return our first menu, a user will have an option to provide additional information such as a selection from a list of options we provide. We will get this selection information in this ‘text’ variable. Finally, the last two logs generate indicate that the request was successfully returned to the simulator (“END”), followed by usage statistics and billing (“REPORT”). So far so good!
Next, we should double check that Africa’s Talking received the value we sent in our Lambda function. To do that, we will navigate back to Africa’s Talking Sandbox, and this time select the “Sessions” option under the USSD menu. Here we should see at least one session recorded from the request we just sent from the simulator.
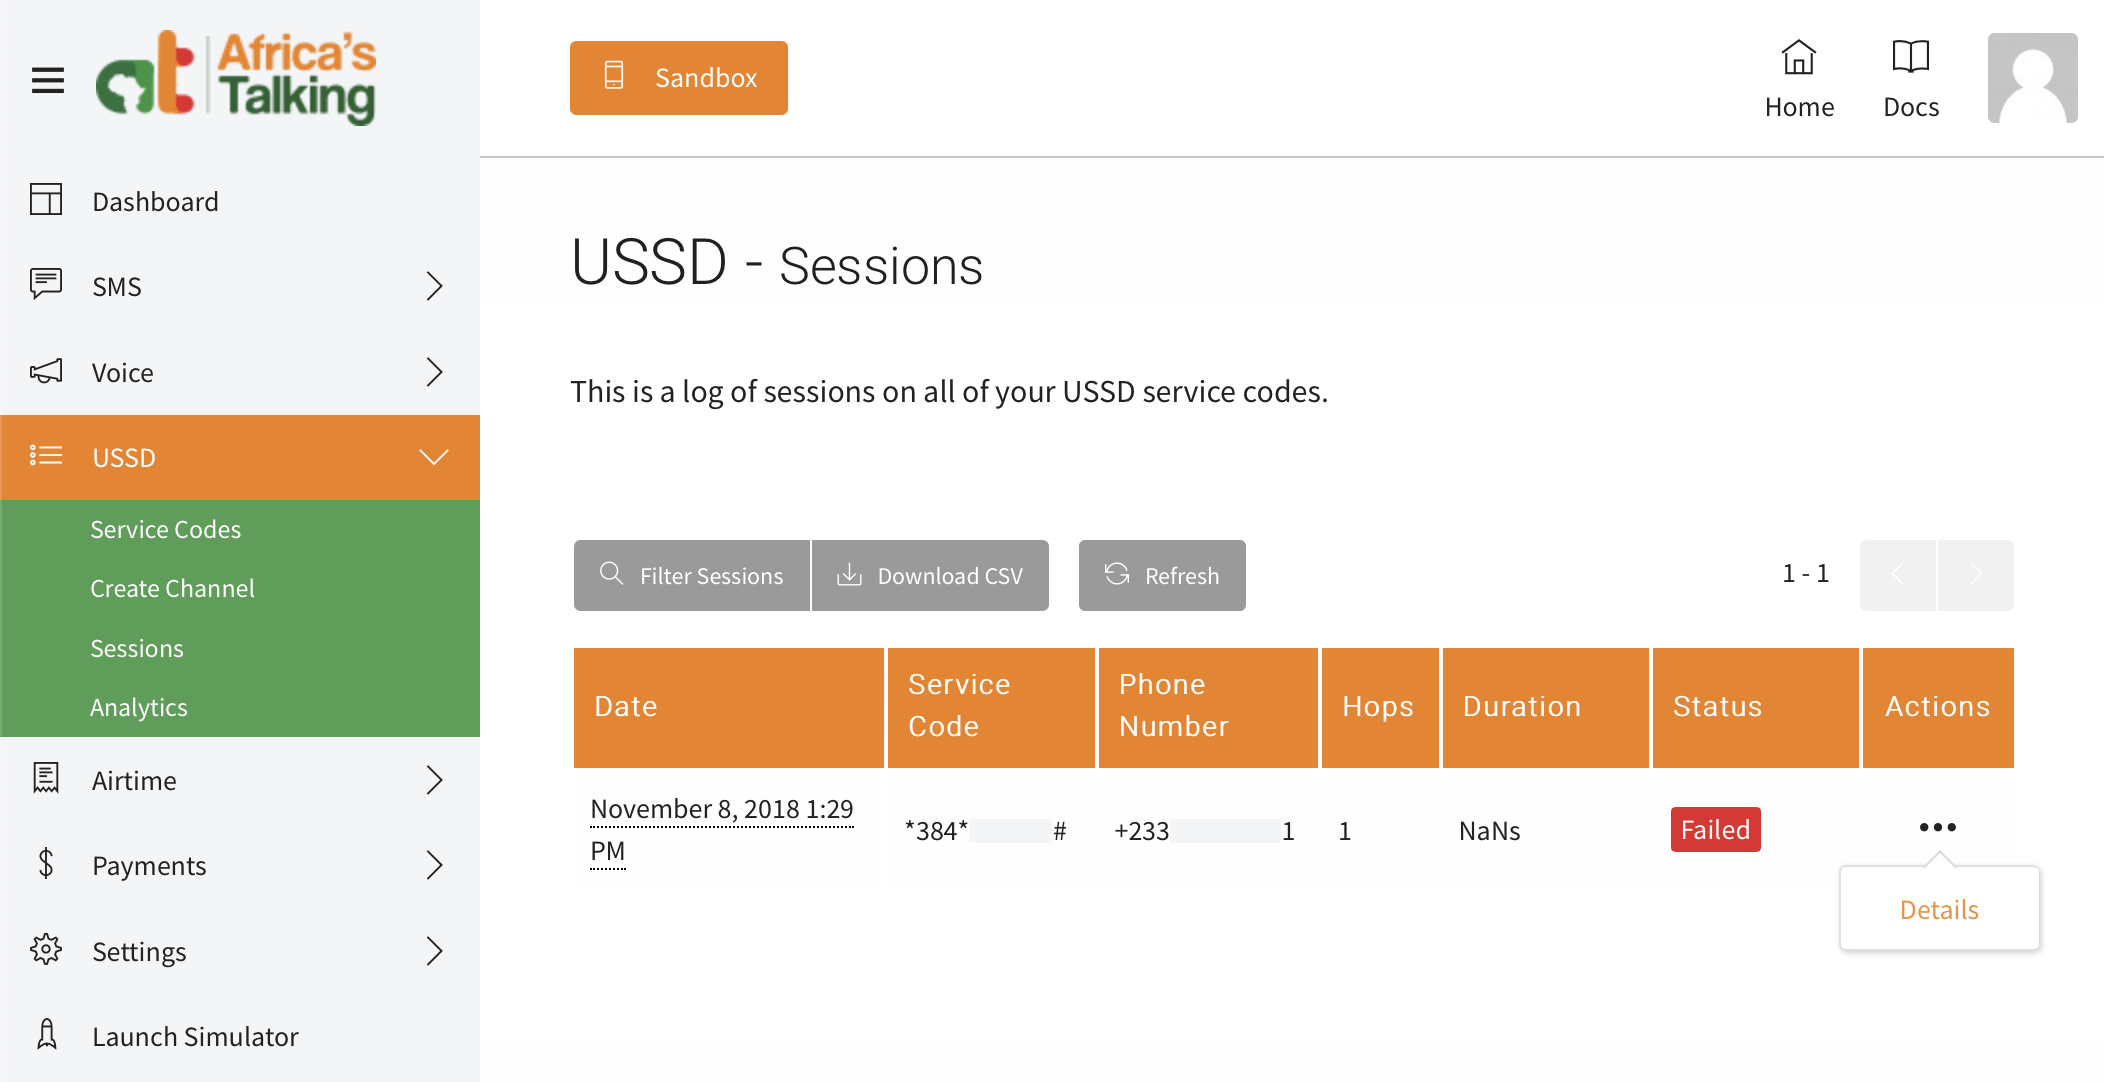
To view additional information about this request, we will select the three ‘more’ dropdown menu in the ‘Actions’ column, and selecting ‘Details’.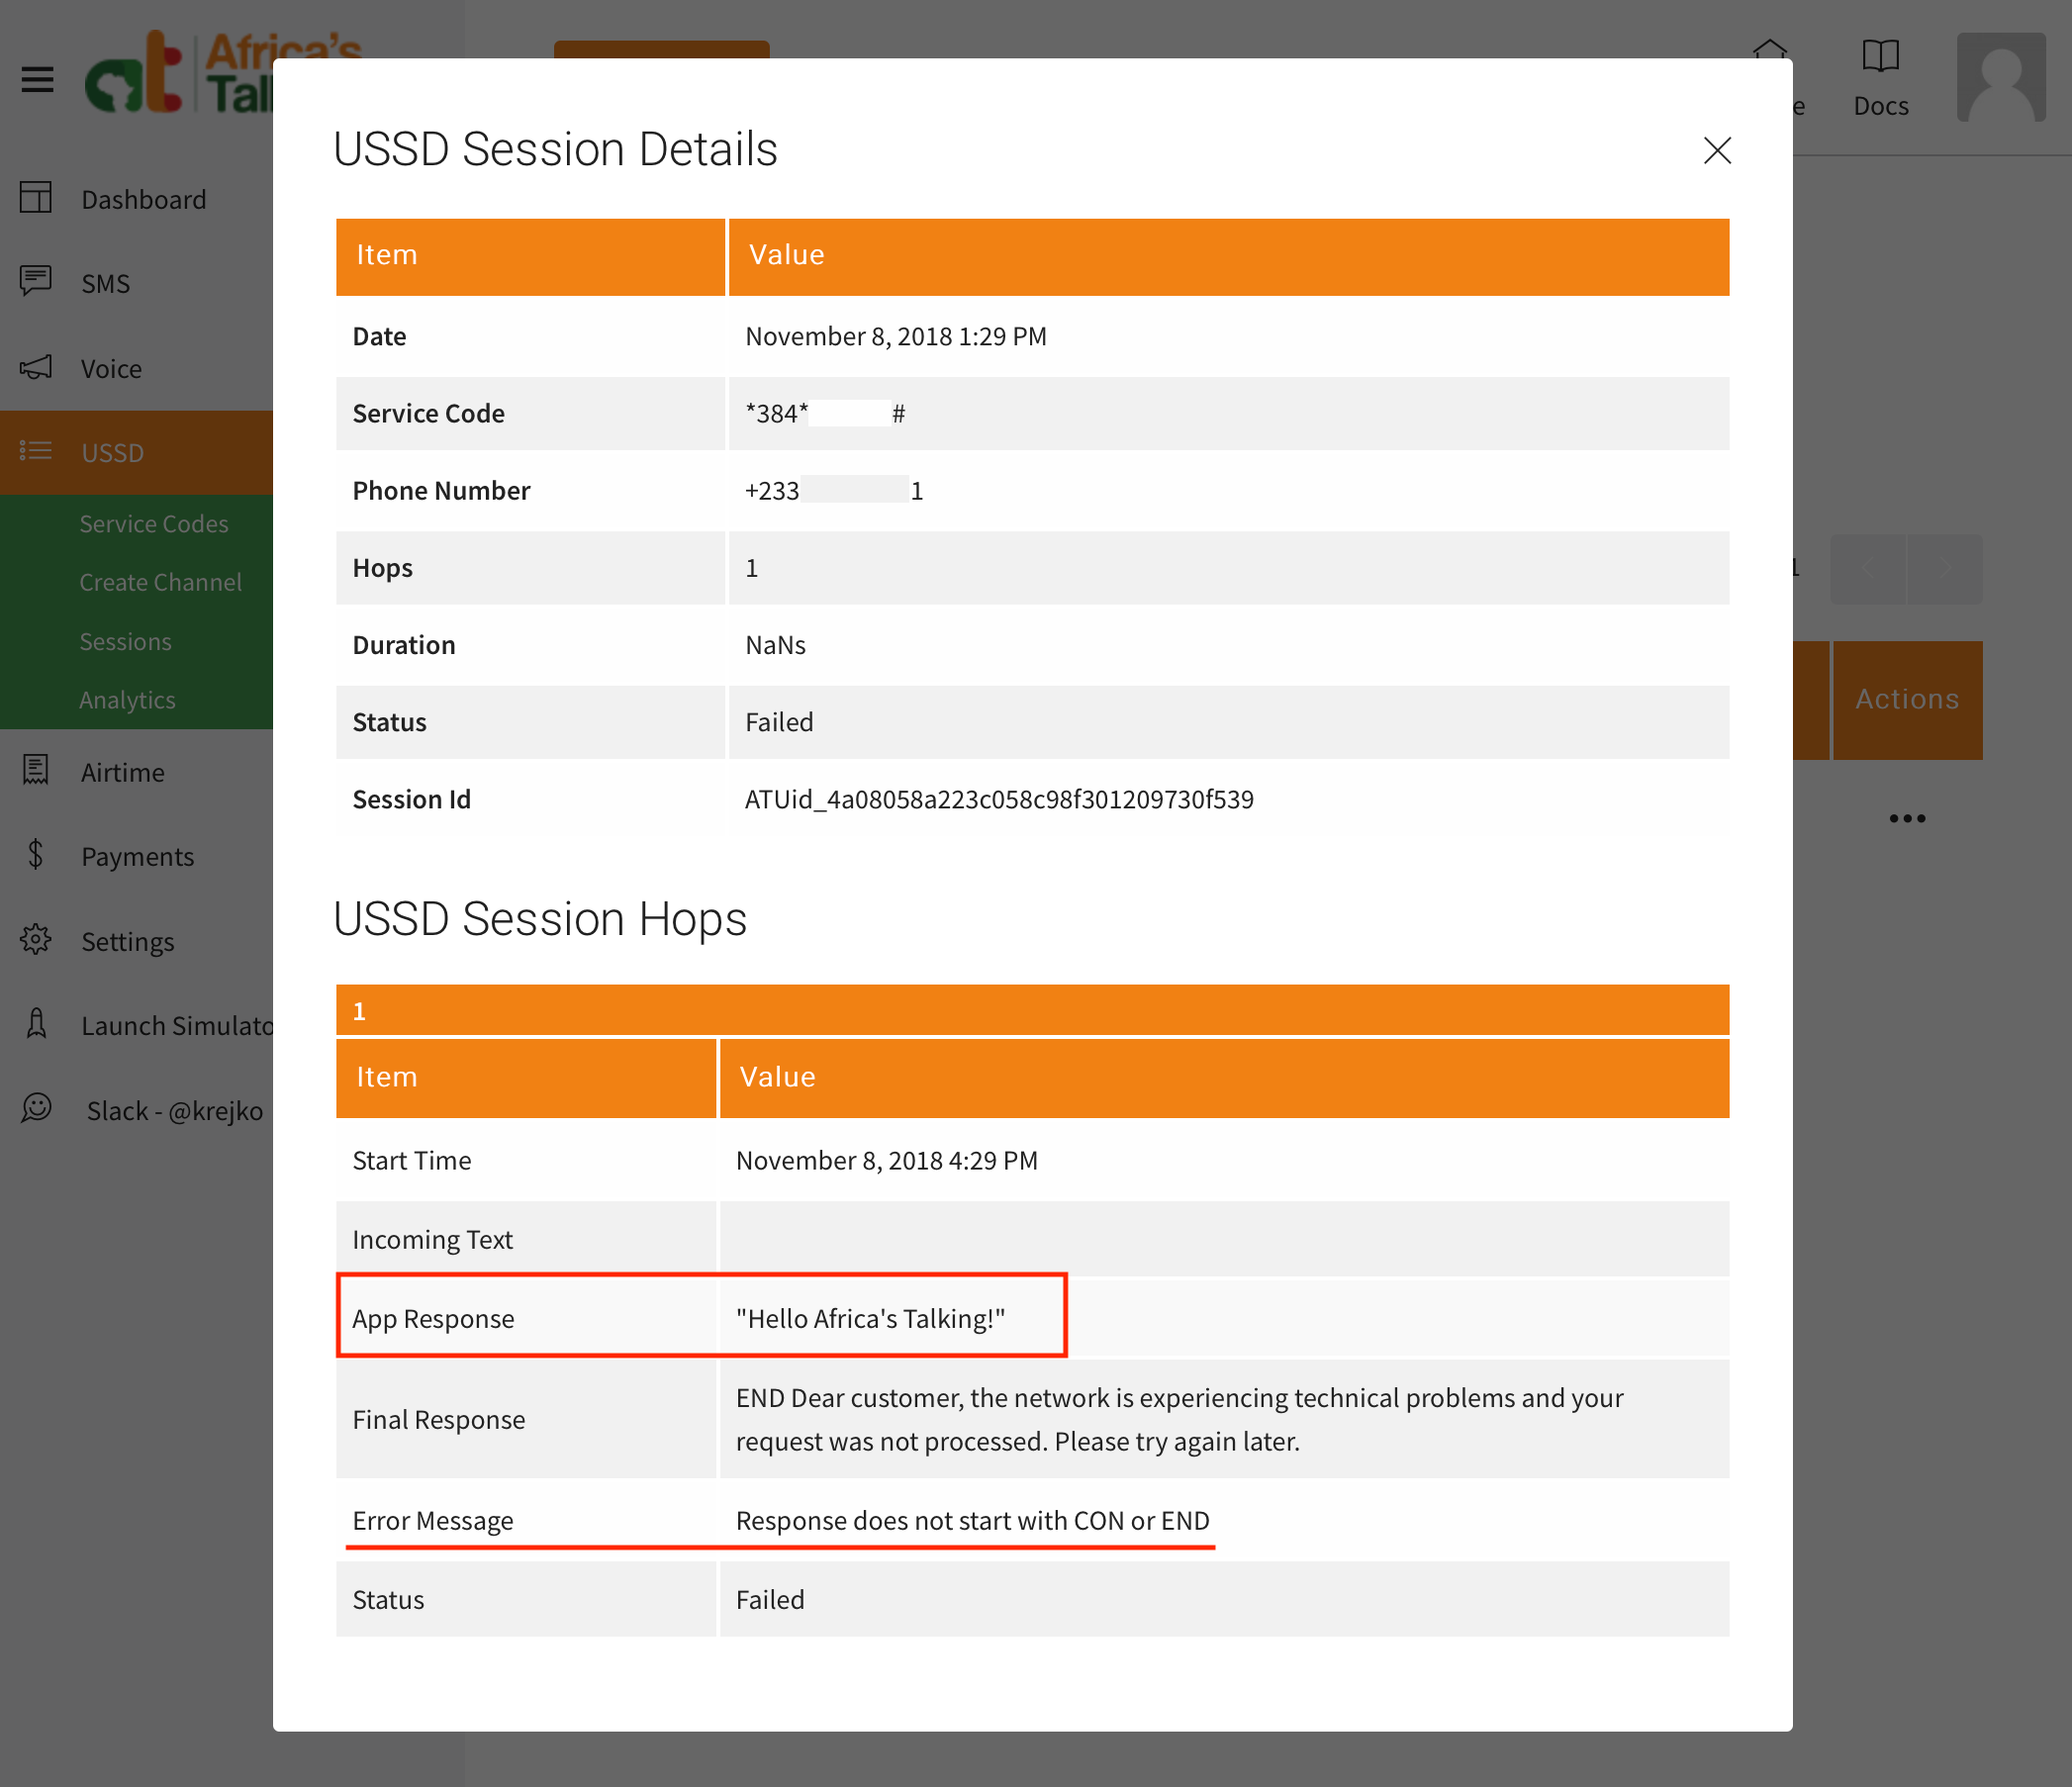
Here we can see that our AWS app did respond to Africa’s Talking with out message “Hello Africa’s Talking!”. Additionally, if we inspect the Error message field, it indicates reason for receiving an error message is due to our purposfully malformed response; not starting our response with CON or END.
If you are not seeing these same messages, please go back and review some of the previous steps. One of the most common mistakes is missing one of the ‘Save’ buttons when making edits in AWS.
With this, we have validated a successful integration of Africa’s Talking with our AWS app! We have also completed the last leg of journey, requesting a USSD menu from Africa’s Talking.
However, I think we can all agree that an app that returns an error message is not very useful. Next, let’s figure out how to send back a message that will be accepted and displayed by Africa’s Talking.
The Simple Fix
To fix our issue with the response not starting with CON or END, let’s try to prefix our message with one of these two values. Let’s navigate back to our Africas-Talking-USSD Lambda function and update the callback response to return CON Hello Africa\’s Talking!.
We can now save our function and try to load our menu again in the simulator. Unfortunately, we should still see the same error response.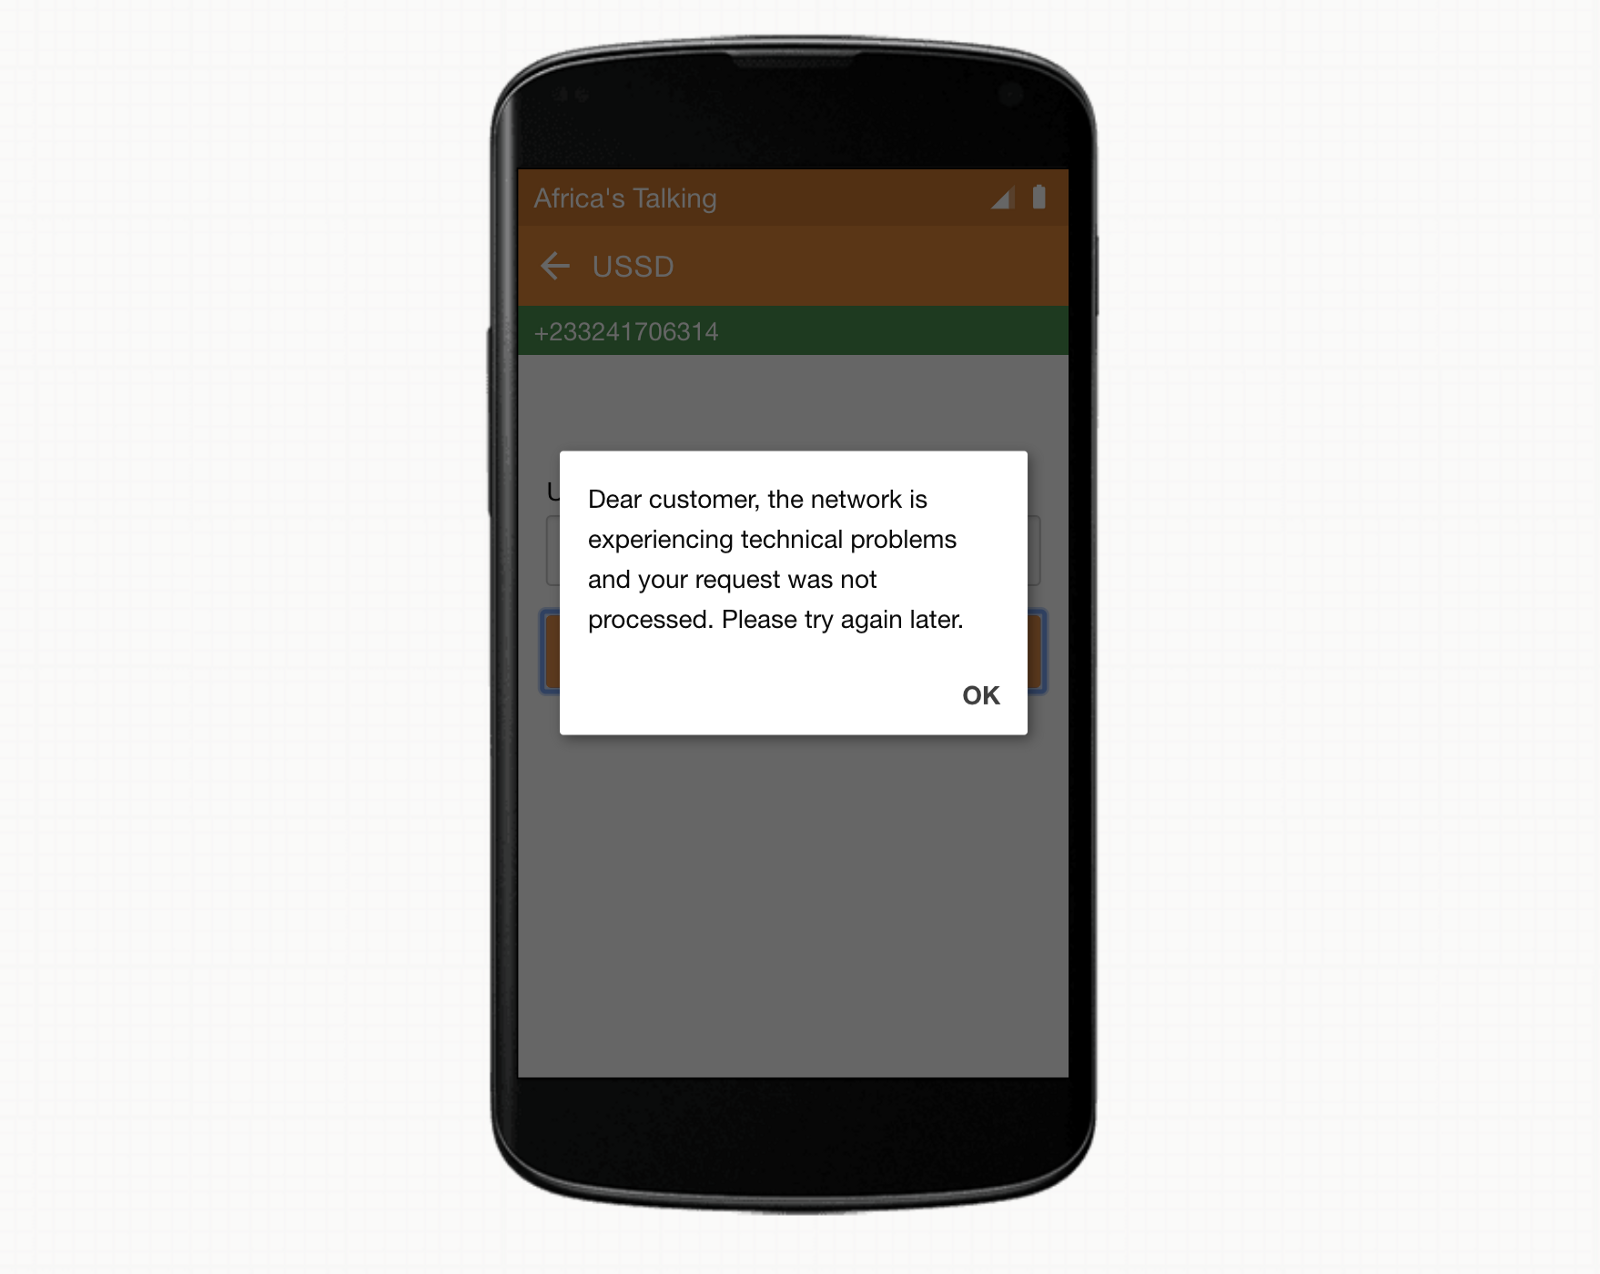
While this is a good start, it is not enough. Let’s return to Africa’s Talking and pull up the detail information for this last session to try and get an idea of what’s happening.
What we can see here is that behind the scenes, AWS is trying to help us out by putting our response value inside of quotes. However, in doing this, our response still violates the Africa’s Talking requirement of starting with either CON or END.
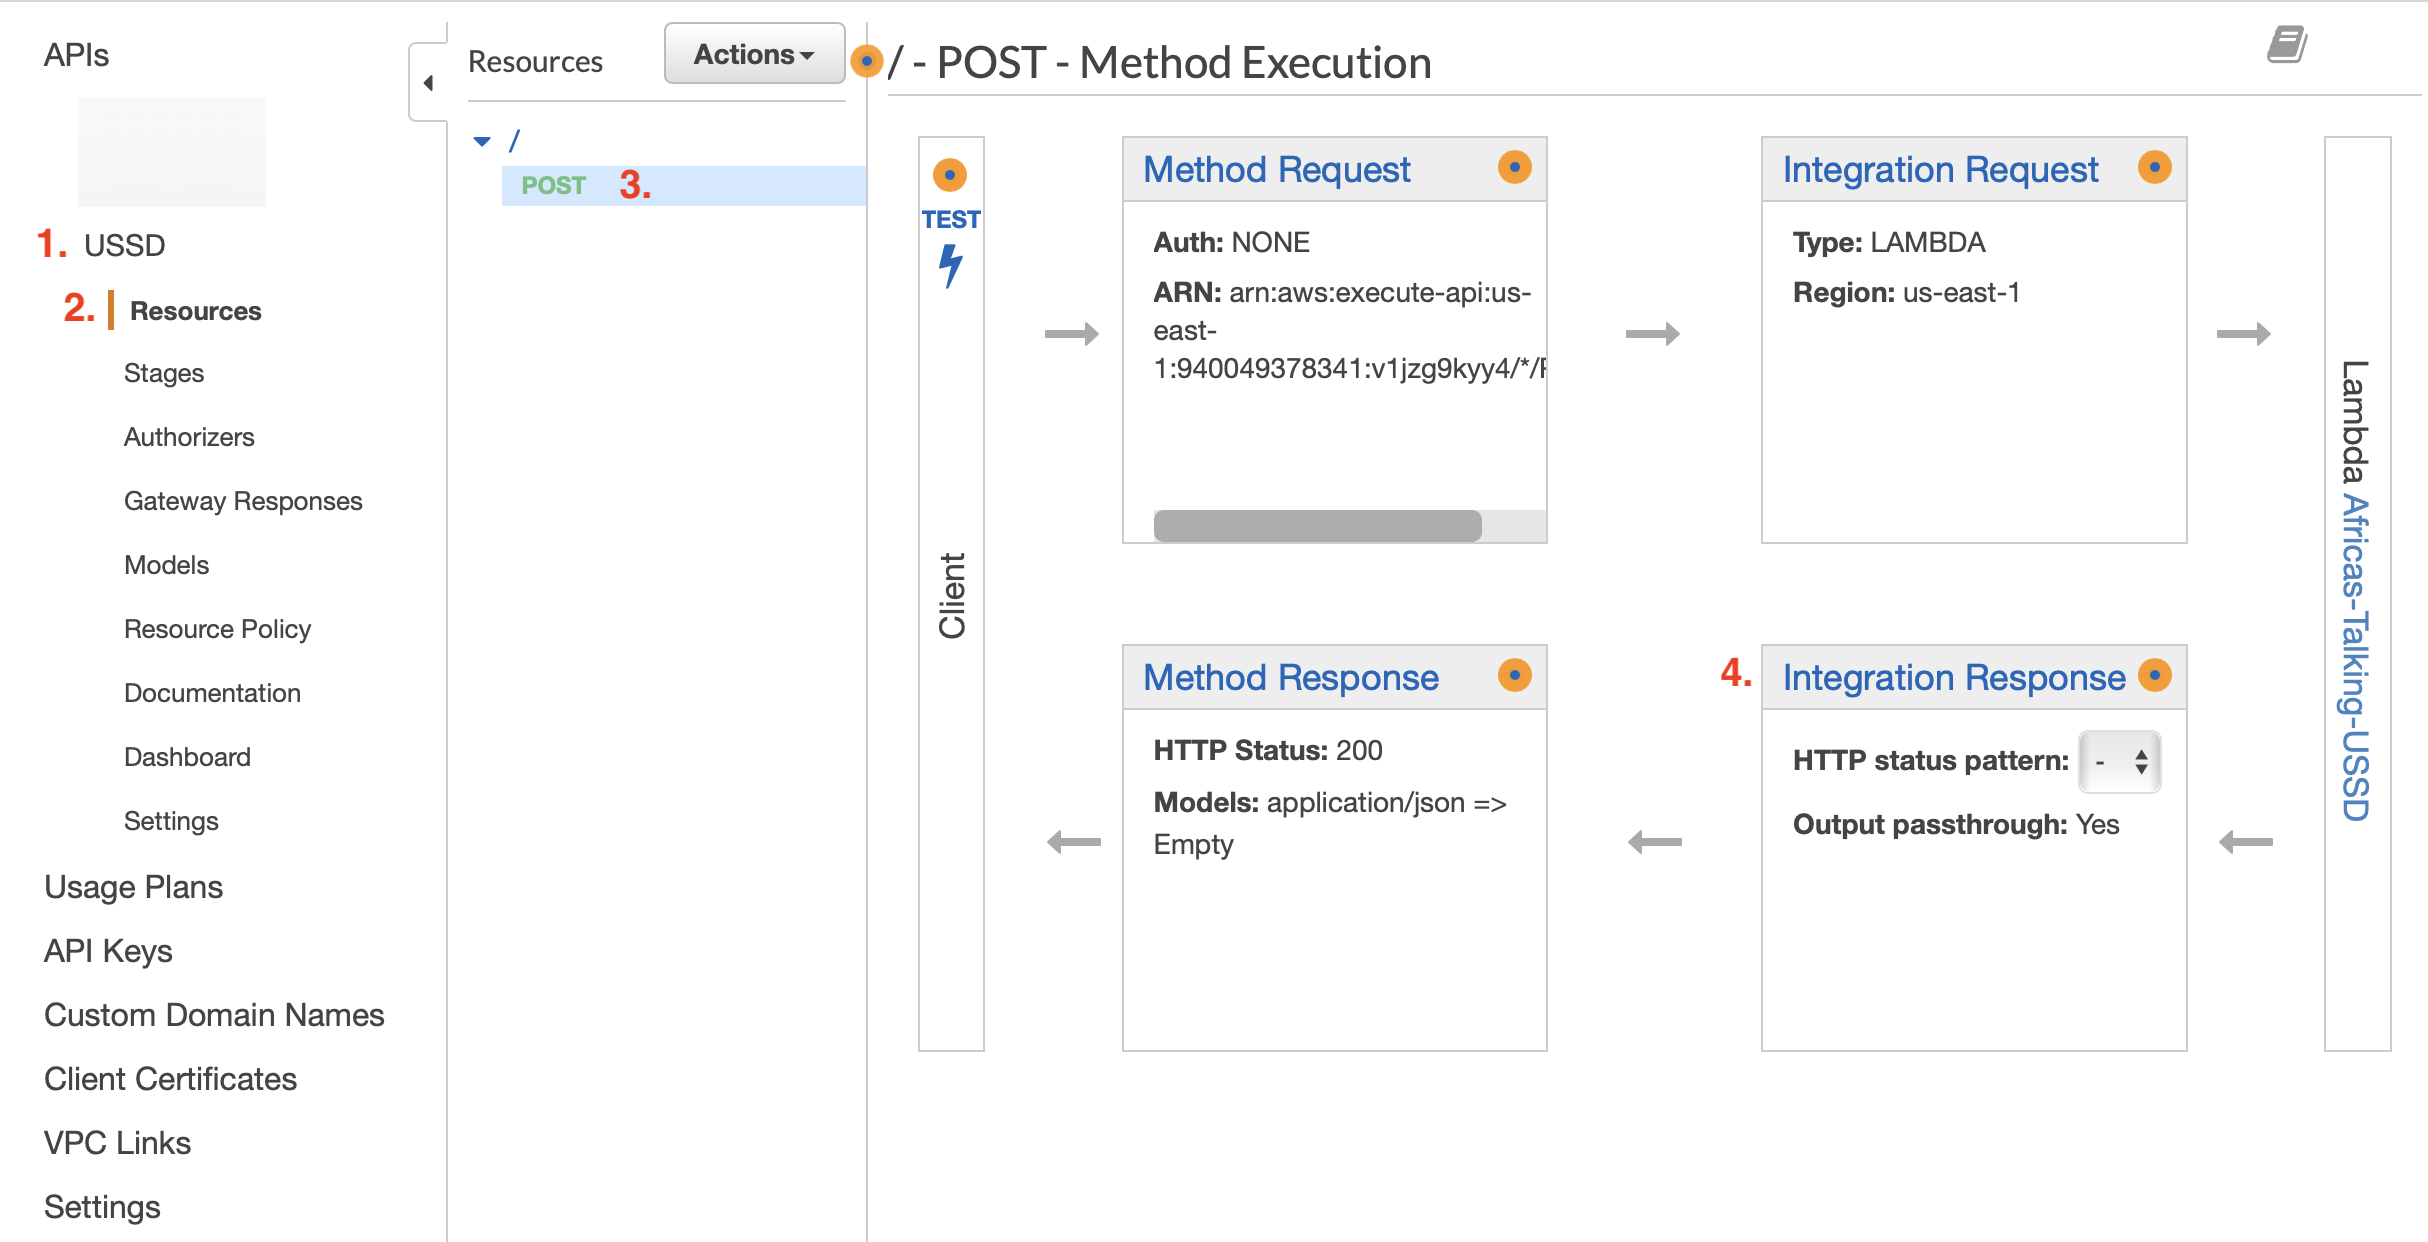
To fix this small issue, we must tell API Gateway not to format our response. Let’s navigate back to API Gateway. We will select ‘Resources’ under our USSD API followed by the POST method we had previously created. Here we should see the method execution diagram. This time, we would like to update how the data returned from Lambda is formatted so we will select the ‘Integration Response’ section.
Here, we must unfold the section for the 200 Method response status, and then unfold the Mapping Templates section. We will see another Content-Type section just as we had seen when formatting the responses heading to Lambda. This time, we are returning plain text, so we must add a new Content-Type of ‘text/plain’. Don’t forget to press the small checkbox to the right of the input field. Just as before, this should reveal a text editor. If it does not, select the ‘text/plain’ Content-type’ from the list for the editor to show. To have AWS omit the quotes, we will use the following formatter:
$input.path(‘$’)
Our POST Integration Response should look like the following.
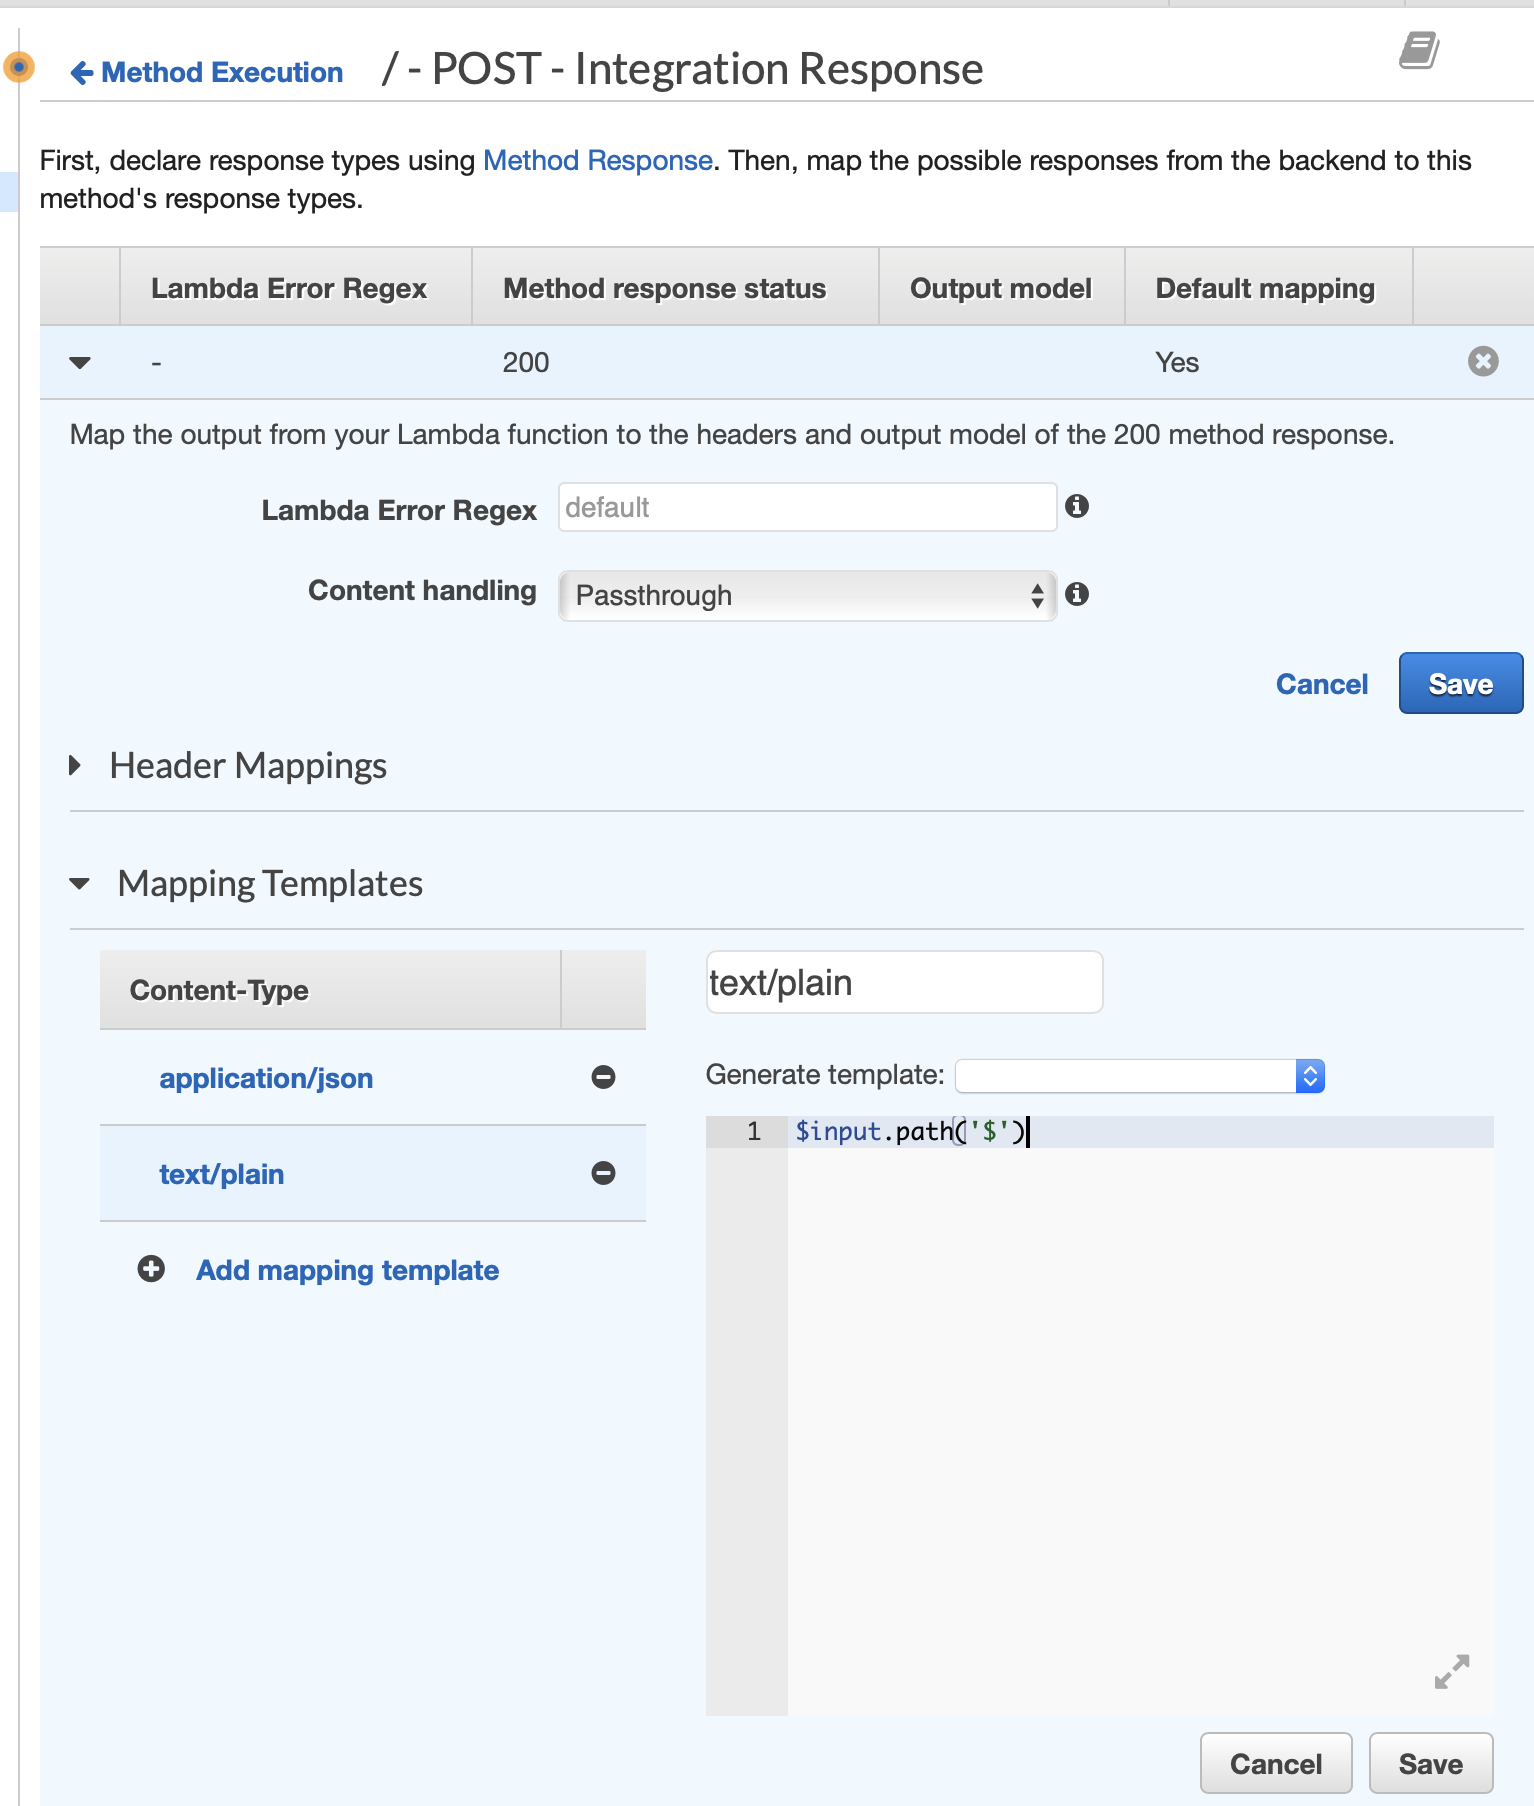
If everything looks good, press the “Save” button below the text editor.
Additionally, because we know we will be sending back plain text and not a json response, we should also click the minus (-) button to the left of the provided application/json mapping template to prevent any unexpected behavior from this configuration.
Lastly, we must redeploy our API so that these changes are used the next time we make a request in the simulator. As a reminder, this can be done by selecting the Actions dropdown at the top of the API Gateway page, and selecting Deploy API. We will want to replace the API that currently exists on the ‘dev’ stage so we will select this from the dropdown before pressing the “Deploy” button. Please note it may take a few seconds for the newly deployed changes to be available. However, once change changes finish propagating, we should now see our message when we reload our USSD Menu!
We can also validate that Africa’s Talking is now getting the correct non-quoted value by checking the response received for the most recent session.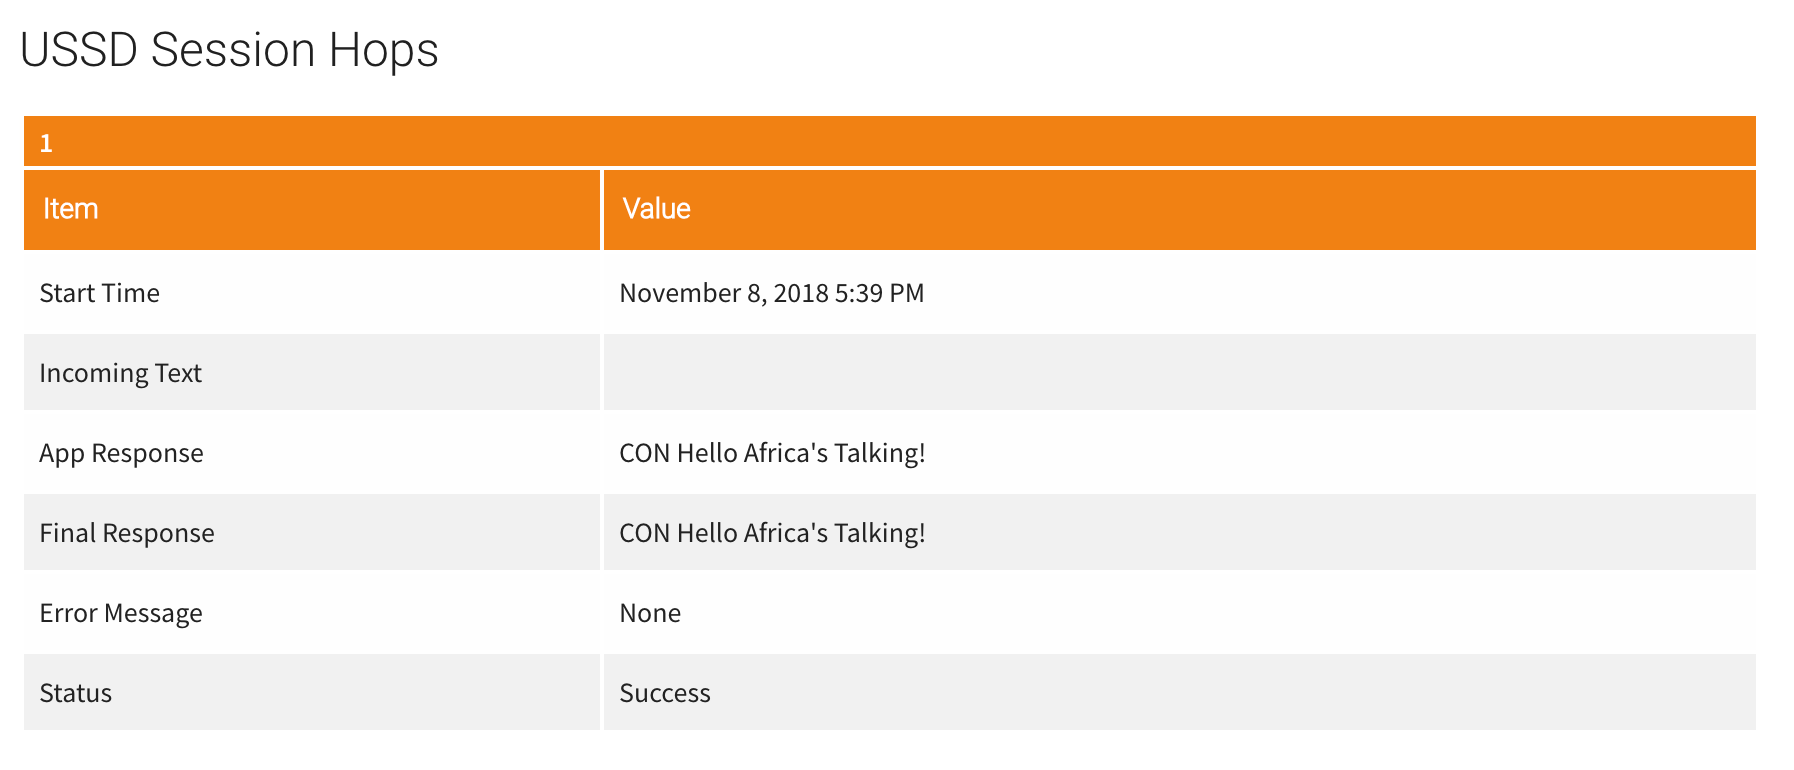
Using the best tools for the job
At this point, we could dive back into our Lambda function and continue to build out the remaining functionality and menus for our app. However, this would also mean that we would need to manually manage each of the moving pieces required by USSD such as session state and keeping track of which messages get which CON or END prefixes.
To make our lives a whole lot easier, we can instead use a USSD menu building node module which will manage each of these moving pieces for us. However, Lambda does not support direct file uploads through the Lambda editor so we must instead use a different method.
To manage the contents of our Lambda function we can use the Amazon Web Services Command Line Interface or AWS CLI. This will allow us to upload a zip file to our AWS account that populates a given Lambda.
The first step to using the AWS-CLI. is to make sure that it is installed on our local machine. On a mac, this can be done by opening terminal and using npm install -g aws-cli. If you don’t have NPM you can get that first by visiting the node.js website. On Windows 10, you can install the Windows Subsystem for Linux to get a Windows-integrated version of Ubuntu and Bash.
The next step to using the AWS CLI is to create an account that has programatic access. This will let us sign in via the AWS CLI to perform our file uploads. Navigate to IAM and select the “Users” option from the menu on the left. Next select the blue “Add user” button at the top of the screen.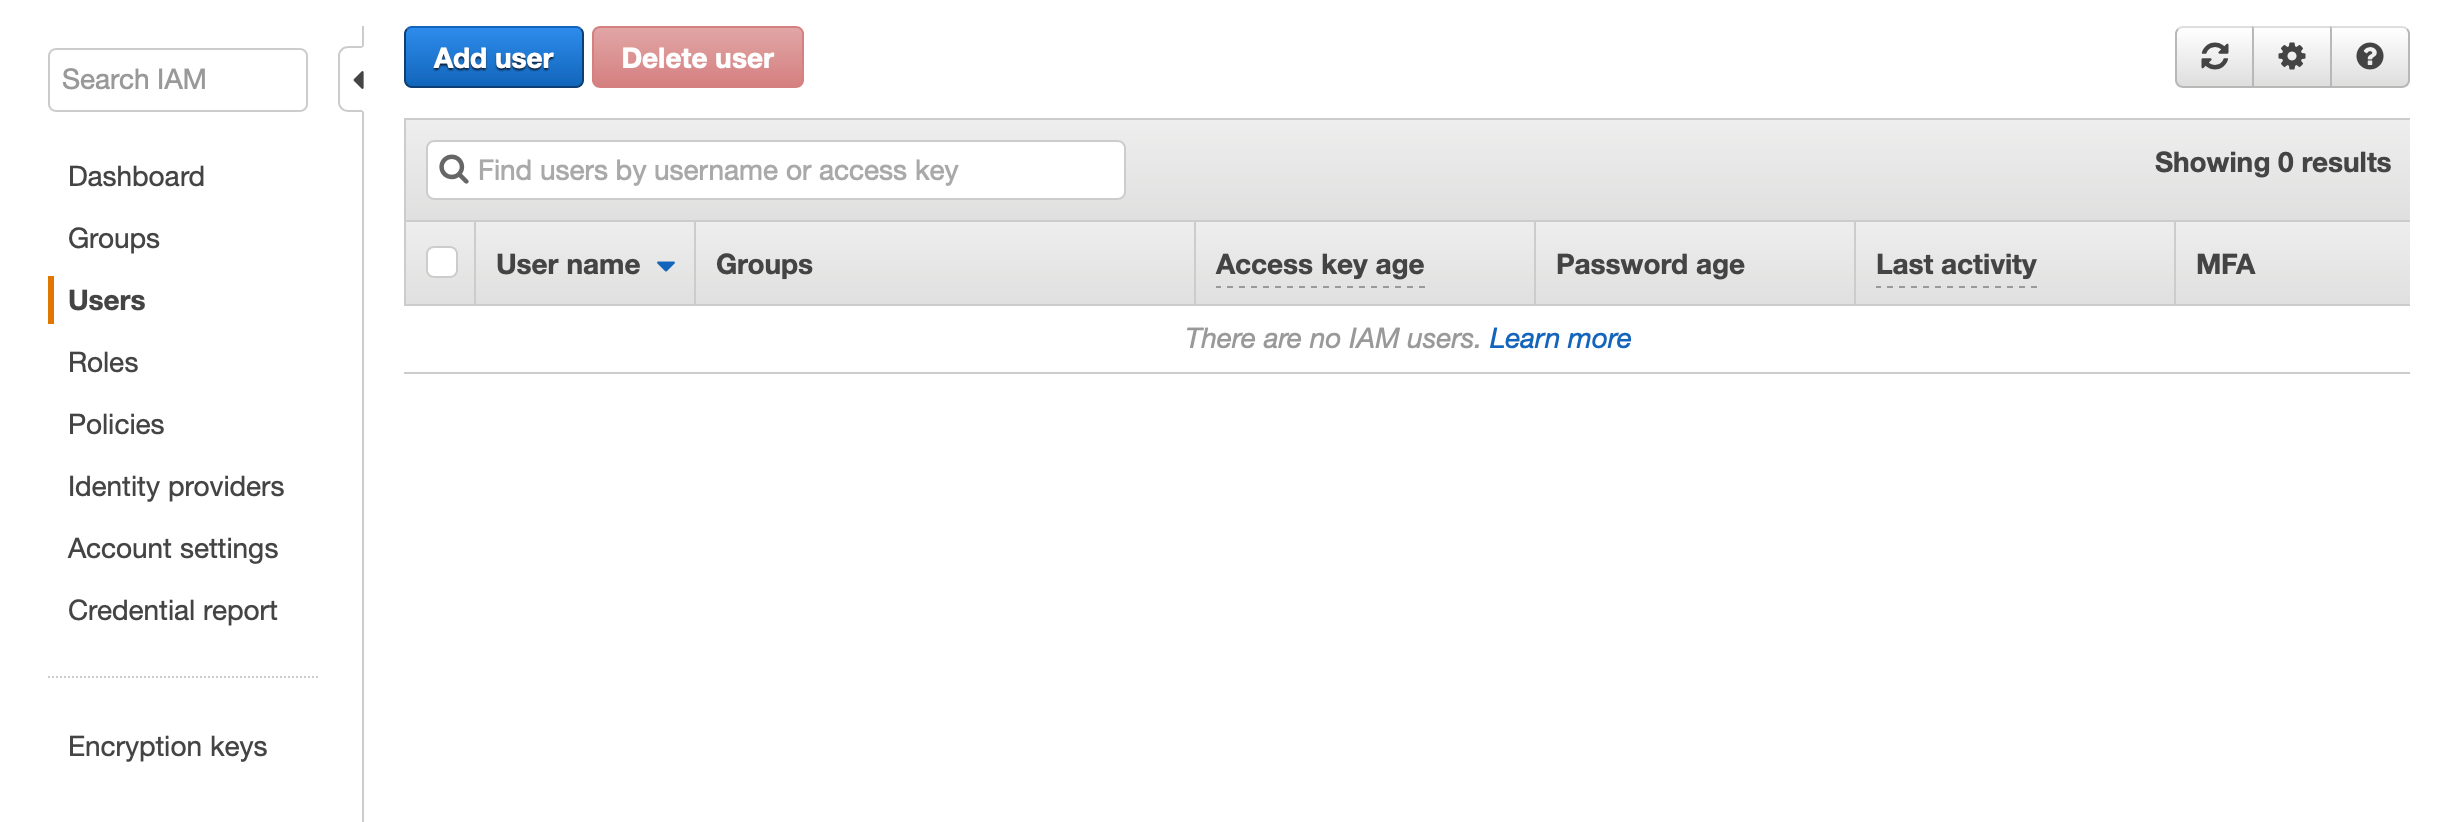
We must then give our new user a name, and enable them to have programmatic access to our AWS account.
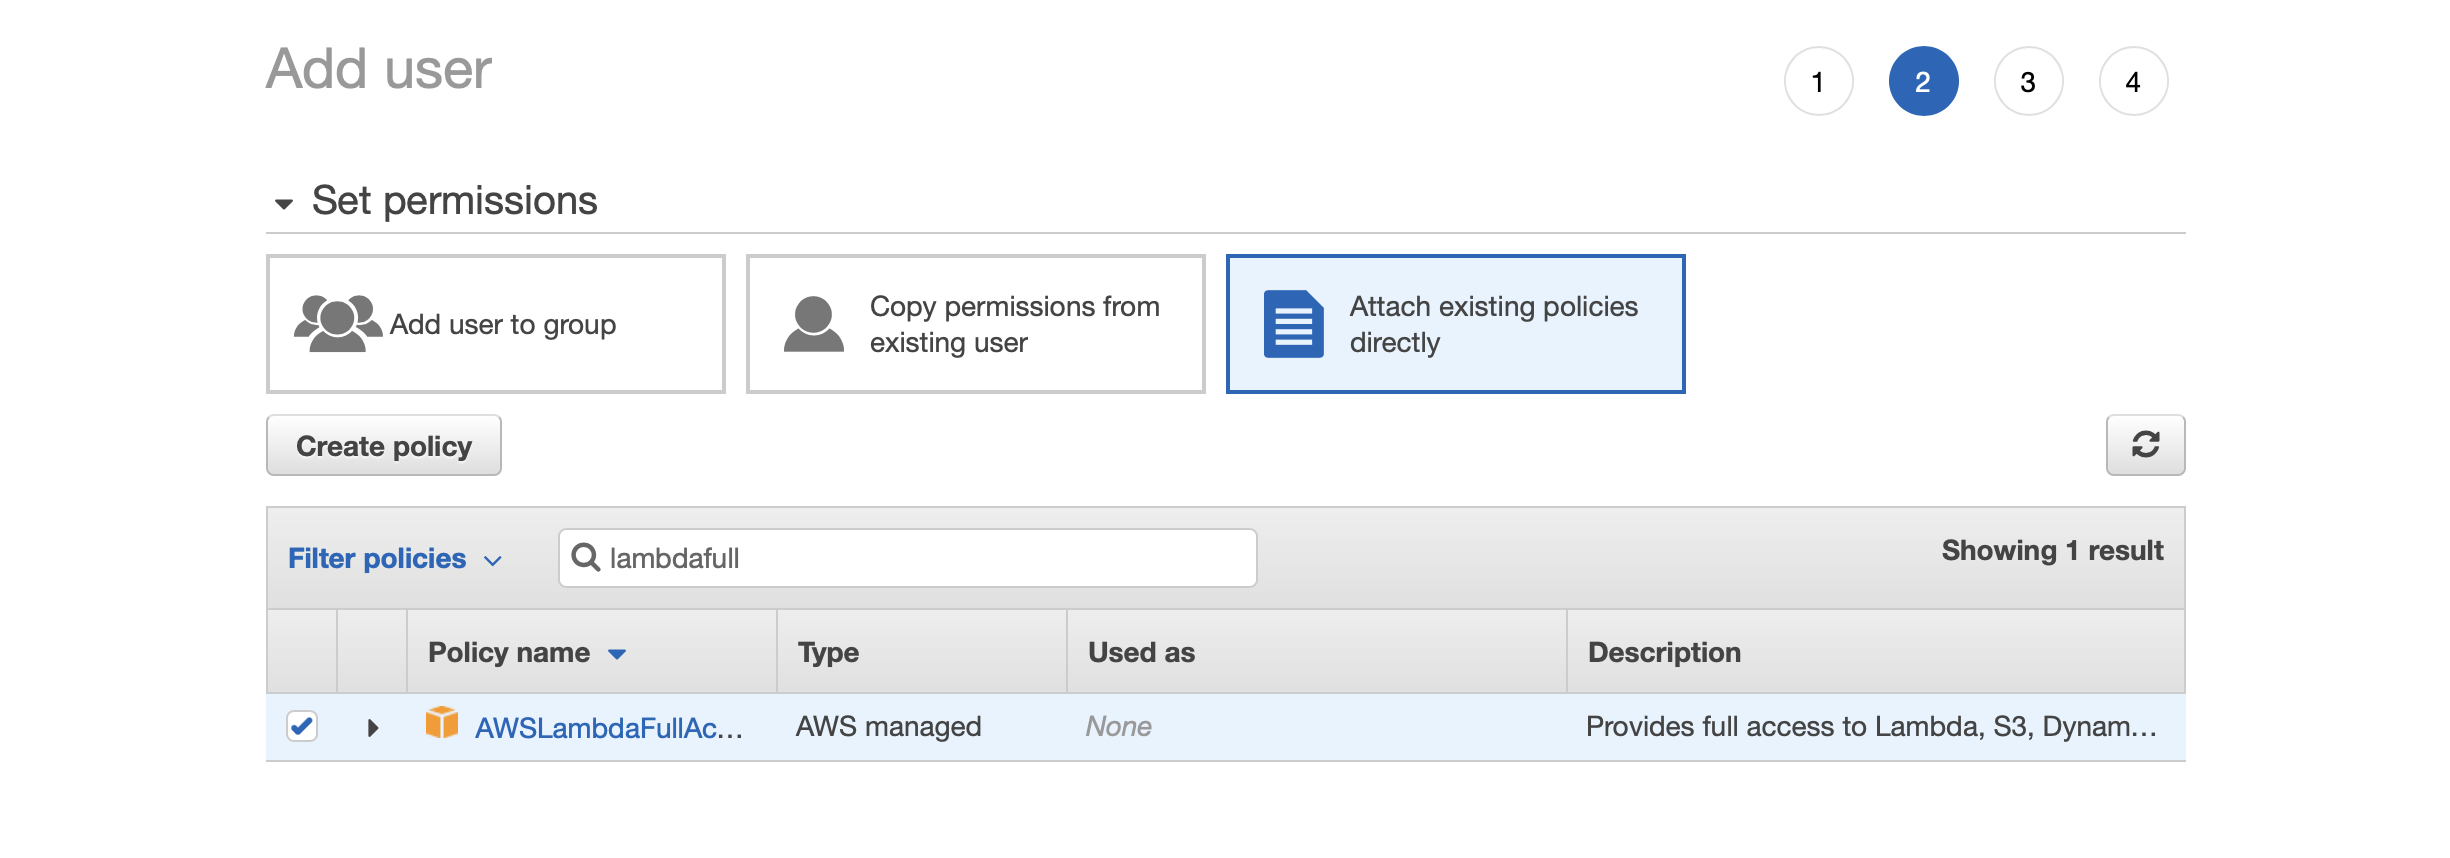
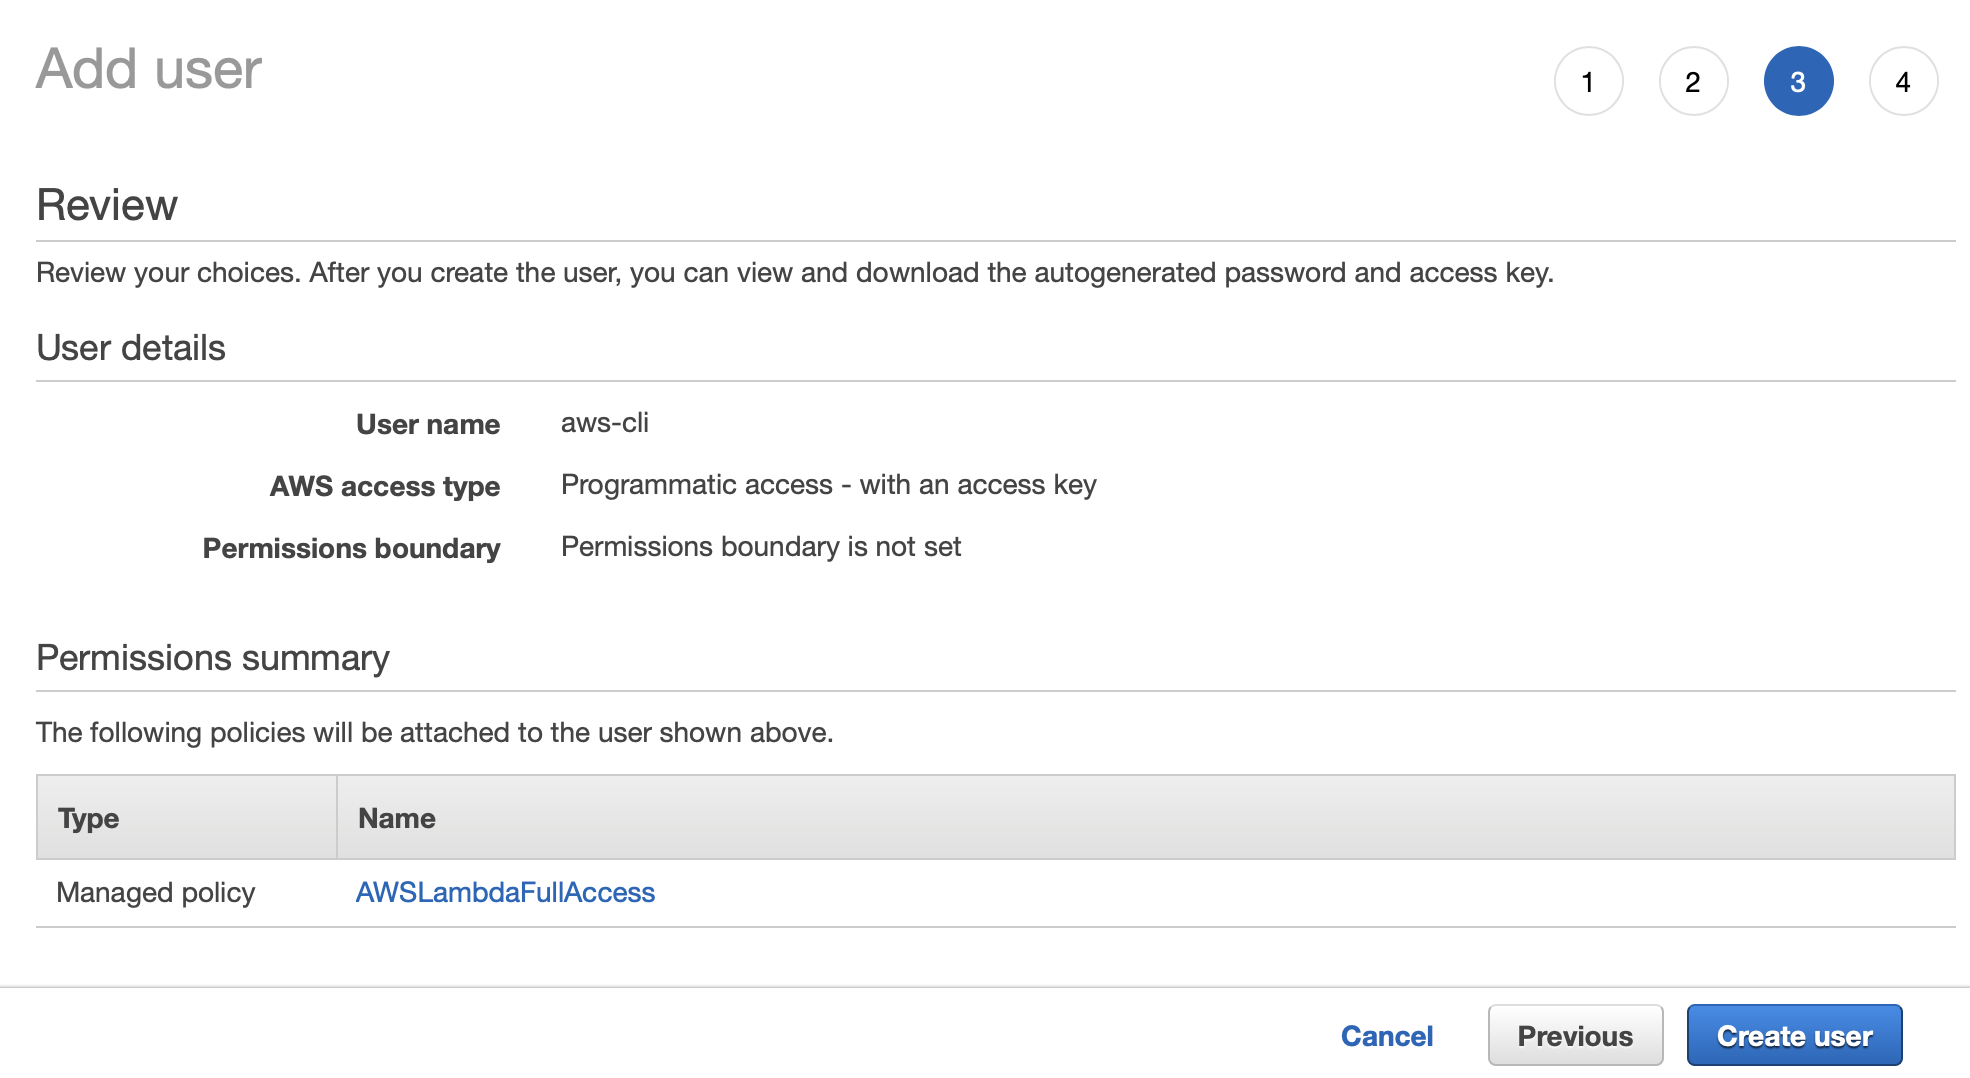
Following, select the “Attach existing policy directly” and then check the box for AWSLambdaFullAccess. Feel free to fine-tune or remove these permissions when you are finished based on your own particular use case.
Lastly, review and click ‘Create user’
At this point you will be shown a page that has a Access key ID and Secret access key for your newly created user.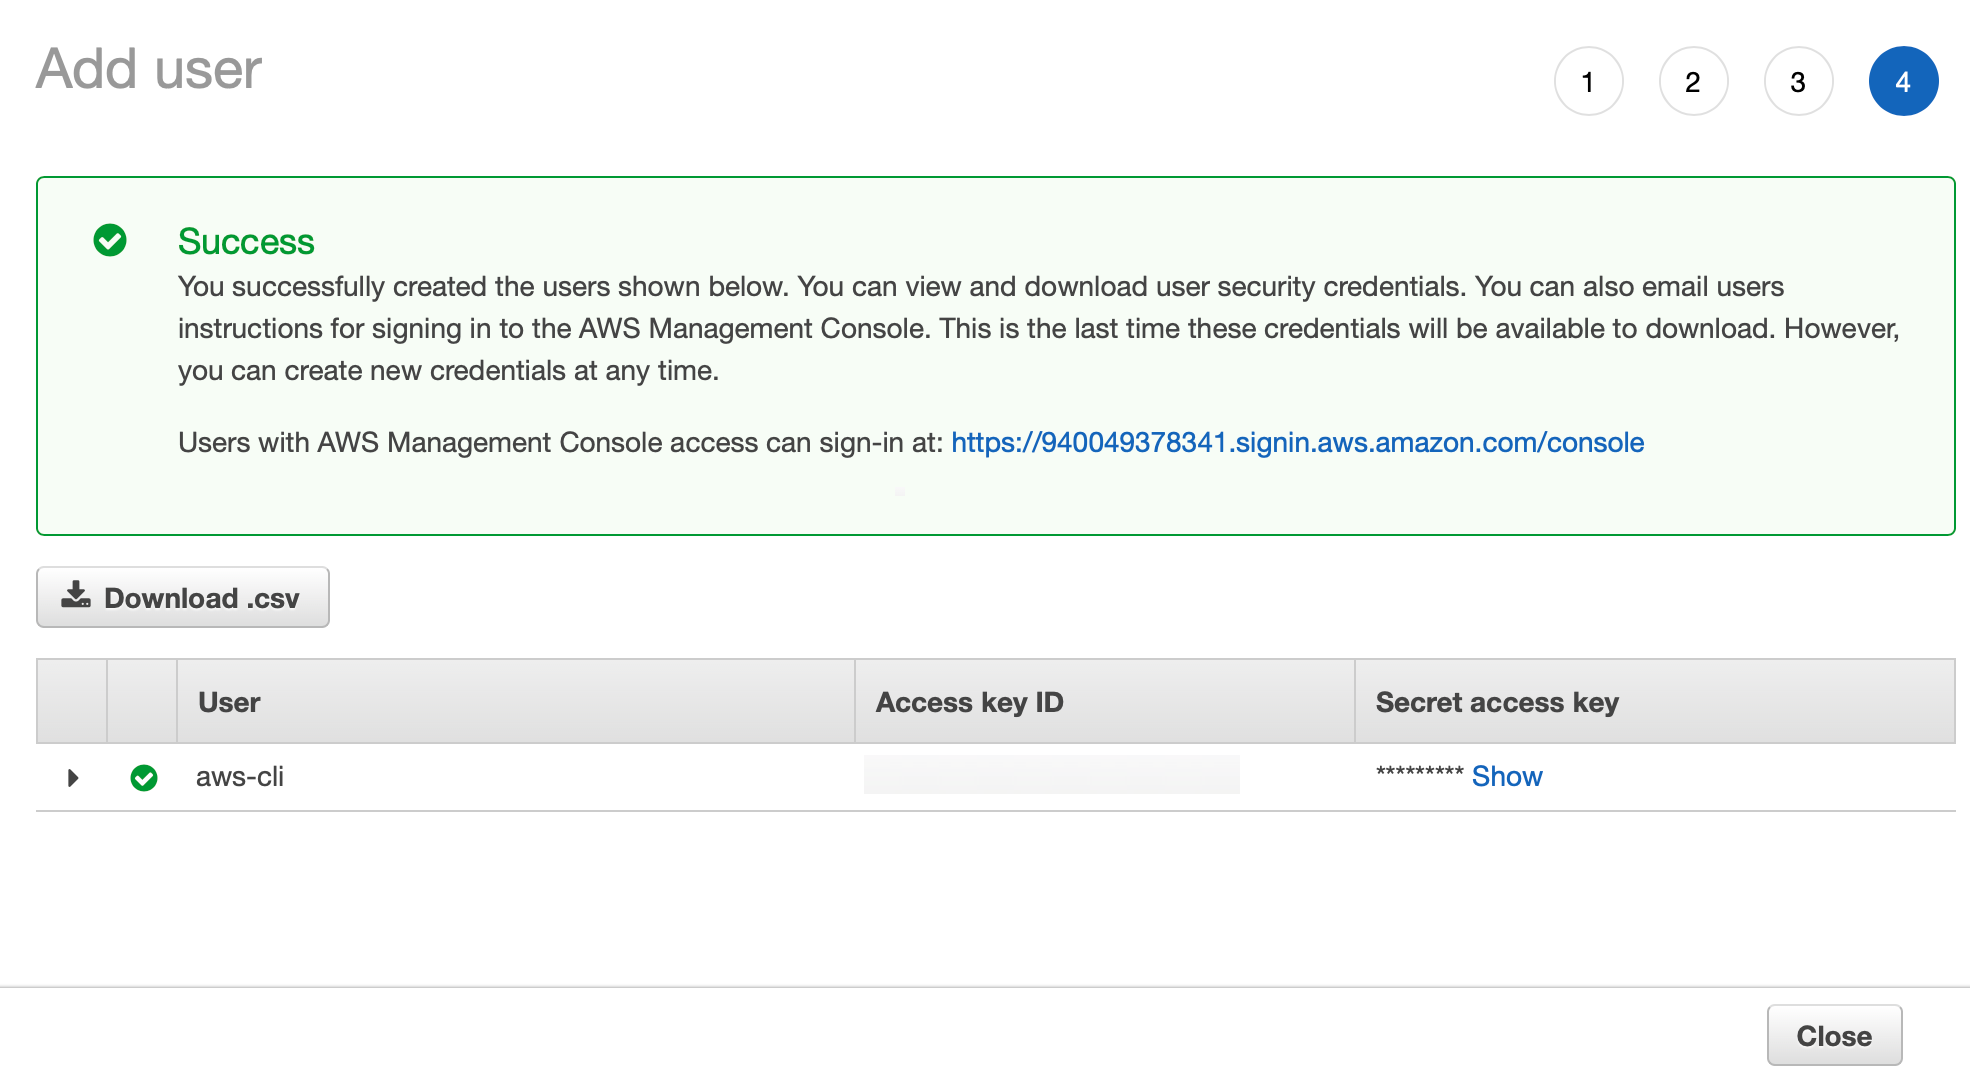
Be sure to copy this information to a safe place because this is the only time that AWS will show the information. Just like the password to sign in to your account, the secret access key is kept private and cannot later be shown to anyone, including ourselves. Additionally, this page will time-out with your current session, so be sure to save this data before switching to another task. Otherwise, you will have to make new access keys for this account before you will be able to use it.
Now that we have the values we will use to sign in to the AWS CLI, return to your terminal and run the command aws configure. You will be presented with a series of prompts that ask for the following information:
- AWS Access Key ID [None]
- AWS Secret Access Key [None]
- Default region name [eu-west-1]
- Default output format [json]
Now that we’ve got the CLI set up, we can use it to upload files to our Lambda function. However, because aws-cli’s update-lambda-function replaces all files associated with our function, we must first download existing lambda function before making any changes or adding any files. To find the location of our Lambda function’s files, we can run aws lambda get-function –function-name Africas-Talking-USSD. Once the request is complete, we should see the follow JSON output.
~/checkouts/africas-talking $aws lambda get-function --function-name Africas-Talking-USSD
{
"Configuration": {
"FunctionName": "Africas-Talking-USSD",
"FunctionArn": "arn:aws:lambda:us-east-1:940049378341:function:Africas-Talking-USSD",
"Runtime": "nodejs8.10",
"Role": "arn:aws:iam::xxxxxxxxx:role/Lambda-Cloudwatch",
"Handler": "index.handler",
"CodeSize": 824471,
"Description": "",
"Timeout": 3,
"MemorySize": 128,
"LastModified": "2018-11-08T19:13:29.473+0000",
"CodeSha256": "pVVrpHxHTk5OFasXP2EKYXmv/yYkVngoJ0/yr8WqIzQ=",
"Version": "$LATEST",
"TracingConfig": {
"Mode": "PassThrough"
},
"RevisionId": "2f3987ad-e51c-4850-9997-c35a49f32b20"
},
"Code": {
"RepositoryType": "S3",
"Location": "https://prod-04-2014-tasks.s3.amazonaws.com/snapshots/xxxxxx/Africas-Talking-USSD-b009eeb4-1978-4052-b1e0-efefbc77b5b7?versionId=2ue7Kp8ZfnIsvIHJMJe5kpAPTvwtY6y9&X-Amz-Security-Token=FQoGZXIvYXdzEGwaDKQXdIKeYz0TibnsgyK3A%2FkP29AqvDW82QLUbqo%2BzX%2F%2FyQWwWH8zPm%2Fe%2FHhOb%2BYJY0HtXMGxiDrlYKw1AMeWM0Ct0yqim%2Bm7MOT0dQfFrjGIcJPJHgpwy4lB3BahkiIYUgETlshI2OIoJiRJm0PWyRF4CWkkC39cA47aoQsB9FDT80AulJ6jB0eMkdJuMKnSNKeqUv3twHWsGZair%2FXvkLEQsUoSqYRlECDNUw4Y0gpP61m8g0Pd8yBy98a33xEupPX2pXJi2IyQNRB2gs8c4Aqgc5hplNy%2Fw0mvSkOqatXsr6iuAQH3g25%2FJvsrQngCGd%2BroMId6IAN4slbKIrcPRXuzAWgPQhl6amsKNhiRTePOhSqf35jjwFxy7y0KCNYF9g43IGK6LasJFIMnTp6zuK92FHuZTy8yWfNtHdKLyhtqQKO3nozUhFwJ19otYQbH4U9%2BIa3CQOjdMW92l9QOTZLts889GOa6%2B4gtMQkFWMfo8GBxqGJBsGMzXUBgm1%2BnAED2fJoswumdyJnXeA91jRLRvSOSYMIIsC6pQ%2FEaY2vSMSHGooqLRE2ghhnCb7kY7G3TwxxIxYRrJsrwMdcqBM6Agru9ygo6v2R3wU%3D&X-Amz-Algorithm=AWS4-HMAC-SHA256&X-Amz-Date=20181108T192107Z&X-Amz-SignedHeaders=host&X-Amz-Expires=600&X-Amz-Credential=ASIA25DCYHY37V7SIXEK%2F20181108%2Fus-east-1%2Fs3%2Faws4_request&X-Amz-Signature=82b9b67548b37cdc2e2453cf914876e37e1c3787c1713d584113cab2fa25fc0b4f83"
}
}
The value we are interested in is the ‘Location’ value inside of the ‘code’ object at the end of this ouput. We can copy this value into our browser to download a zipped archive containing all of the files that are currently part of our function. If these files have not been unzipped automatically, double click on the downloaded archive to extract the lambda directory.
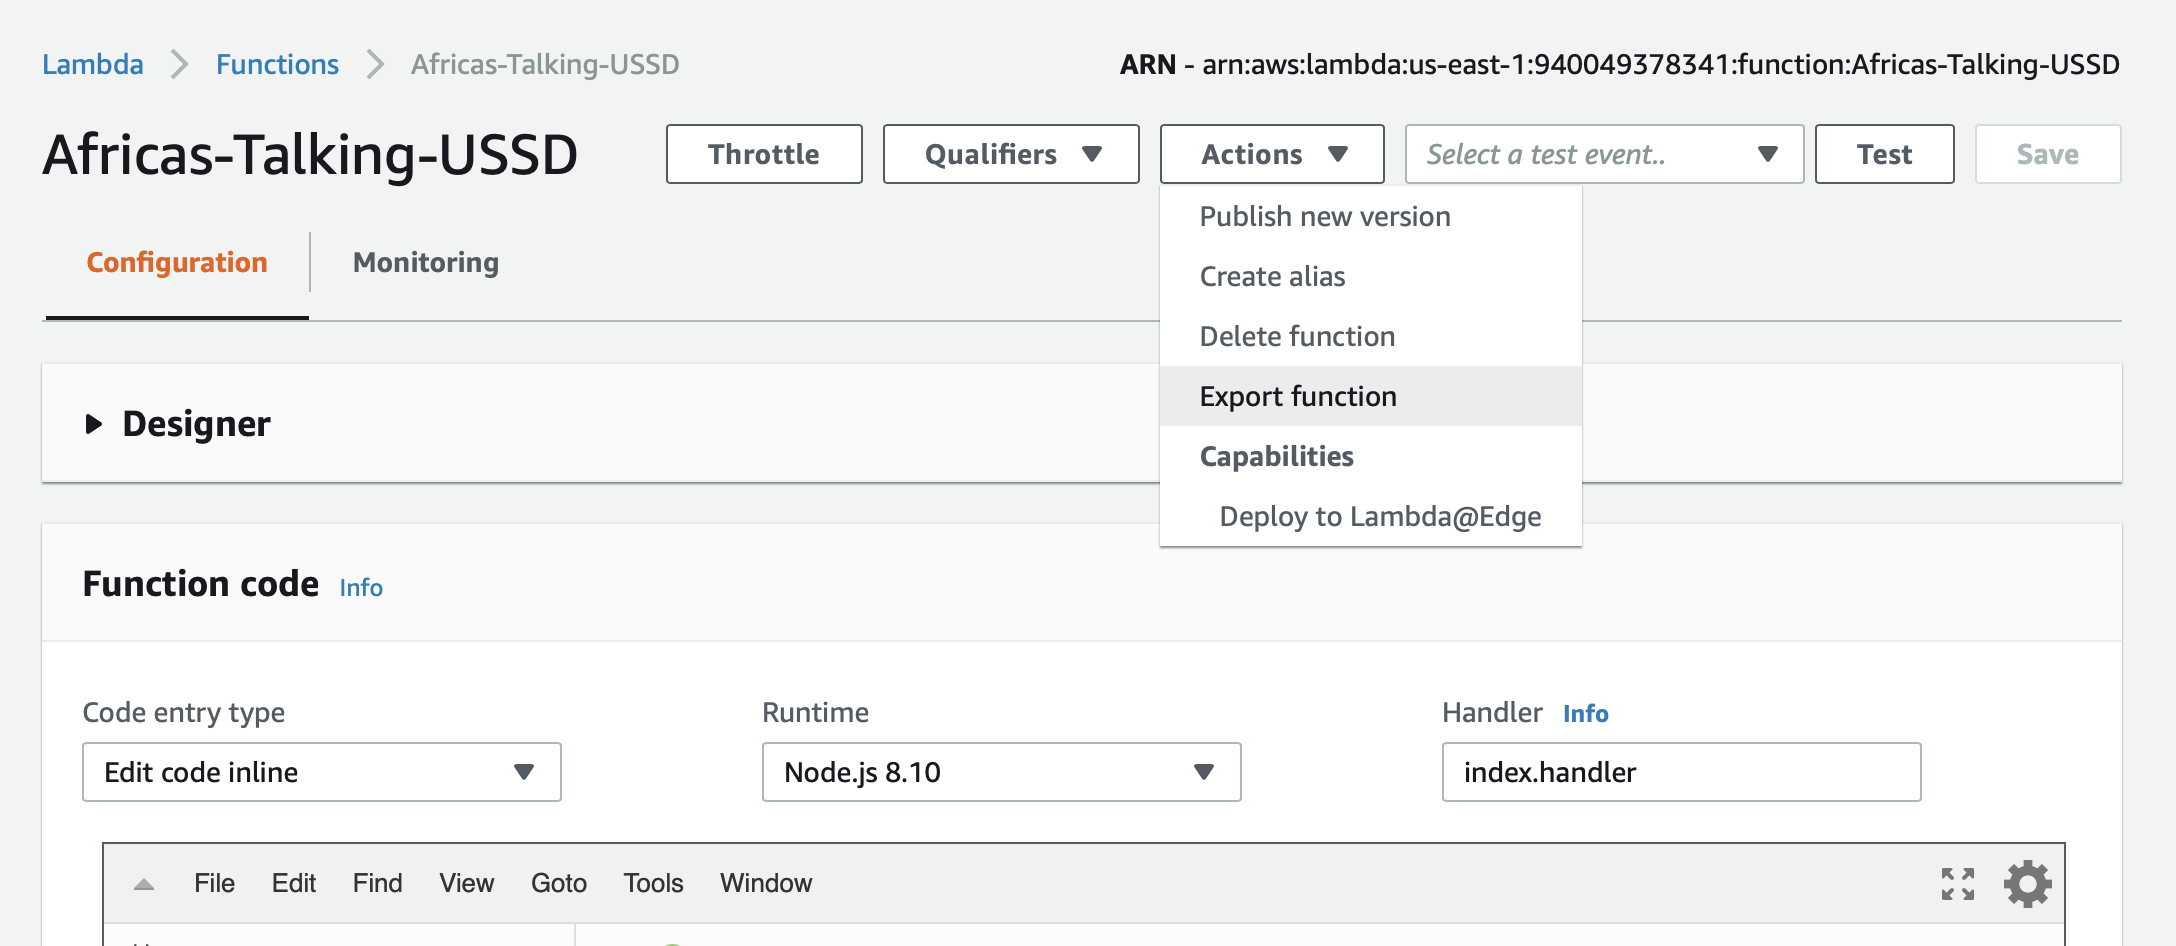
Alternatively, if you still have the web editor for the Lambda function still pulled up, you can also download the code by clicking the ‘Actions’ and then ‘Export’ buttons.
The next step is to download the modules we would like to add to our function. To do this, we must first return to our Terminal and navigate to our newly extracted Lambda directory using the cd (change directory) command followed by the location of the directory. If you don’t know the location of the directory, on a mac you can drag the unzipped directory from finder to the terminal window for it to be typed automatically. Next, we will use the command npm install ussd-menu-builder –save to fetch our library and all of its dependencies. When the modules are finished downloading, you should have a new directory called node_modules that contains the packages we need for our Lambda function.
To get these packages to lambda, we first need to zip them into a single file. This can be done using the command zip -X -r modules.zip *. Next we must send this file to our lambda function using the command: aws lambda update-function-code –function-name Africas-Talking-USSD –zip-file fileb://modules.zip. Once complete, you will see a JSON output confirming the upload was successful.
~/checkouts/africas-talking $ aws lambda update-function-code –function-name Africas-Talking-USSD –zip-file fileb://modules.zip
{
“FunctionName”: “Africas-Talking-USSD”,
“FunctionArn”: “arn:aws:lambda:us-east-1:940049378341:function:Africas-Talking-USSD”,
“Runtime”: “nodejs8.10”,
“Role”: “arn:aws:iam::xxxxxxxxxxxx:role/Lambda-Cloudwatch”,
“Handler”: “index.handler”,
“CodeSize”: 824471,
“Description”: “”,
“Timeout”: 3,
“MemorySize”: 128,
“LastModified”: “2018-11-08T19:13:29.473+0000”,
“CodeSha256”: “pVVrpHxHTk5OFasXP2EKYXmv/yYkVngoJ0/yr8WqIzQ=”,
“Version”: “$LATEST”,
“TracingConfig”: {
“Mode”: “PassThrough”
},
“RevisionId”: “2f3987ad-e51c-4850-9997-c35a49f32b20”
}
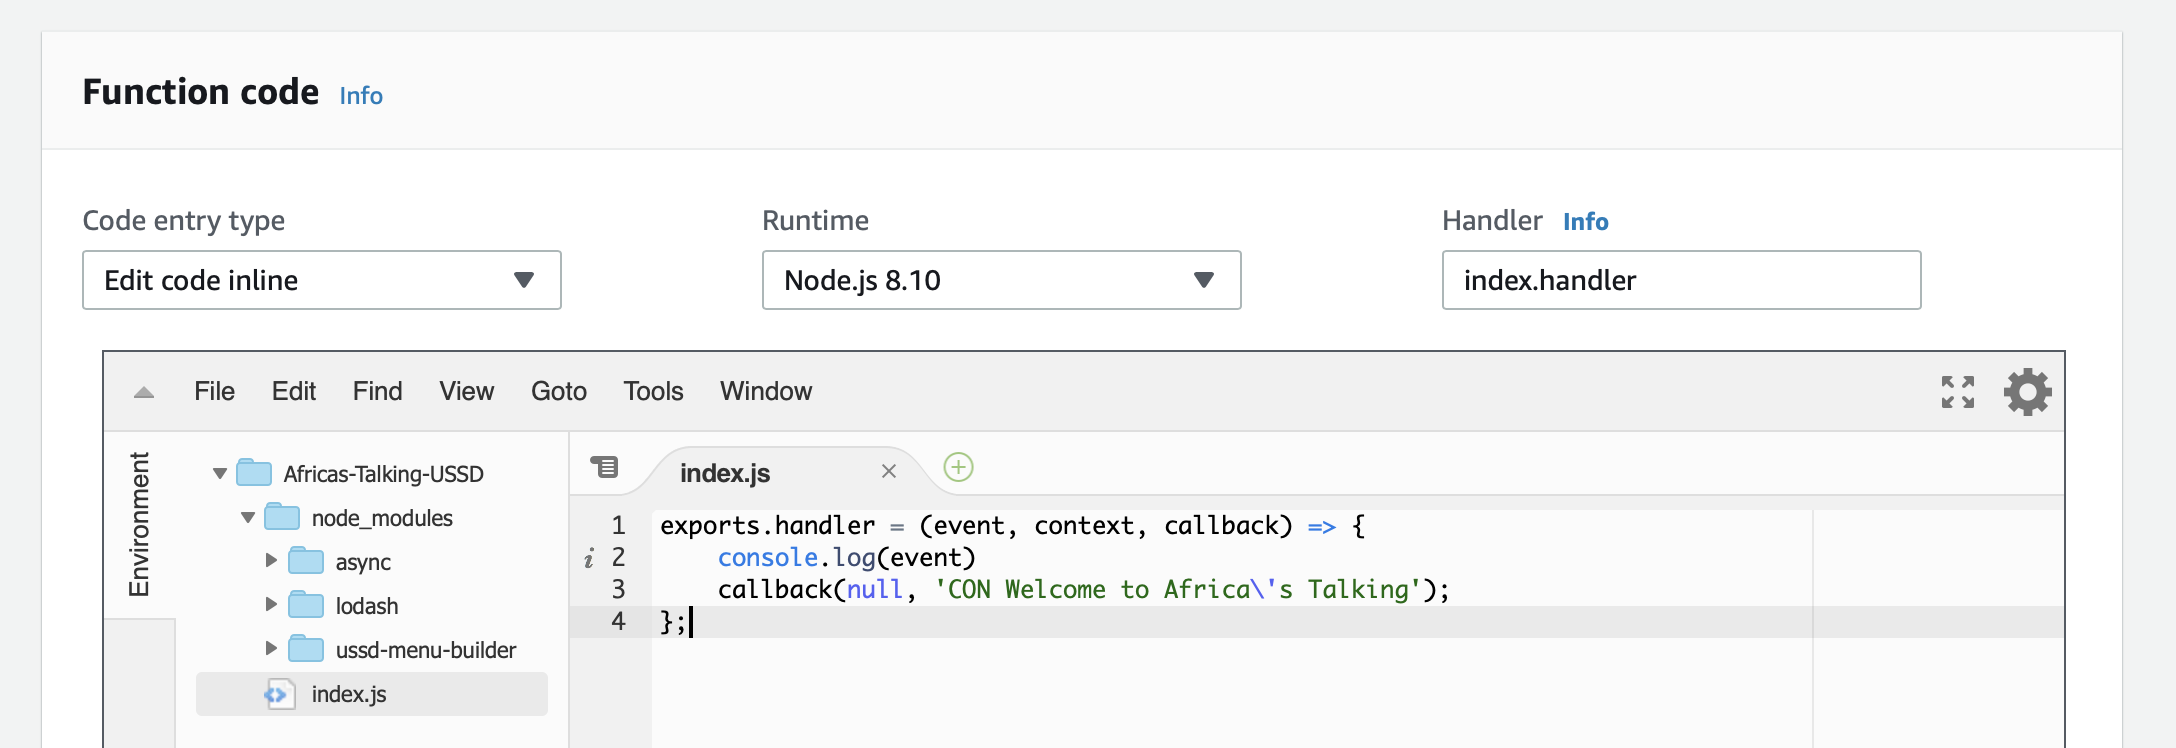
Now, when we refresh the web editor for our lambda function, we can see that our Lambda function now has the contents from the zip file we just uploaded.
With the USSD menu library now available, we can update our Lambda function to support multi-level menus.
const UssdMenu = require(‘ussd-menu-builder’);
// https://www.npmjs.com/package/ussd-menu-builder
exports.handler = (event, context, callback) => {
const menu = new UssdMenu();
let args = {
phoneNumber: event.phoneNumber,
sessionId: event.sessionId,
serviceCode: event.serviceCode,
text: event.text
};
// Define menu states
let startState = {
run: () => {
// use menu.con() to send response without terminating session
menu.con(‘Welcome to Africa\’s Talking’ +
‘\n————–‘ +
‘\n1. First Menu Option’ +
‘\n0. Exit’);
},
// next object links to next state based on user input
next: {
‘1’: ‘first-option’,
‘0’: ‘exit’
}
}
menu.startState(startState);
menu.state(‘start’, startState);
menu.state(‘first-option’, {
run: () => {
// use menu.con() to send response without terminating session
menu.con(‘This is the first option’ +
‘\n————–‘ +
‘\n9. Back’ +
‘\n0. Exit’);
},
// next object links to next state based on user input
next: {
‘9’: ‘start’,
‘0’: ‘exit’
}
});
menu.state(‘exit’, {
run: () => {
menu.end(‘Thank you. Goodbye.’);
}
});
menu.run(args, resMsg => {
console.log(resMsg)
callback(null, resMsg);
});
};
A couple of quick things to note about the updated Lambda code:
- Each page is now created using menu.state().
- We have also denoted a starting state using menu.startState().
- We can use menu.con() and menu.end() instead of prefixing each response with CON or END. You will notice this prefix has been removed from the updated source code.
Now when we launch our app, we see can see our new options.
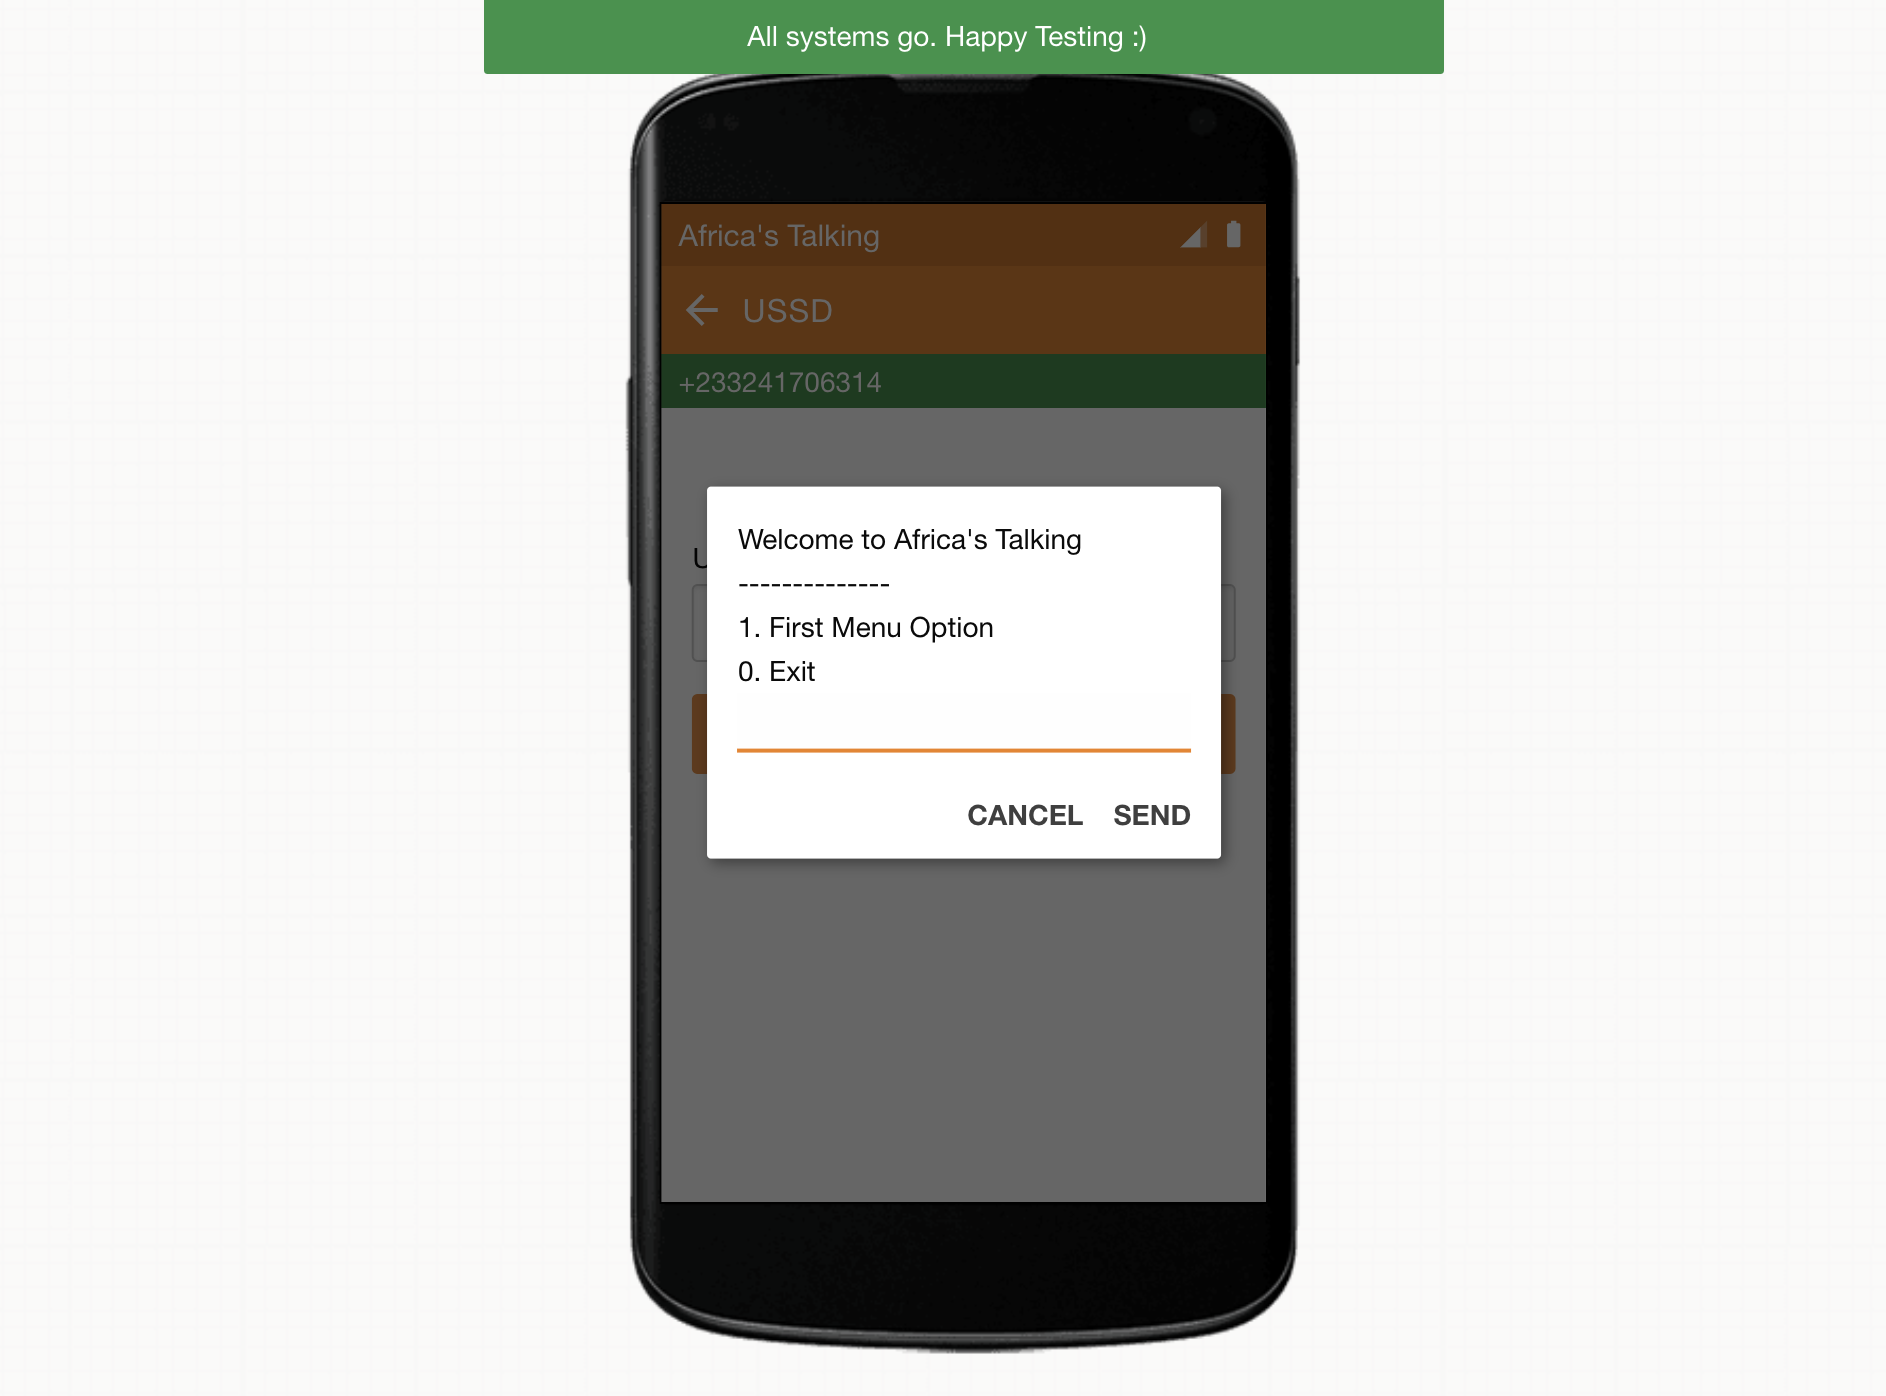
We can also now drill-down to our new sub-menu.

And when we are done, we can terminate the session with a closing message.

And with that, we now have a multi-level USSD app! At this point, the app can be easily customized to include any business logic and features requested from our user.
Things to keep in mind
While USSD is an amazing tool, it does have some limitations. There are also some best practices to keep in mind to make sure the menus can easily be used by everyone.
The biggest limitation to note is that USSD is only supported on phones that use GSM. For anyone wanting a solution for CDMA or another non-GSM network, you will have to do your own research (hint:CBOSSussdLike).
Additionally, USSD menus work best with number-only input. While the USSD protocol does accept both alpha and numeric characters, most users accessing the menus will be using a feature phone. By asking for alpha character input, this limits the number of users capable of using the app to those can type using T9. This omits large swathes of the population you would target with a USSD app. The younger and more tech-savvy populations that would know T9 are also the most prone to having smartphones where the preference would be to use a mobile app instead of USSD menu.
One option for collecting information that alpha-characters is to use a different communication channel. For most businesses, it is common for one-on-one communication either in person or by phone at some point when on-boarding or servicing a user. This would be an appropriate time to collect any information that cannot be easily provided via the USSD app.
Another best practice is to put the most commonly used options first. On smaller devices, less text can be displayed at once making later options harder to access. For some users who are not savvy with their devices, they may never see these later options if they exist ‘below the fold’. It could be devastating to an apps adoption if this were the location of critical functionality.
Lastly, try to keep your menus as short as possible without sacrificing clarity. Verbose menus will also not fit well on the smaller screens of most features phones. It is worth A/B testing which options resonate with your users to make sure the exact level of detail necessary is provided.
Conclusion
Building a scalable USSD application using a serverless architecture can be done quickly an easily with the right tools and setup. I am hoping that with this guide, you have to confidence necessary to build your own USSD app.
Please be sure to check out the Part 2 of this guide to learn how to connect your USSD app to a database that will help recognize your users and store their information.
I would love to hear of any projects this guide has helped build so please share in the comments below. Thanks for reading!