Serverless USSD with Africa’s Talking — Part 2
If you haven’t read part one, this article is a continuation and will build off the implementation we created in the previous guide. I strongly recommend starting there as it will provide all of the context necessary to understand and follow along with this article.
In the previous article, we reviewed how to set up the basic infrastructure for receiving and handling USSD requests from Africa’s Talking. In this next article, we are going to connect our USSD application to a database so that it recognize a user based on their phone number and can customize the options presented to them.
Goals:
- Allow a user to sign-up for our service
- Recognize and welcome a user by name once they have signed up
High Level:
- Set up a database to store our information
- Connect to our database in our lambda function
- Update our service configurations to be reliable on first time connections
- Use our database connection to create personalized menus
From the previous article, we should have an architecture in place that looks like this:

In this article, we will be introducing a new service called Amazon Aurora on RDS to store our data. We will also swap out our API Gateway implementation for the more reliable Elastic Load Balancer running on an EC2 Instance.

Getting Started:
To continue taking advantage of all of the serverless architecture benefits, we will be using Amazon Aurora Serverless as our data storage solution. Additionally, besides pausing entirely when it is not needed, Amazon Aurora will automatically scale up and down to meet the needs of our application so our user’s don’t experience timeouts or delays during spikes of activity.
Pricing
Before diving into our Aurora implementation, let’s quickly discuss how much this new service is going to cost. According to Amazon Aurora’s documentation, ‘you only pay for database storage and the database capacity and I/O your database consumes while it is active’. The total bill is calculated by adding up the total compute capacity (measured in ACUs) over the period of time the database is active (or unpaused), plus the volume of data we have stored during the time the database is provisioned, plus the number of I/O requests to our database.
While the prices do vary from region to region, if we use US East (N. Virginia) as an example, we can see that ACUs are charged at $0.06 per ACU per hour, storage is billed at $0.10 per GiB per month, and I/O Requests cost $0.20 per million.
To contextualize these numbers, I have provided Amazon’s pricing example from their site verbatim:
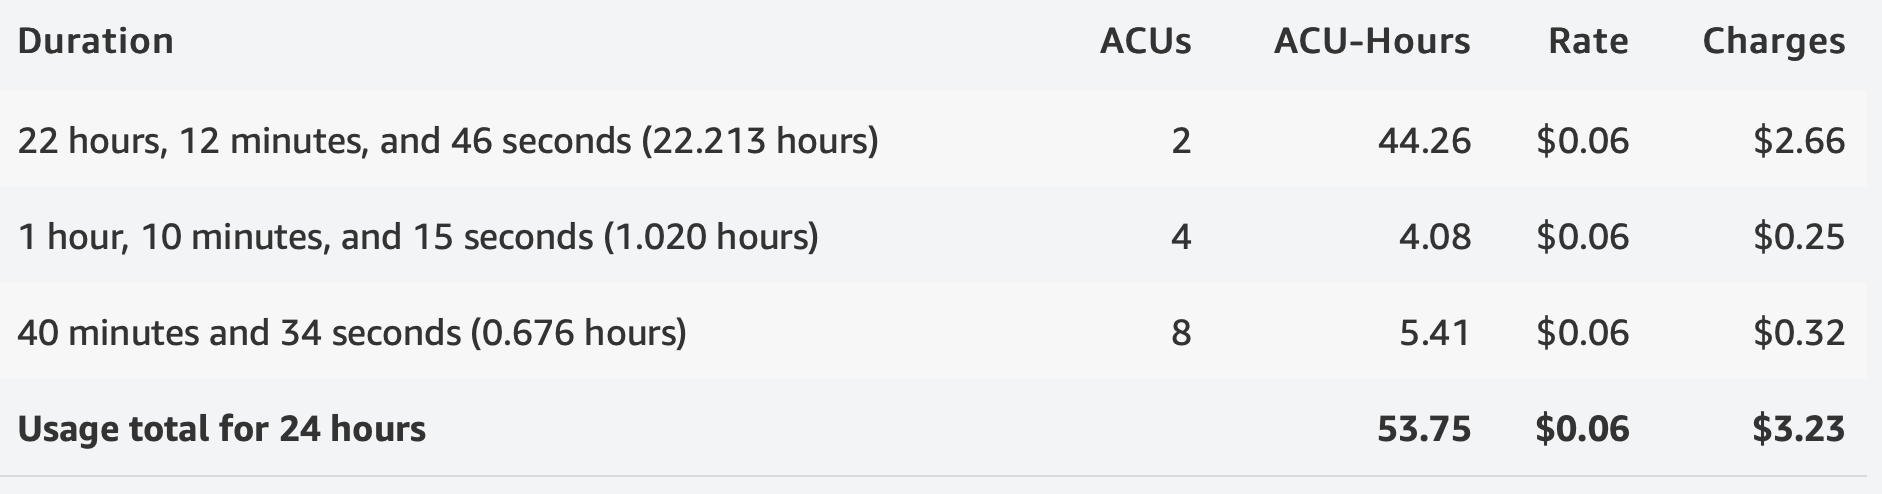
You are running a news website using an Aurora Serverless database with a storage size of 80 GB. While there is light load on the site most of the time, there are peaks of activity in the morning or as news stories break. For example, there is a period of 1 hour, 10 minutes and 15 seconds in the morning where the database scales to 4 ACUs and a period of 40 minutes and 34 seconds after a breaking news story where the database is scaled up to 8 ACUs. The remainder of the day (22 hours, 12 minutes, and 46 seconds), the database runs at a capacity of 2 ACUs. In total, you also used 90,000 I/O operations during the day.
You will be billed for the following usage during this period:
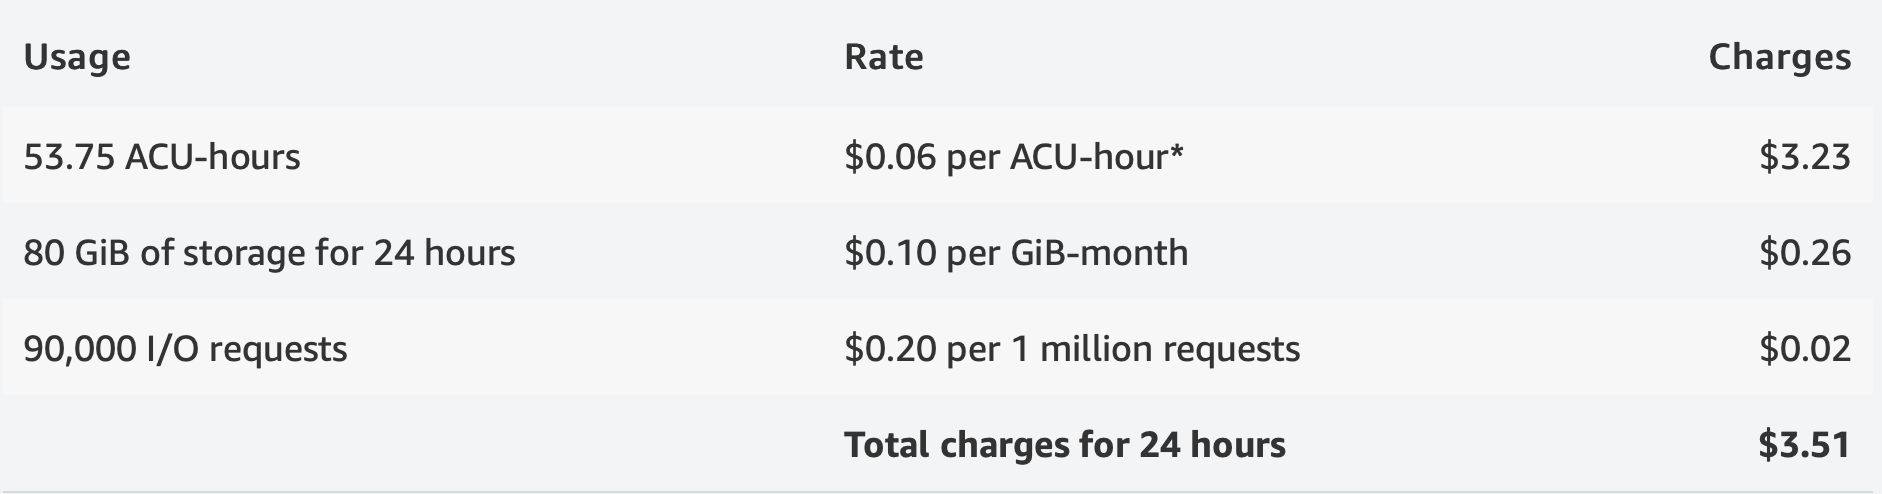
You are also billed for database storage and I/O during this 24 hour period.
Your total charges for the period are:
Implementation
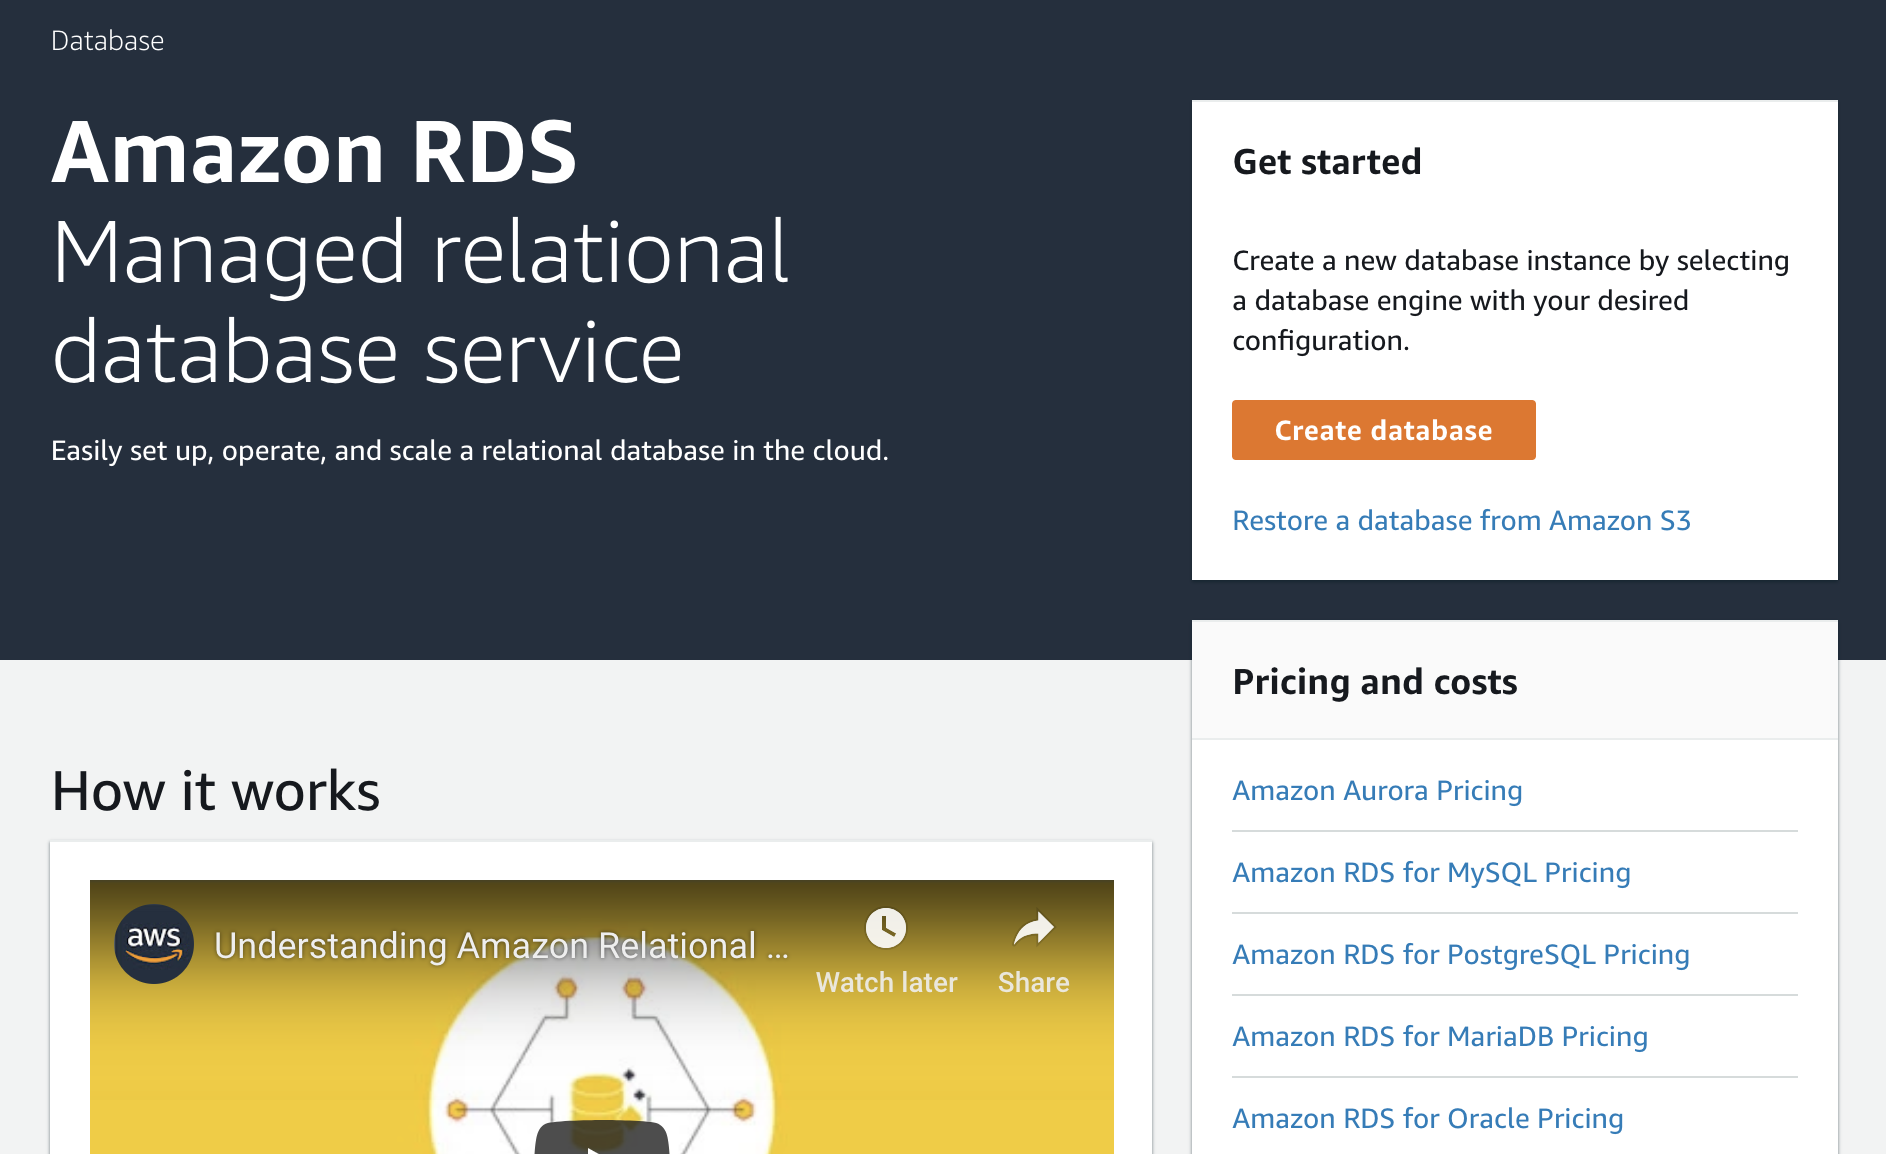
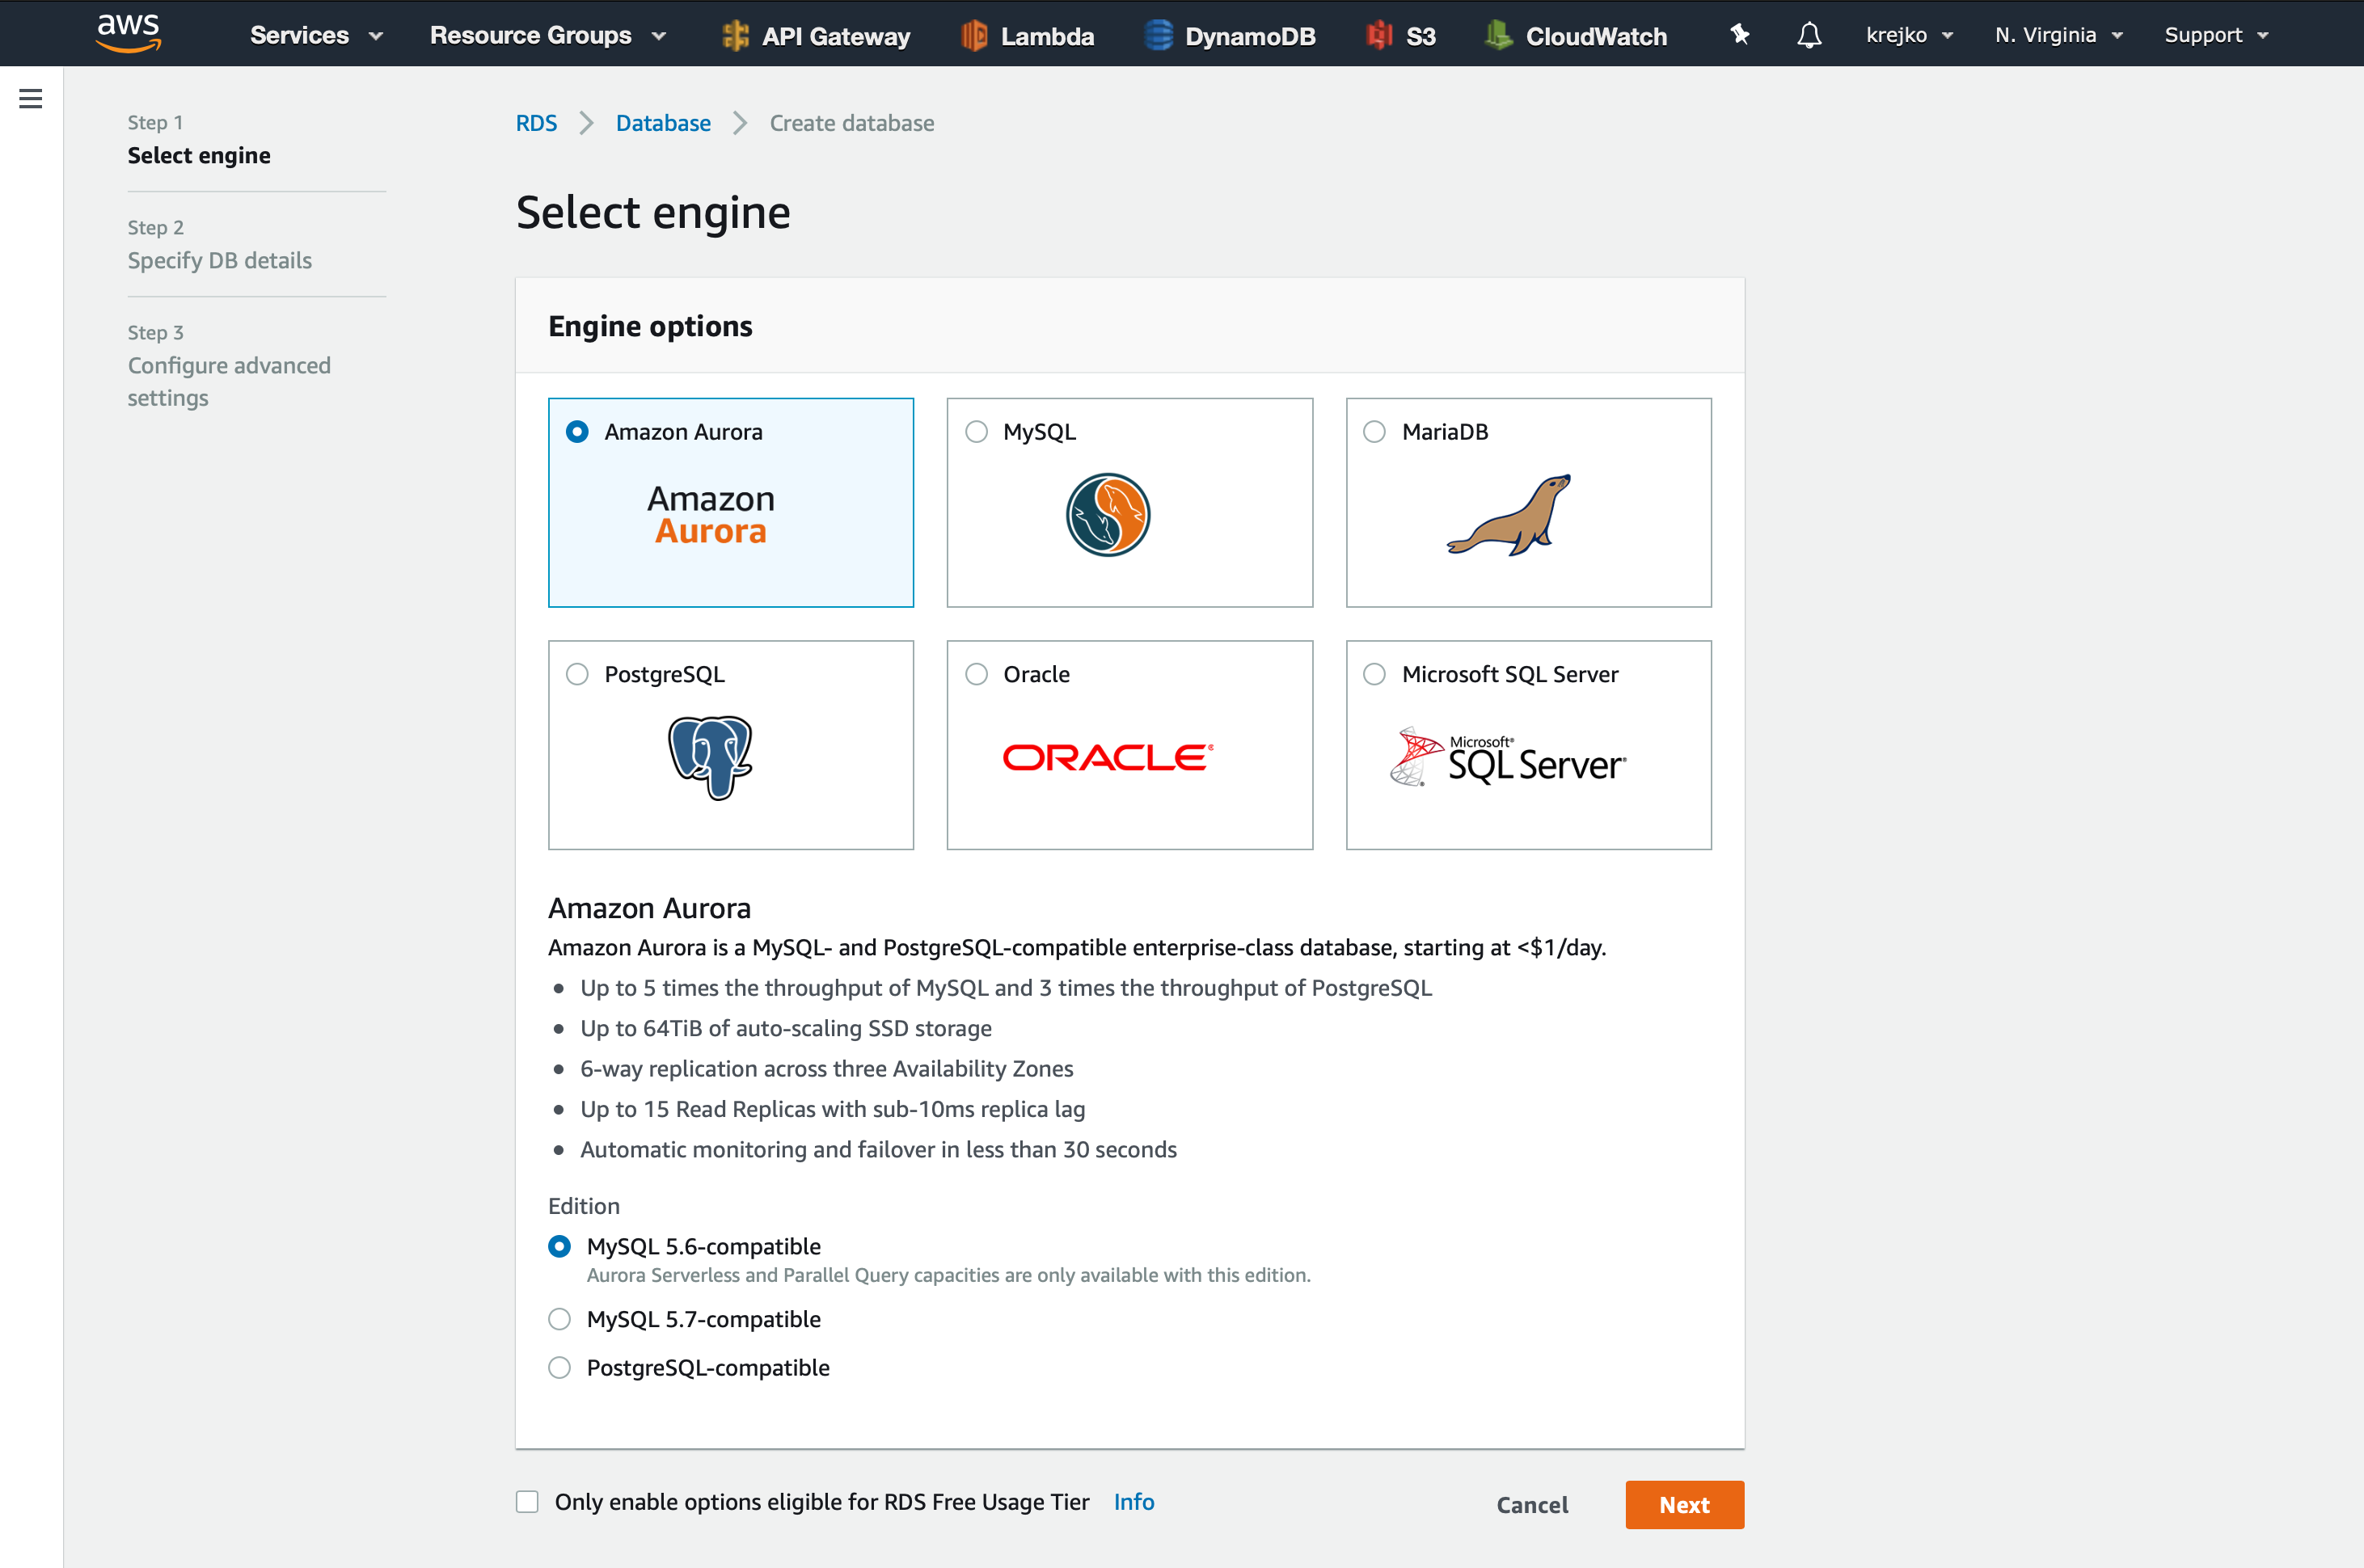
First step is to create an Aurora Servelss DB Cluster. Sign back into Amazon Web Services if you haven’t already, and this time we want to head on over to ‘RDS’ which stands for Relational Database Service. If this is your first RDS database, you can select the ‘Create database’ button on the getting started page.
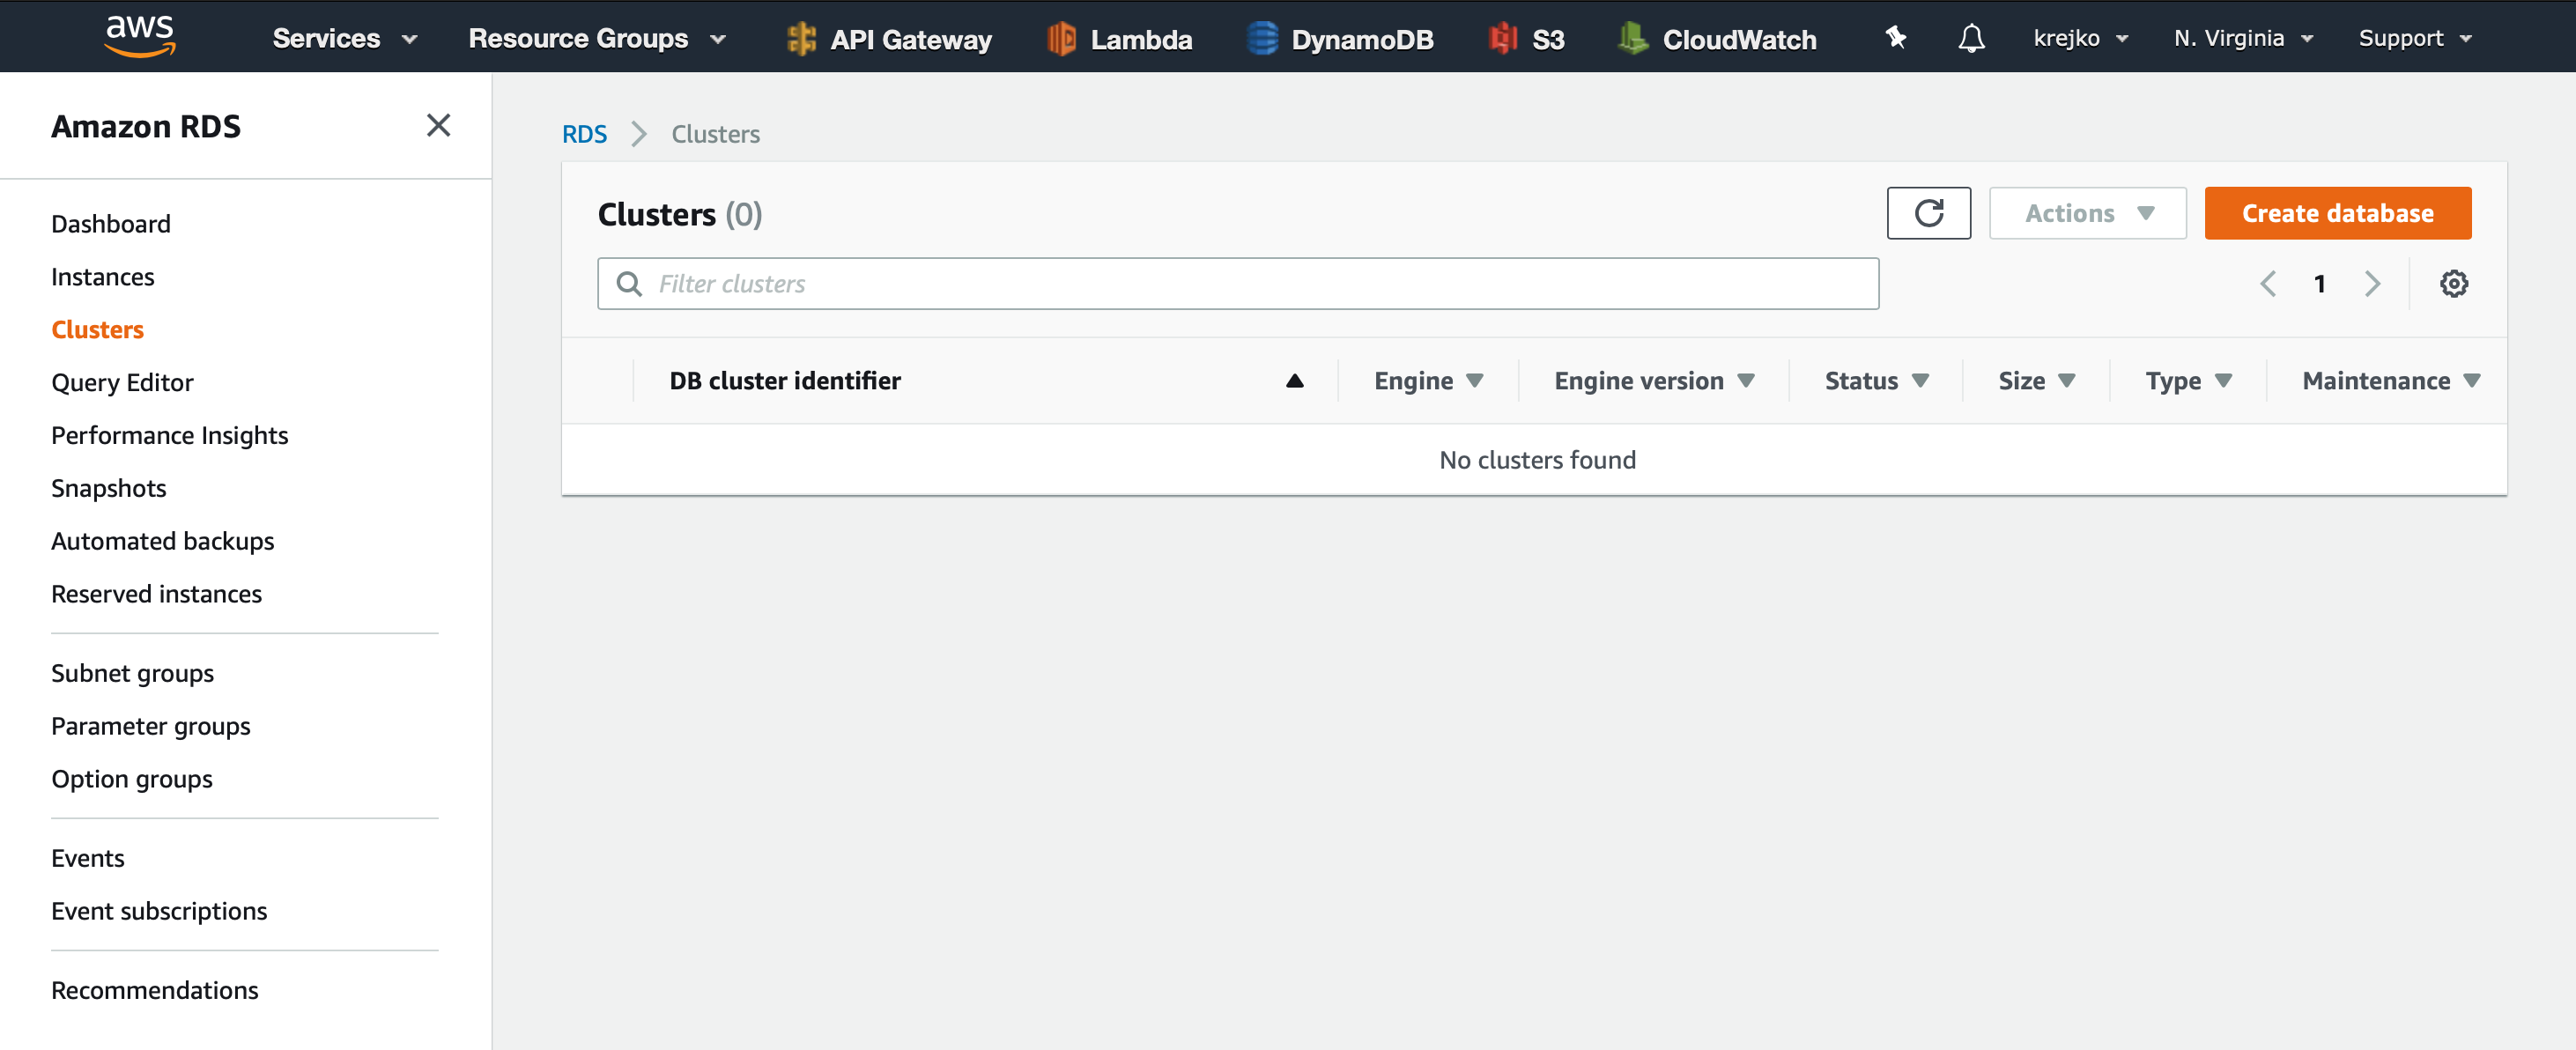
Otherwise, navigate to the ‘Clusters’ section on the left hand side and click “Create Database
To make sure we get a serverless database we will want to make sure Amazon Aurora and MySQL 5.6-compatible options are selected as our engine.
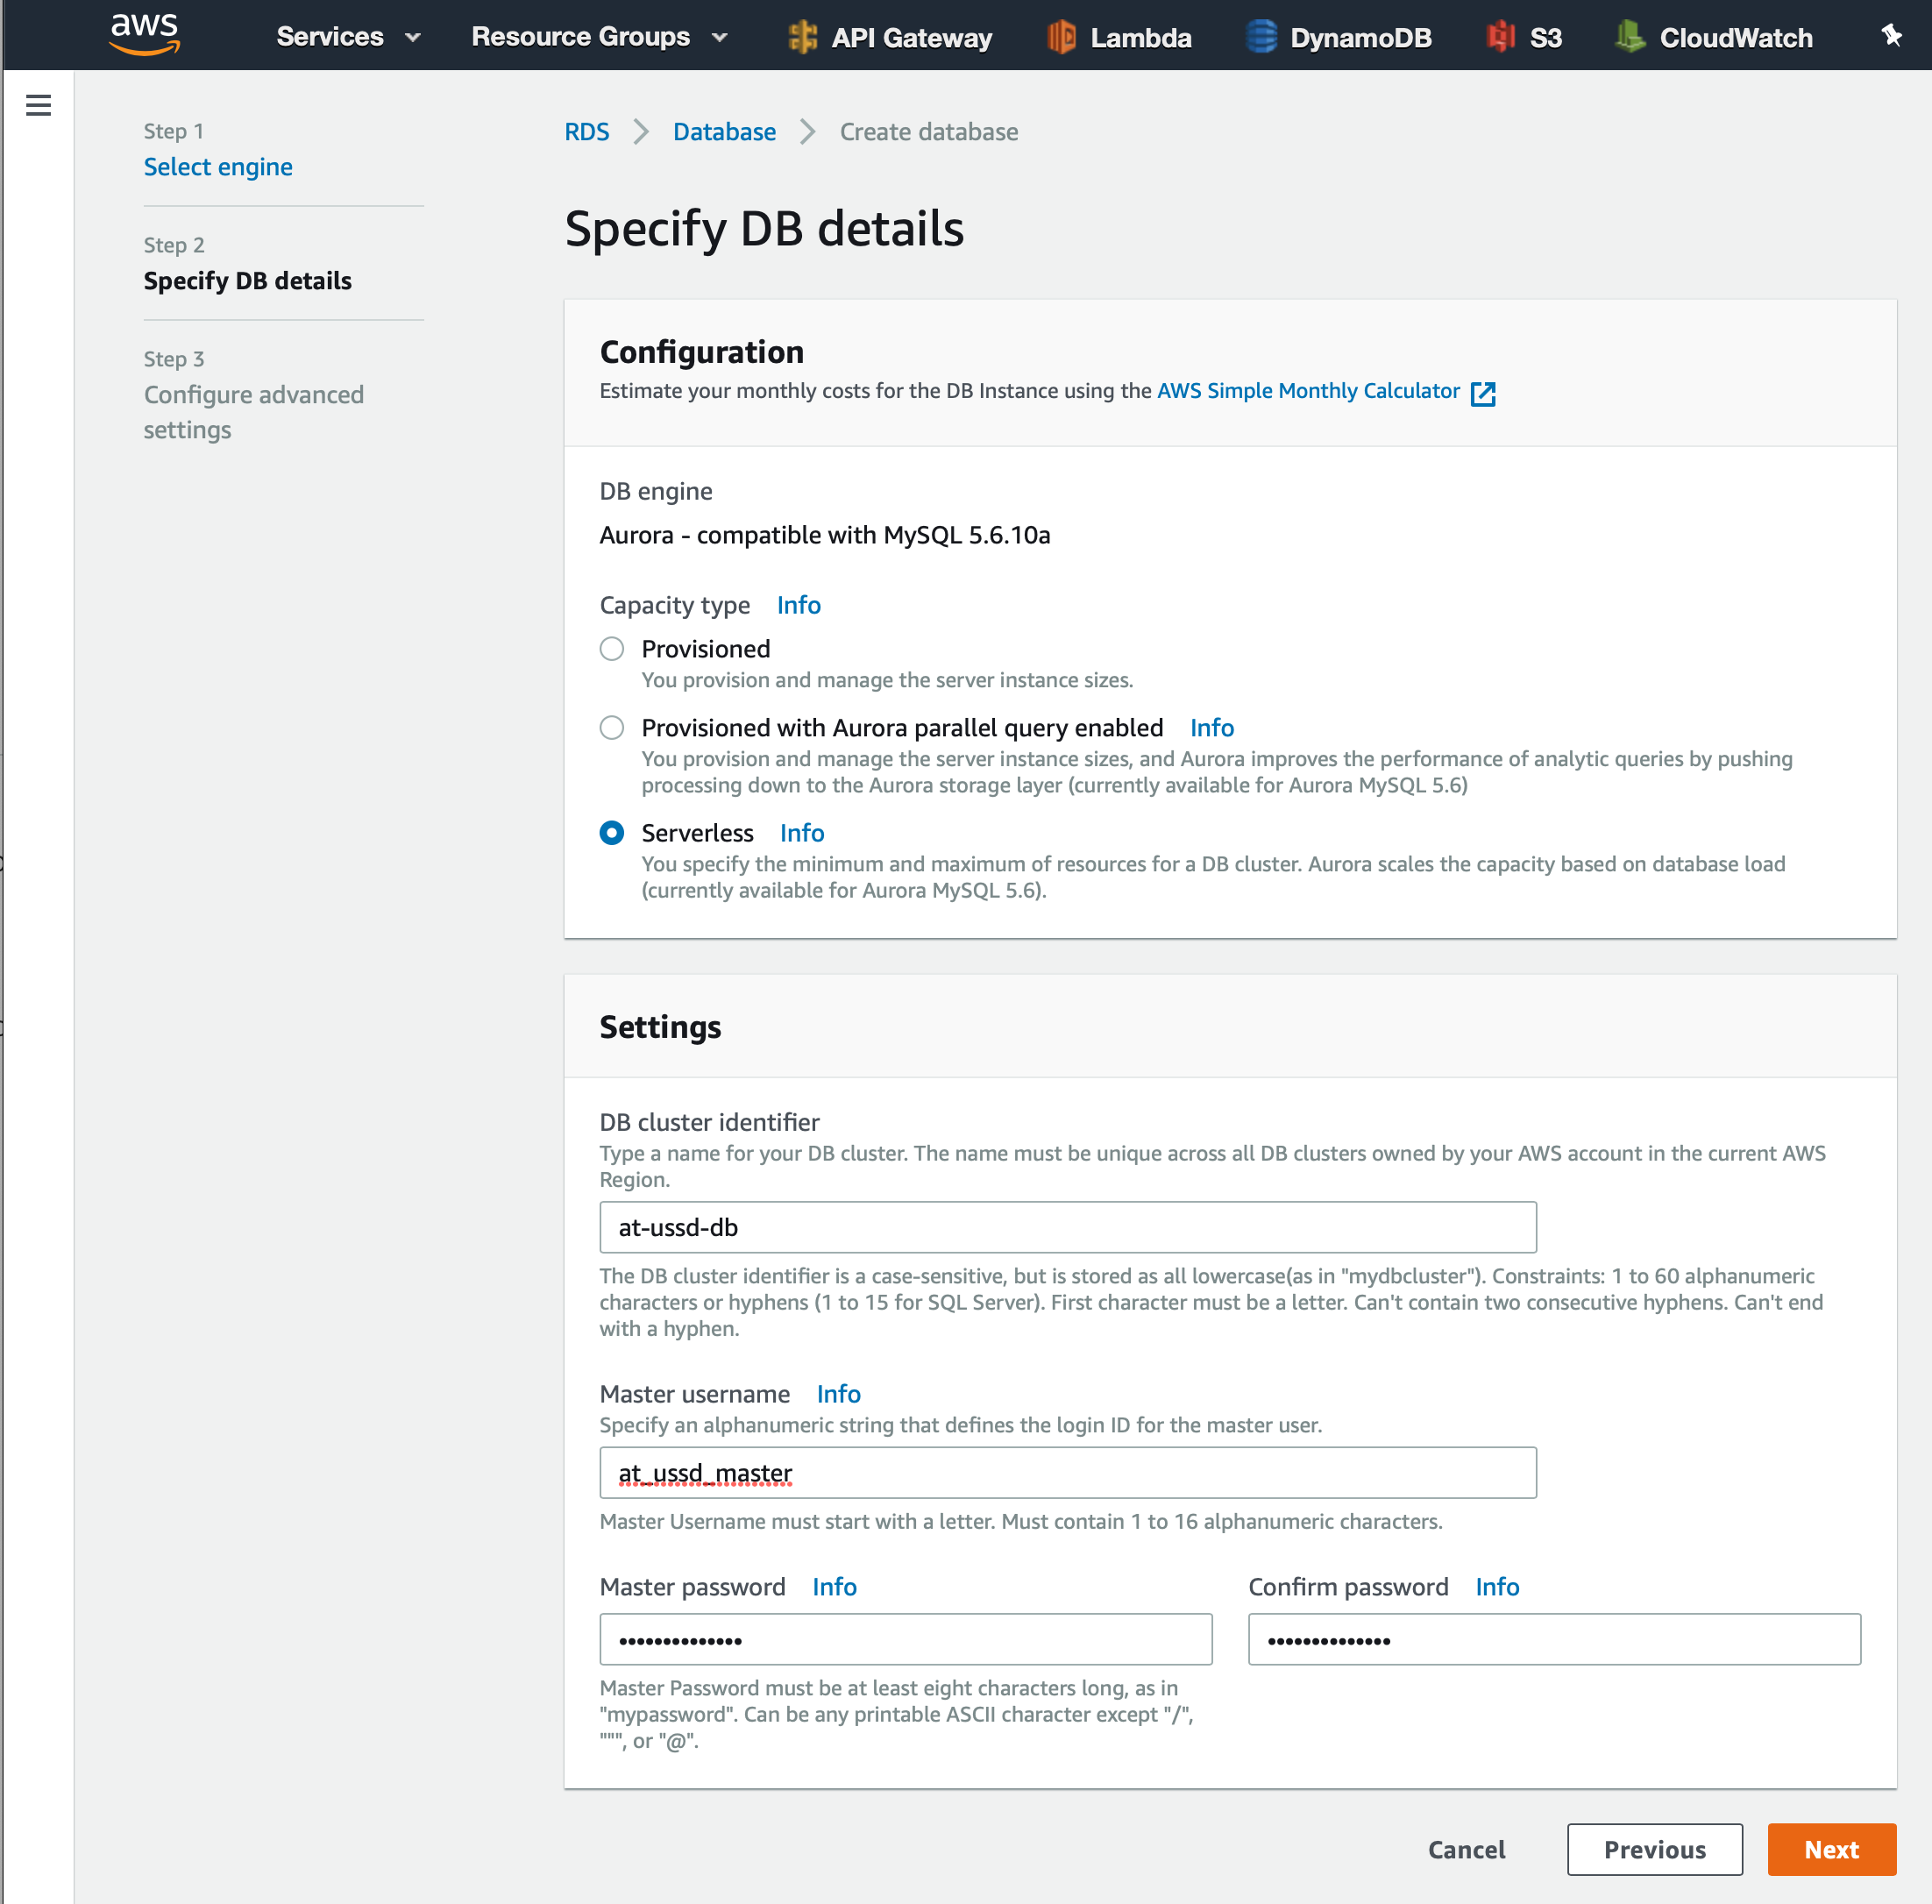
From here, we will select the ‘Serverless option before providing a cluster-identifier, username, and password. For this project we will use the name, ‘at-ussd-db’, and a username of ‘at_ussd_master’. For the password, we will each select a value that can easily be remembered.
On this next page, we will be able to set the utilization limits for when our database is running. To keep things simple, we will leave most of these settings as they are. One thing I do want to point out before continuing is the timeout limit for when our database will pause and be set to inactive. Select the ‘> Additional scaling configuration’ button to reveal this setting.
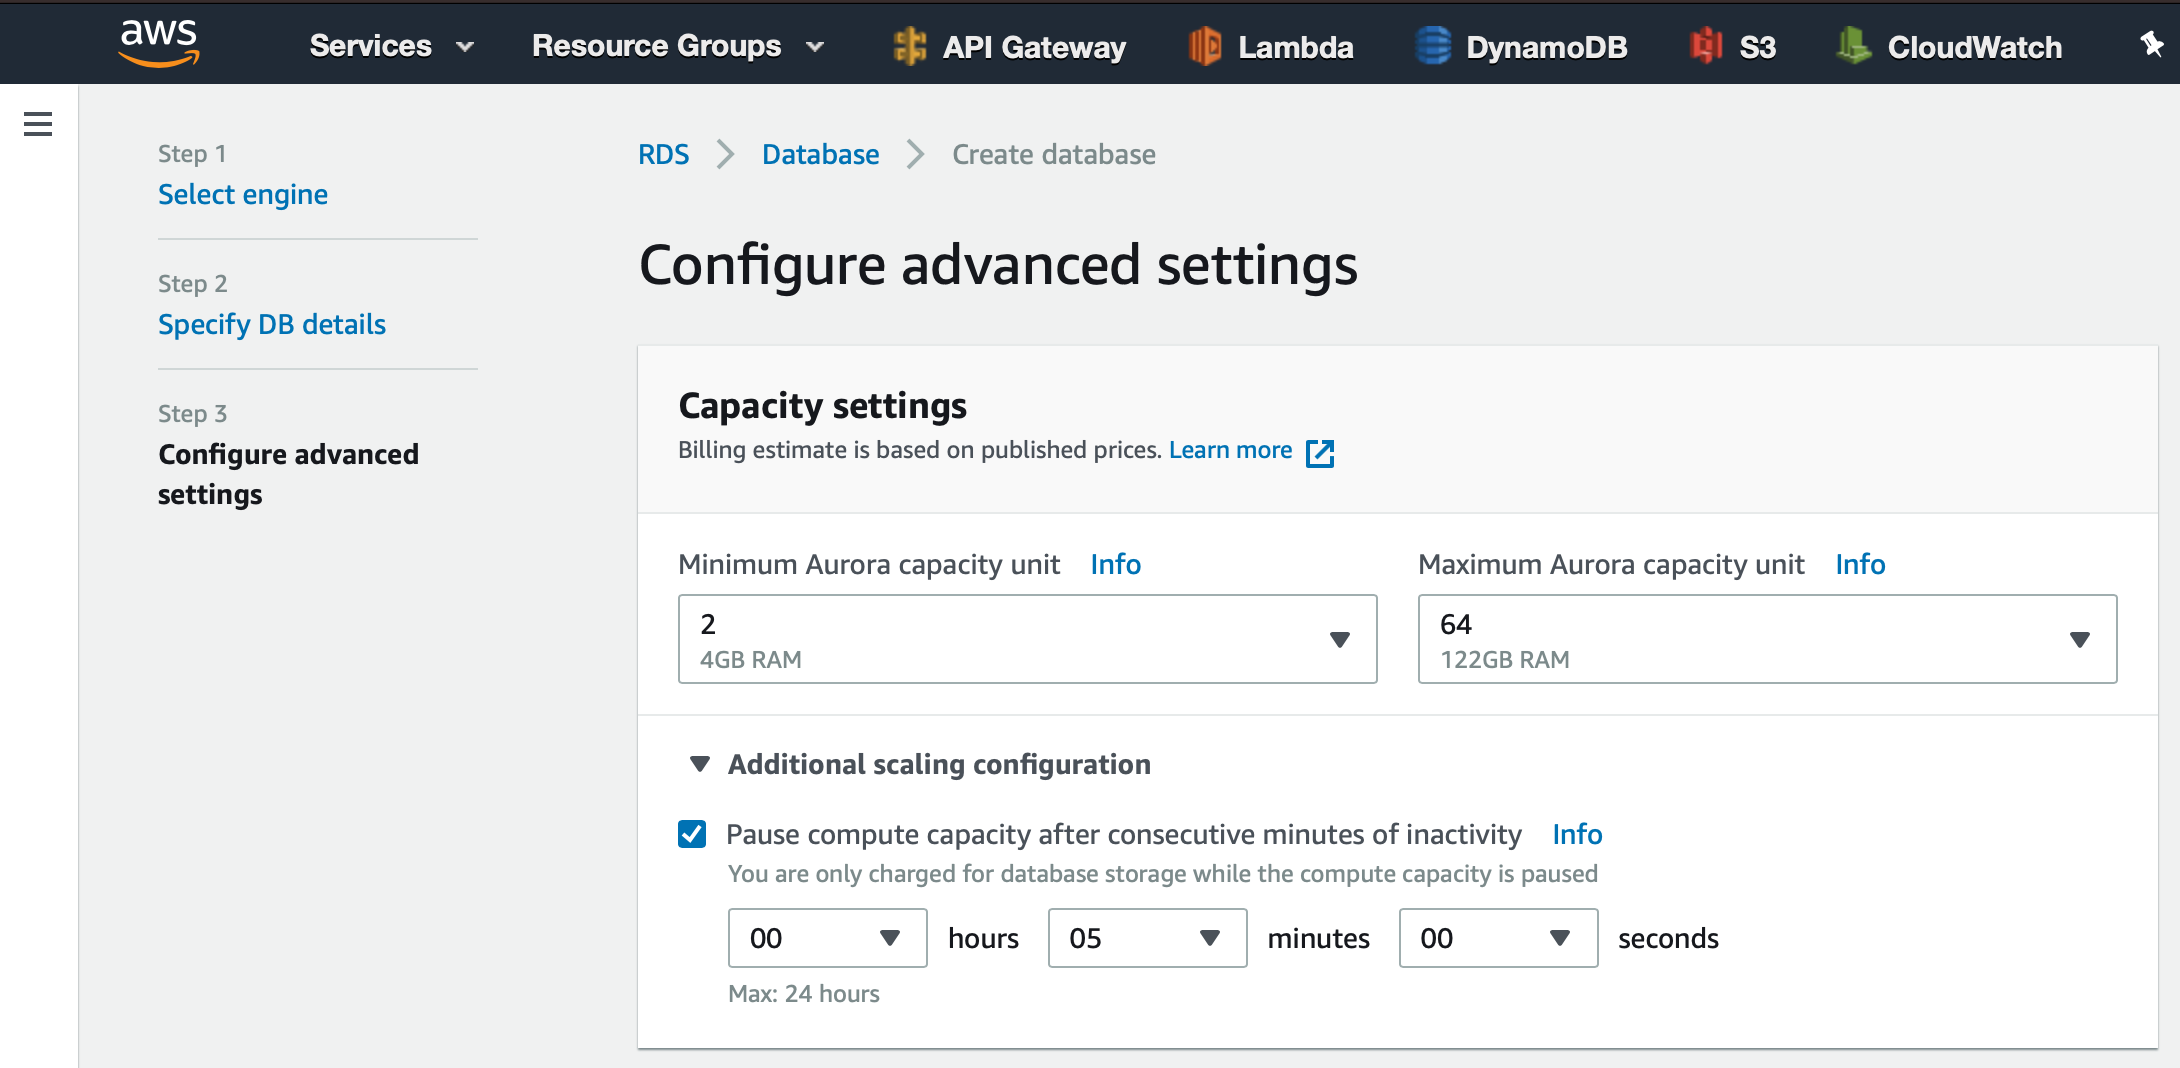
You will notice that the default value is 5 minutes. This value is important to note because this combined with the number of capacity units will affect how you get billed when using serverless storage. The more capacity units and longer the database remains active, or the more data while the database is paused, the higher the bill will be. However, setting these values too low may mean that your application is unable to facilitate the traffic that comes to your application or will have frequent delays while the database is unpausing.
The one setting we will need to update before creating our database is the subnet group. In the ‘Network & Security’ pane, select the ‘Create new VPC’ (virtual private cloud) option and double check that the ‘Create new DB Subnet Group’ is automatically selected.
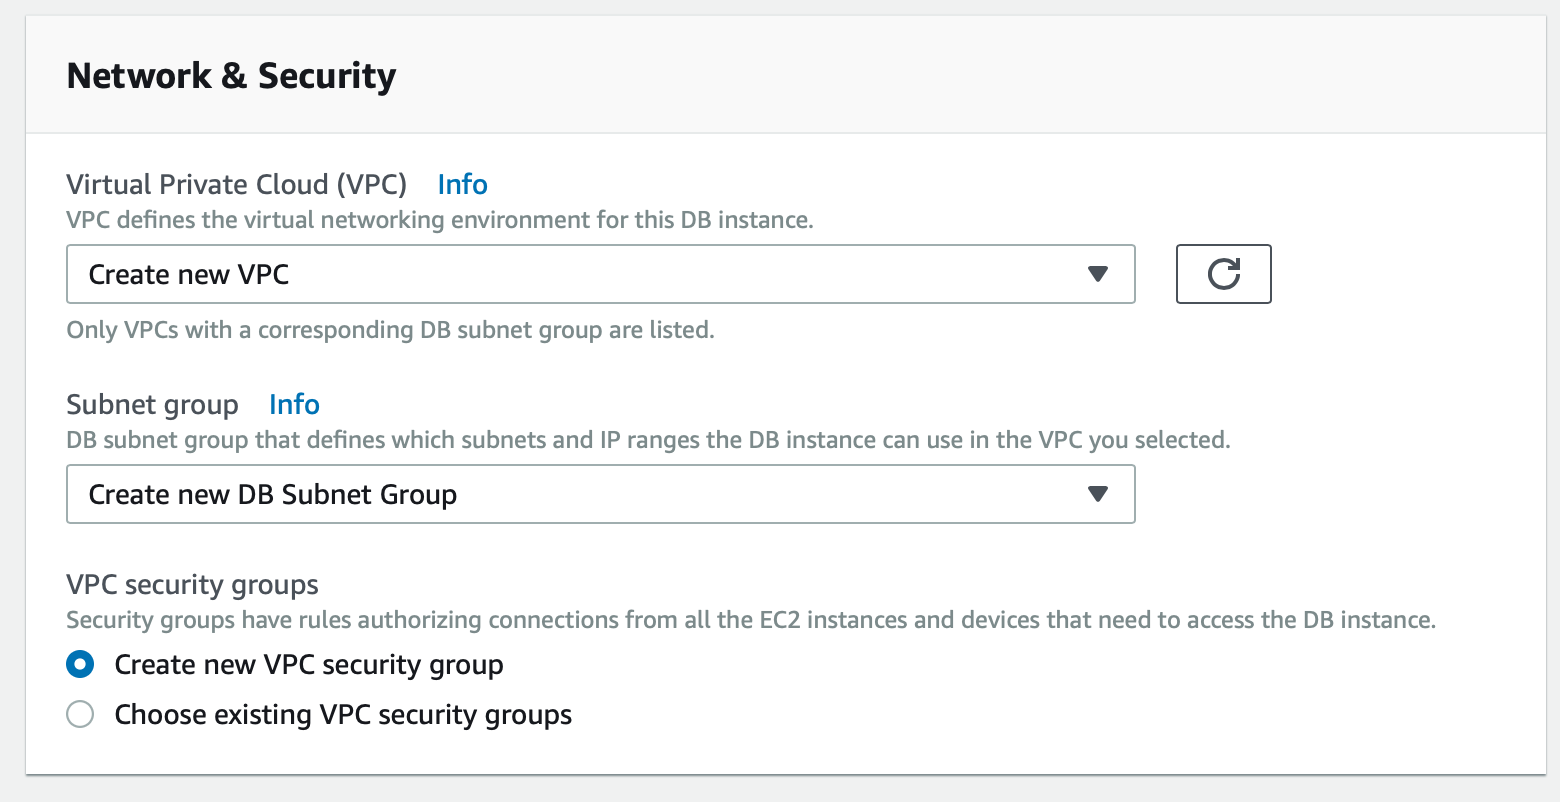
With this, we are ready to select the ‘Create database’ option.
We will be redirected back to the ‘Clusters’ screen, but this time we will see our newly created database with the status of ‘creating’.
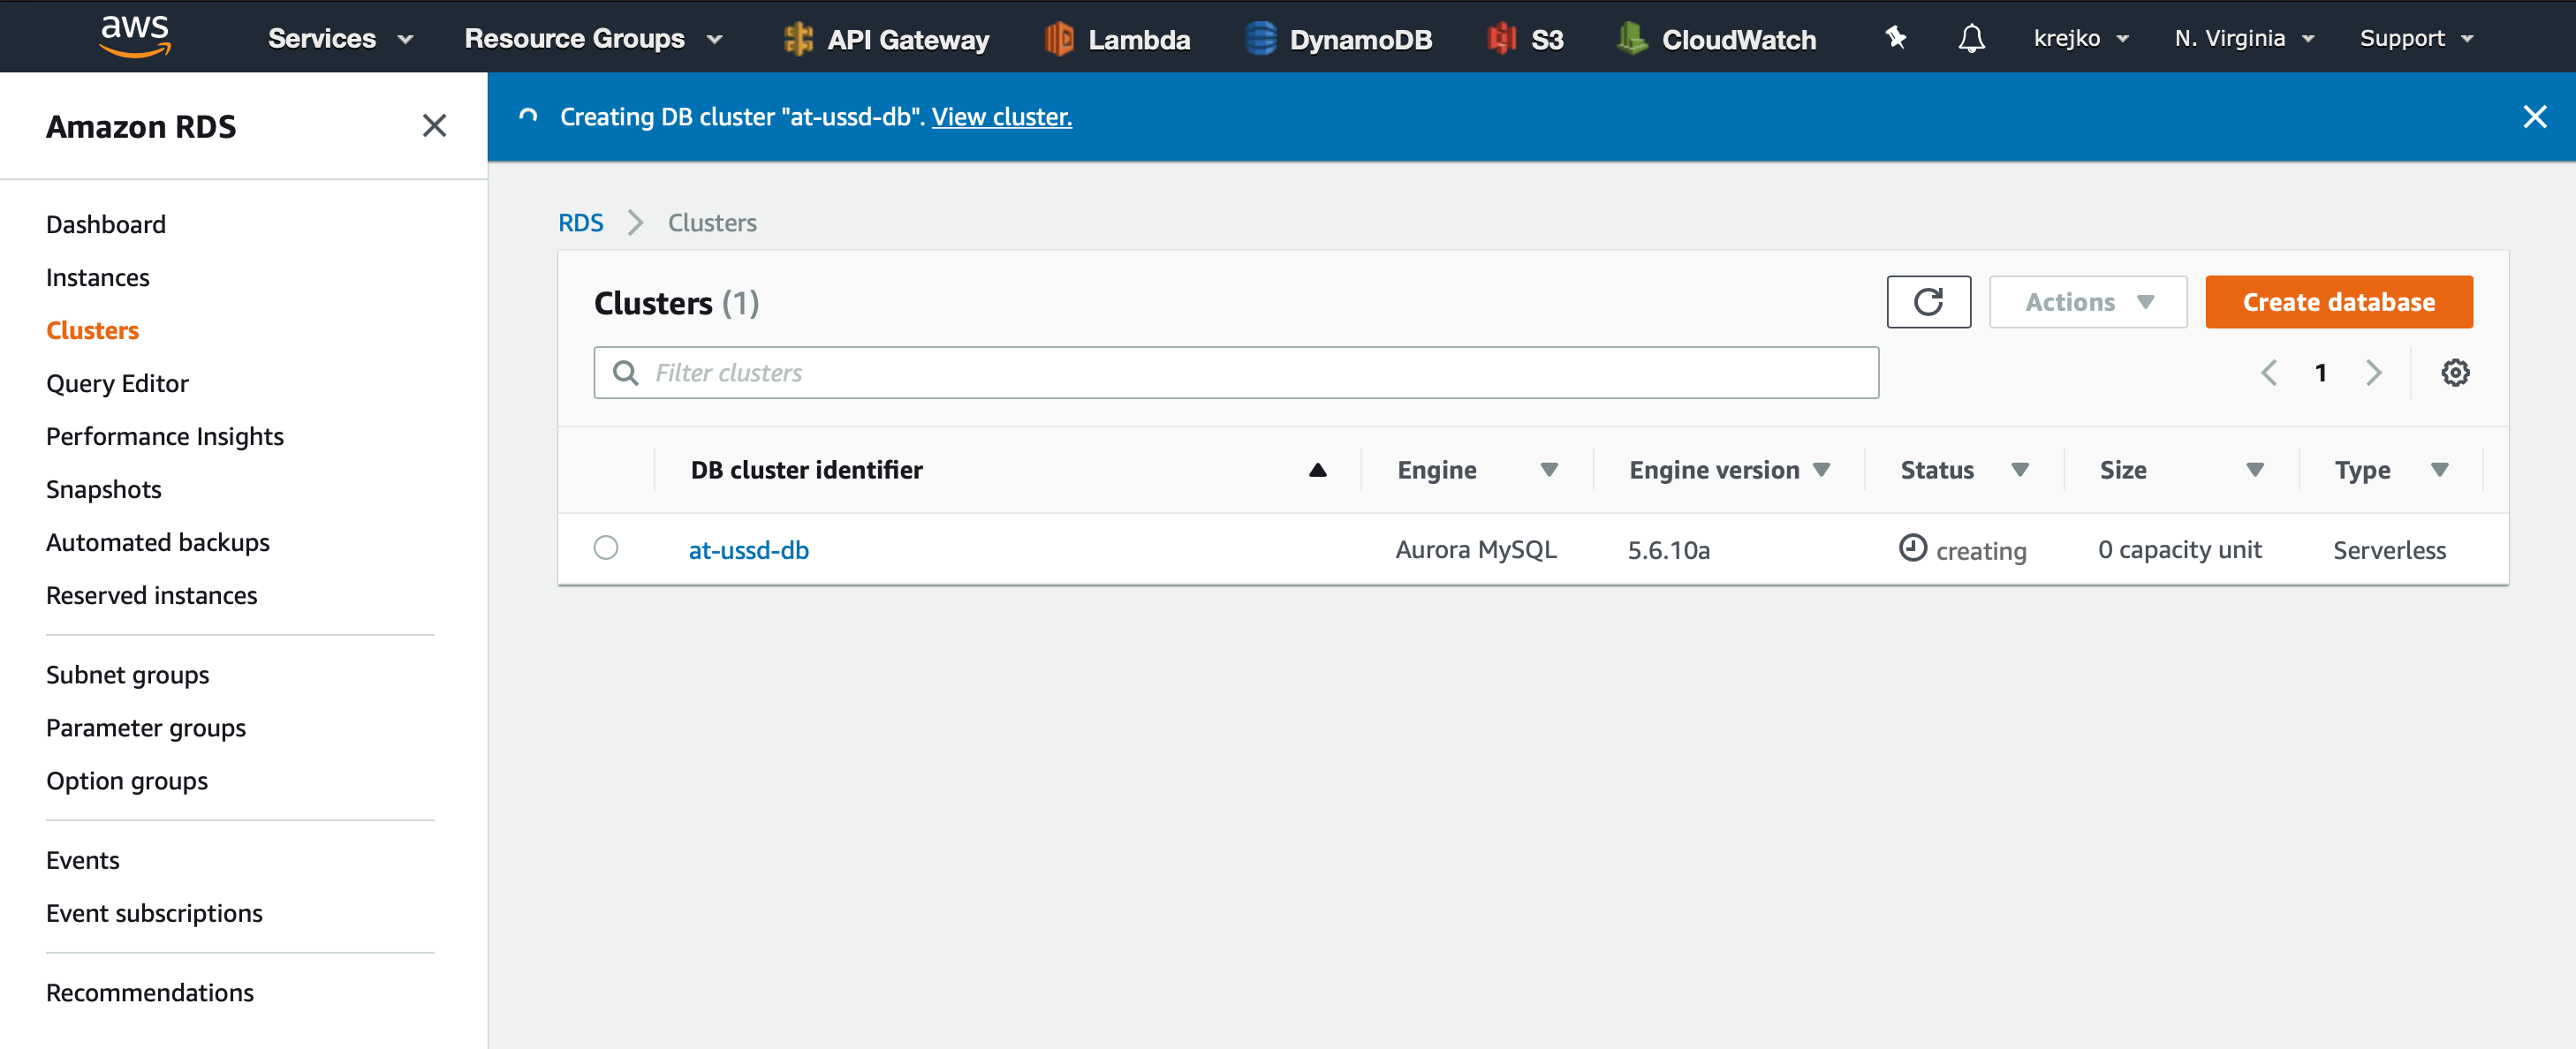
We can now select our new ‘at-ussd-db’ to view it’s information.
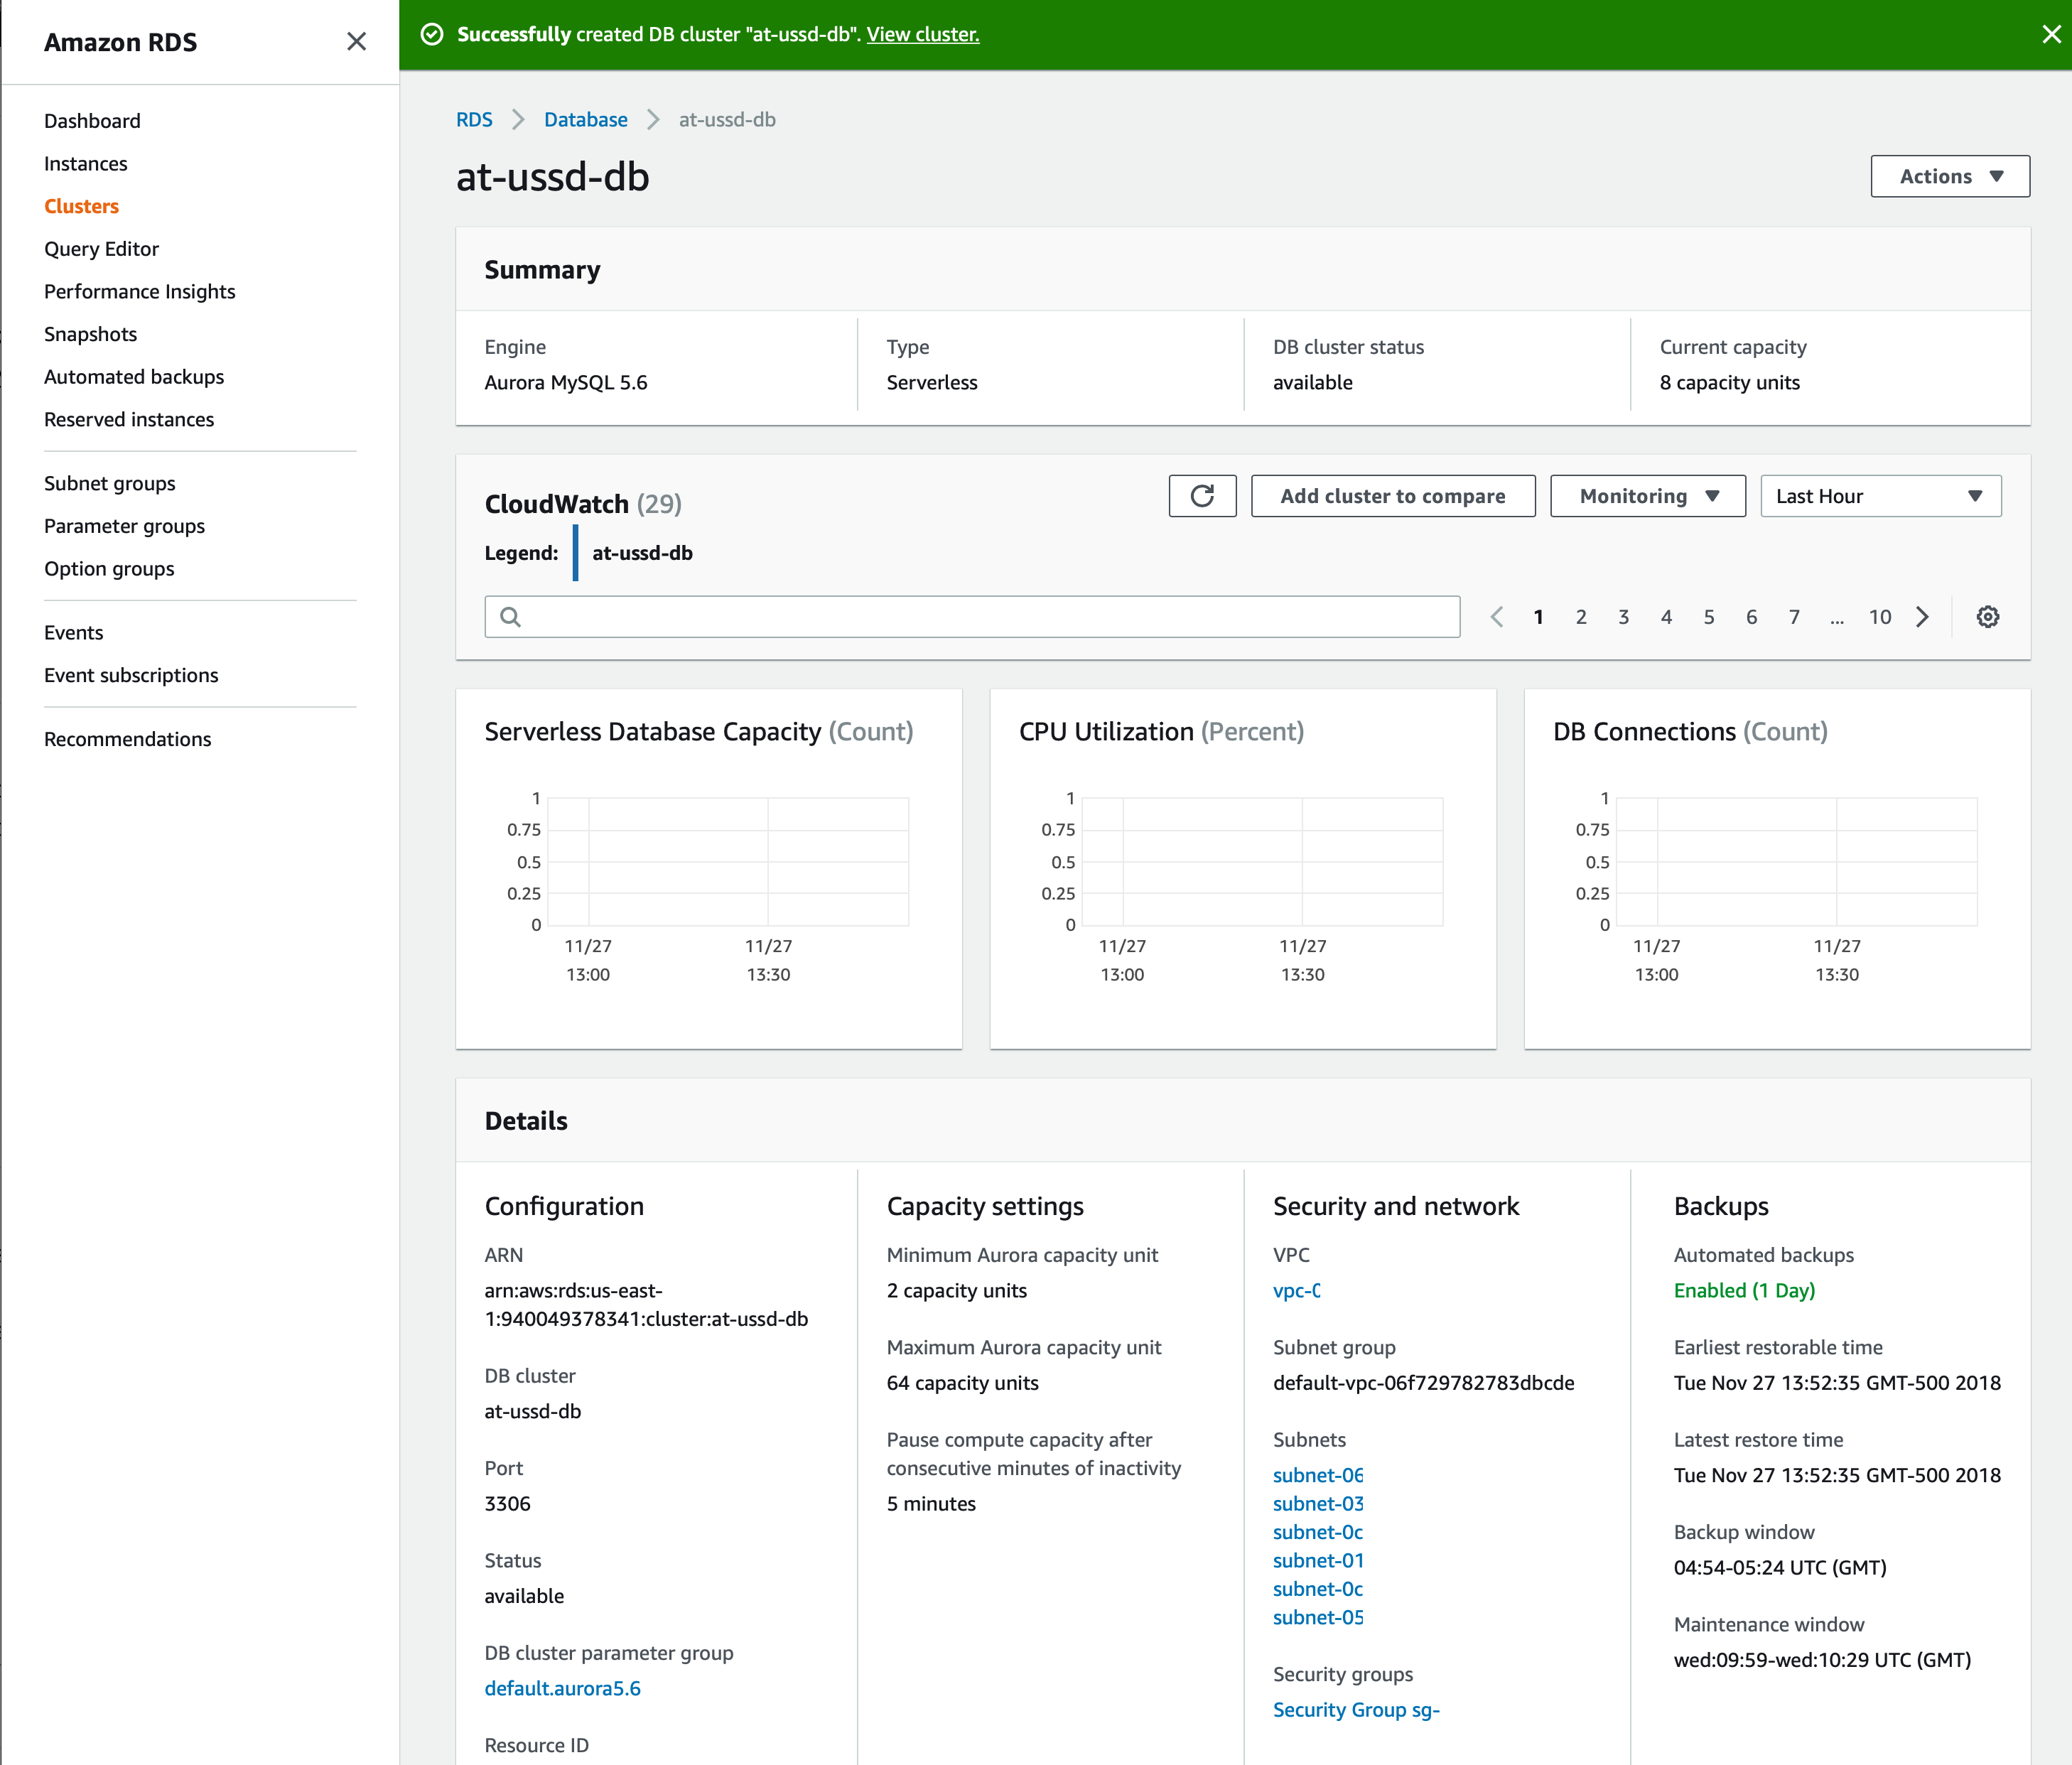
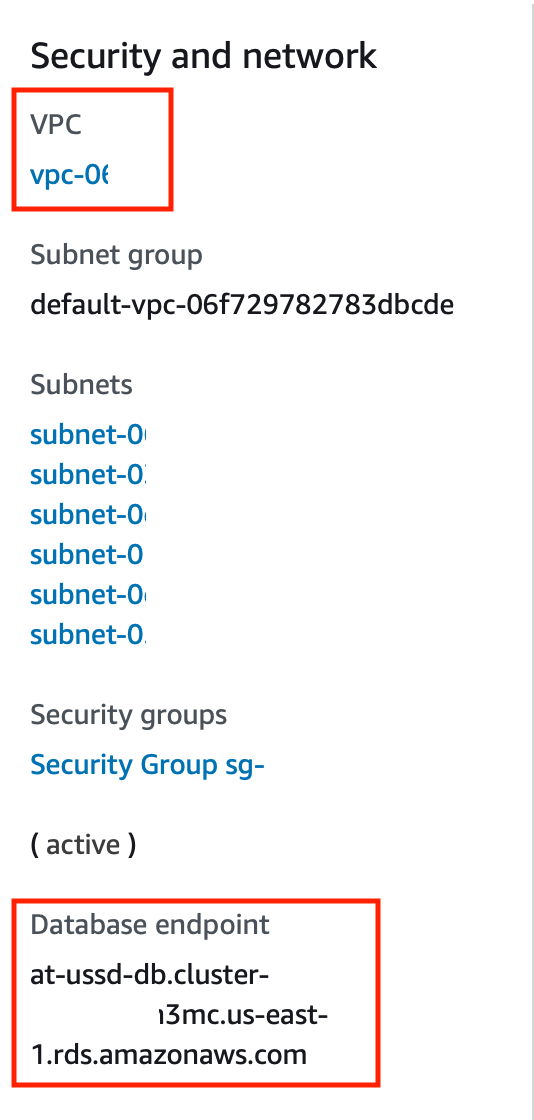
This page provides tons of informaton including CloudWatch logs, capacity units used over time, and connection information. The two key pieces of information we are interested in at this point in time are the ‘VPC’ and ‘Database endpoint’ values located in the ‘Security and network’ subsection of the ‘Details’ pane at the bottom of the page.
Connecting a Client
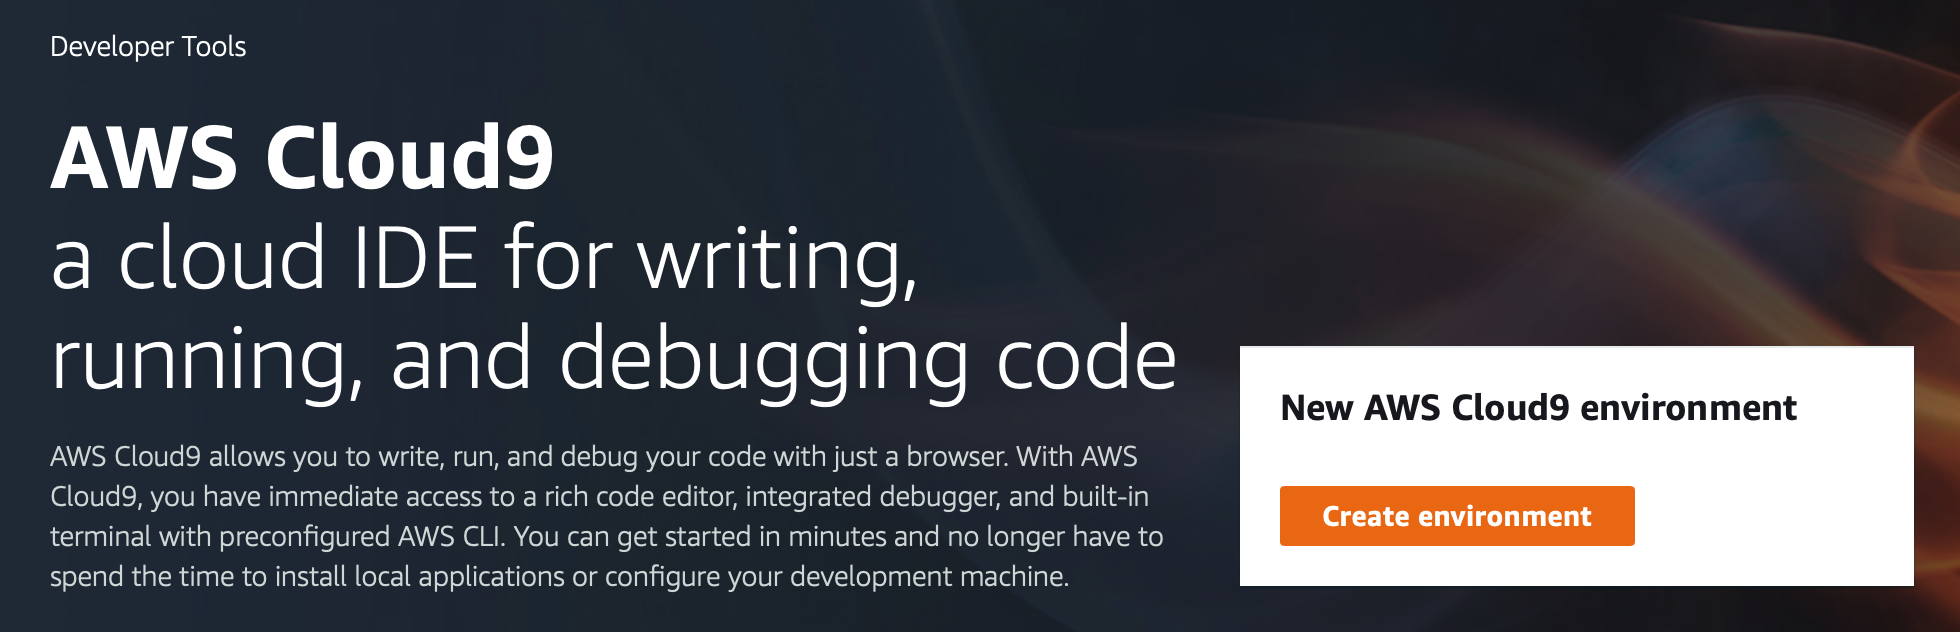
Now that we have our serverless database set up, we must enable a clients to connect. Because our client must be in the same virtual private cloud as our serverless database, we will use a Cloud9 environment to faciliate this connection.
Notice: At the time this article was being written, Cloud9 is only availabe in US East, US West (Oregon only), Asia Pacific (Singapore only), and EU (Ireland only). If you are in a region other than these four, you will need to connect to the database in a different way.
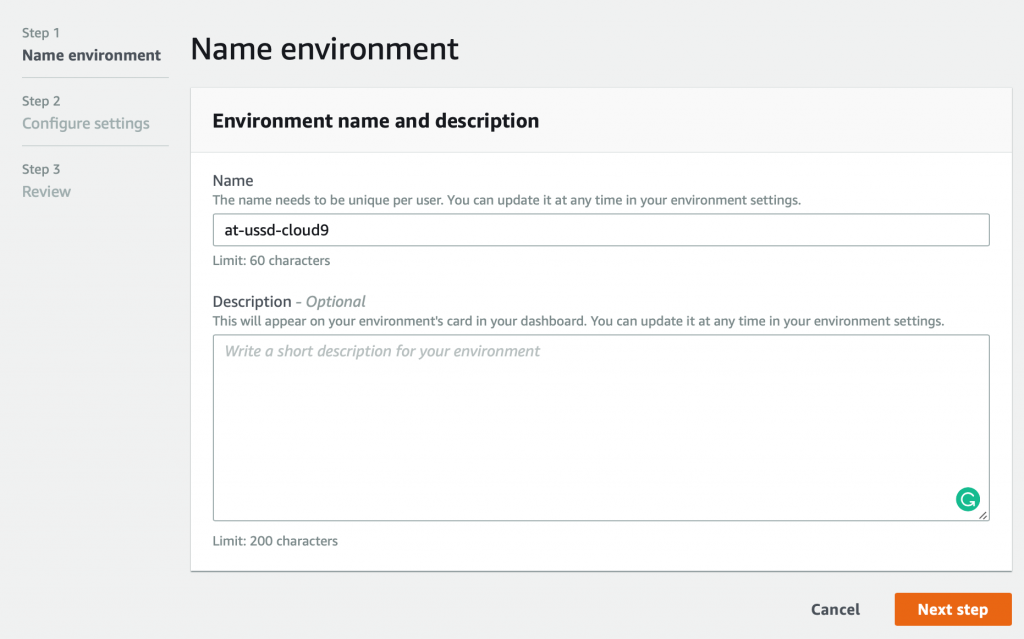
Navigate over to AWS’s Cloud9 service and select the ‘Create environment’ button.
Here we must give our new environment a name, such ‘at-ussd-cloud9’.
Next, we must specify what kind of node we would like for our cloud9 environment. To keep things simple, we will use the default settings of ‘Create a new instance for environment’ and ‘t2micro’.
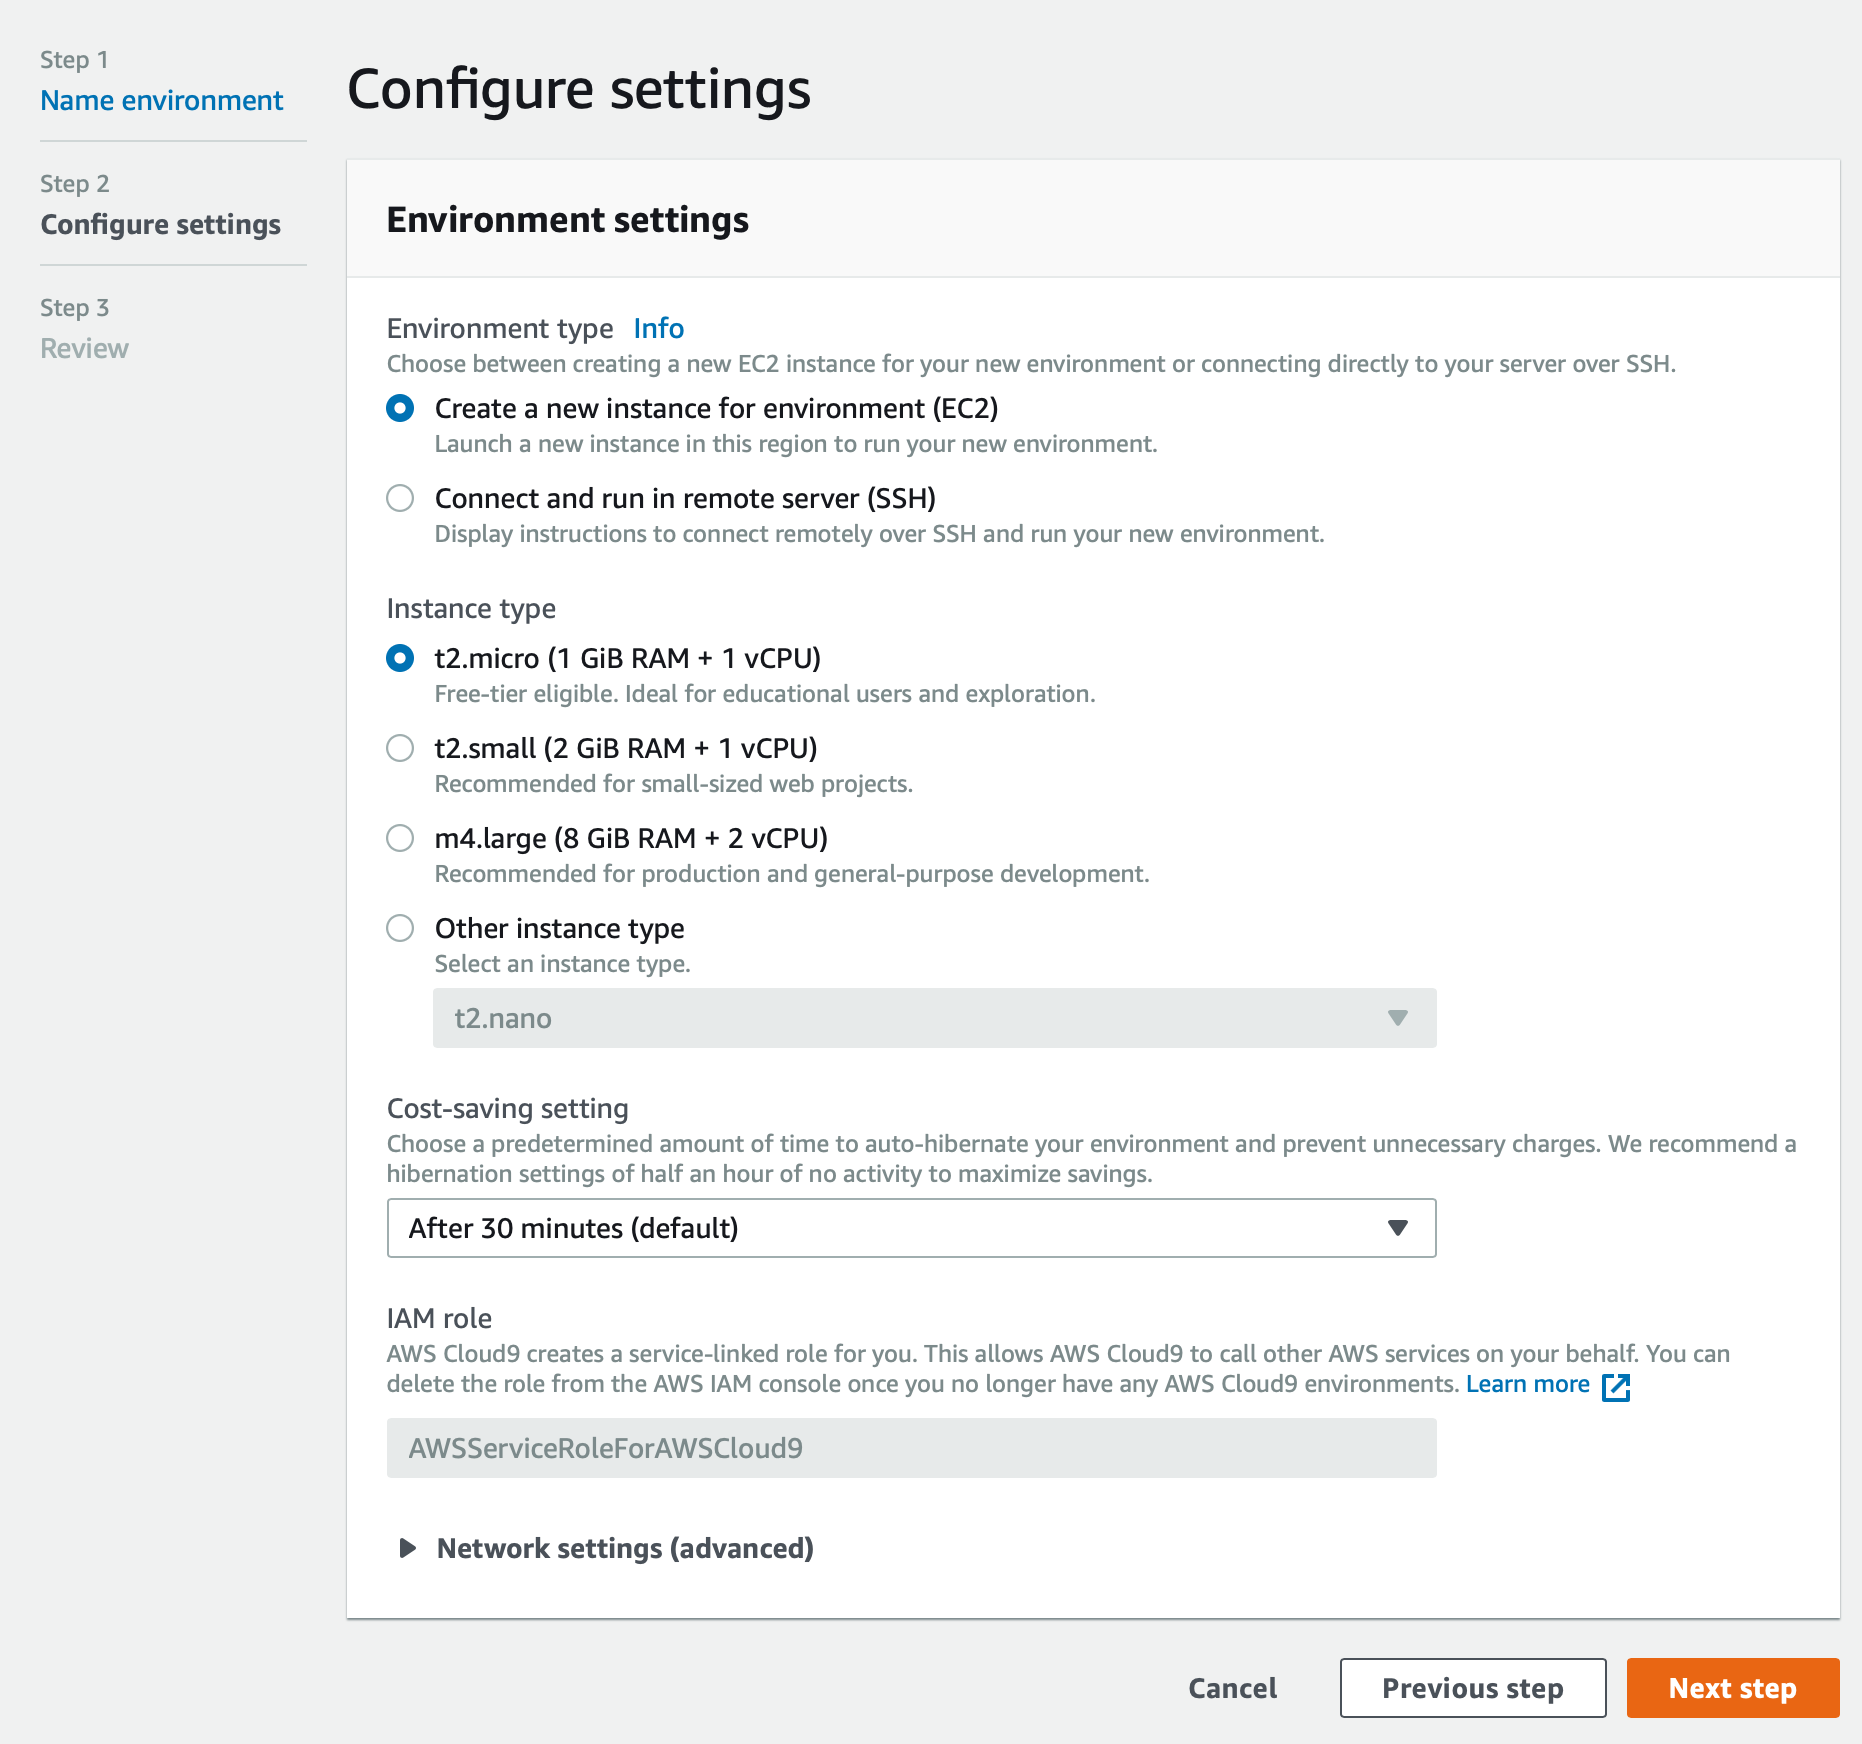
We will leave ‘cost-savings setting’ to auto-hibernate after 30 minutes to reduce any unnecessary billing when we are finished using our client node.
There is one more critical setting we must set before proceeding to the next step, and this is the Virtual Private Cloud (VPC) that our environment will be a part of. If we unfold the ‘> Network settings (advanced)’ we can see the options for VPC. Use the dropdown to select the ‘Network (VPC)’ value that matches our at-ussd-db that we just created. This should also auto-populate the correct ‘Subnet’ dropdown as well.
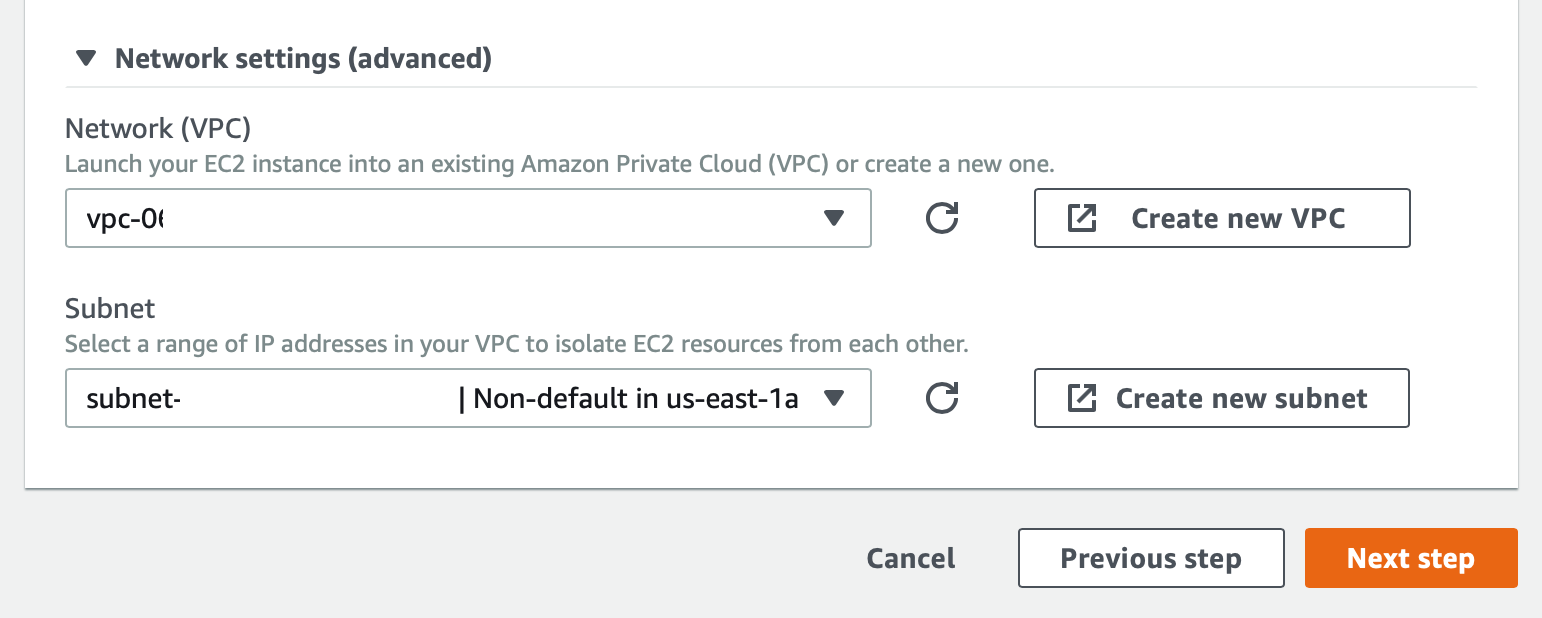
From here we can click the ‘Next step’ button.
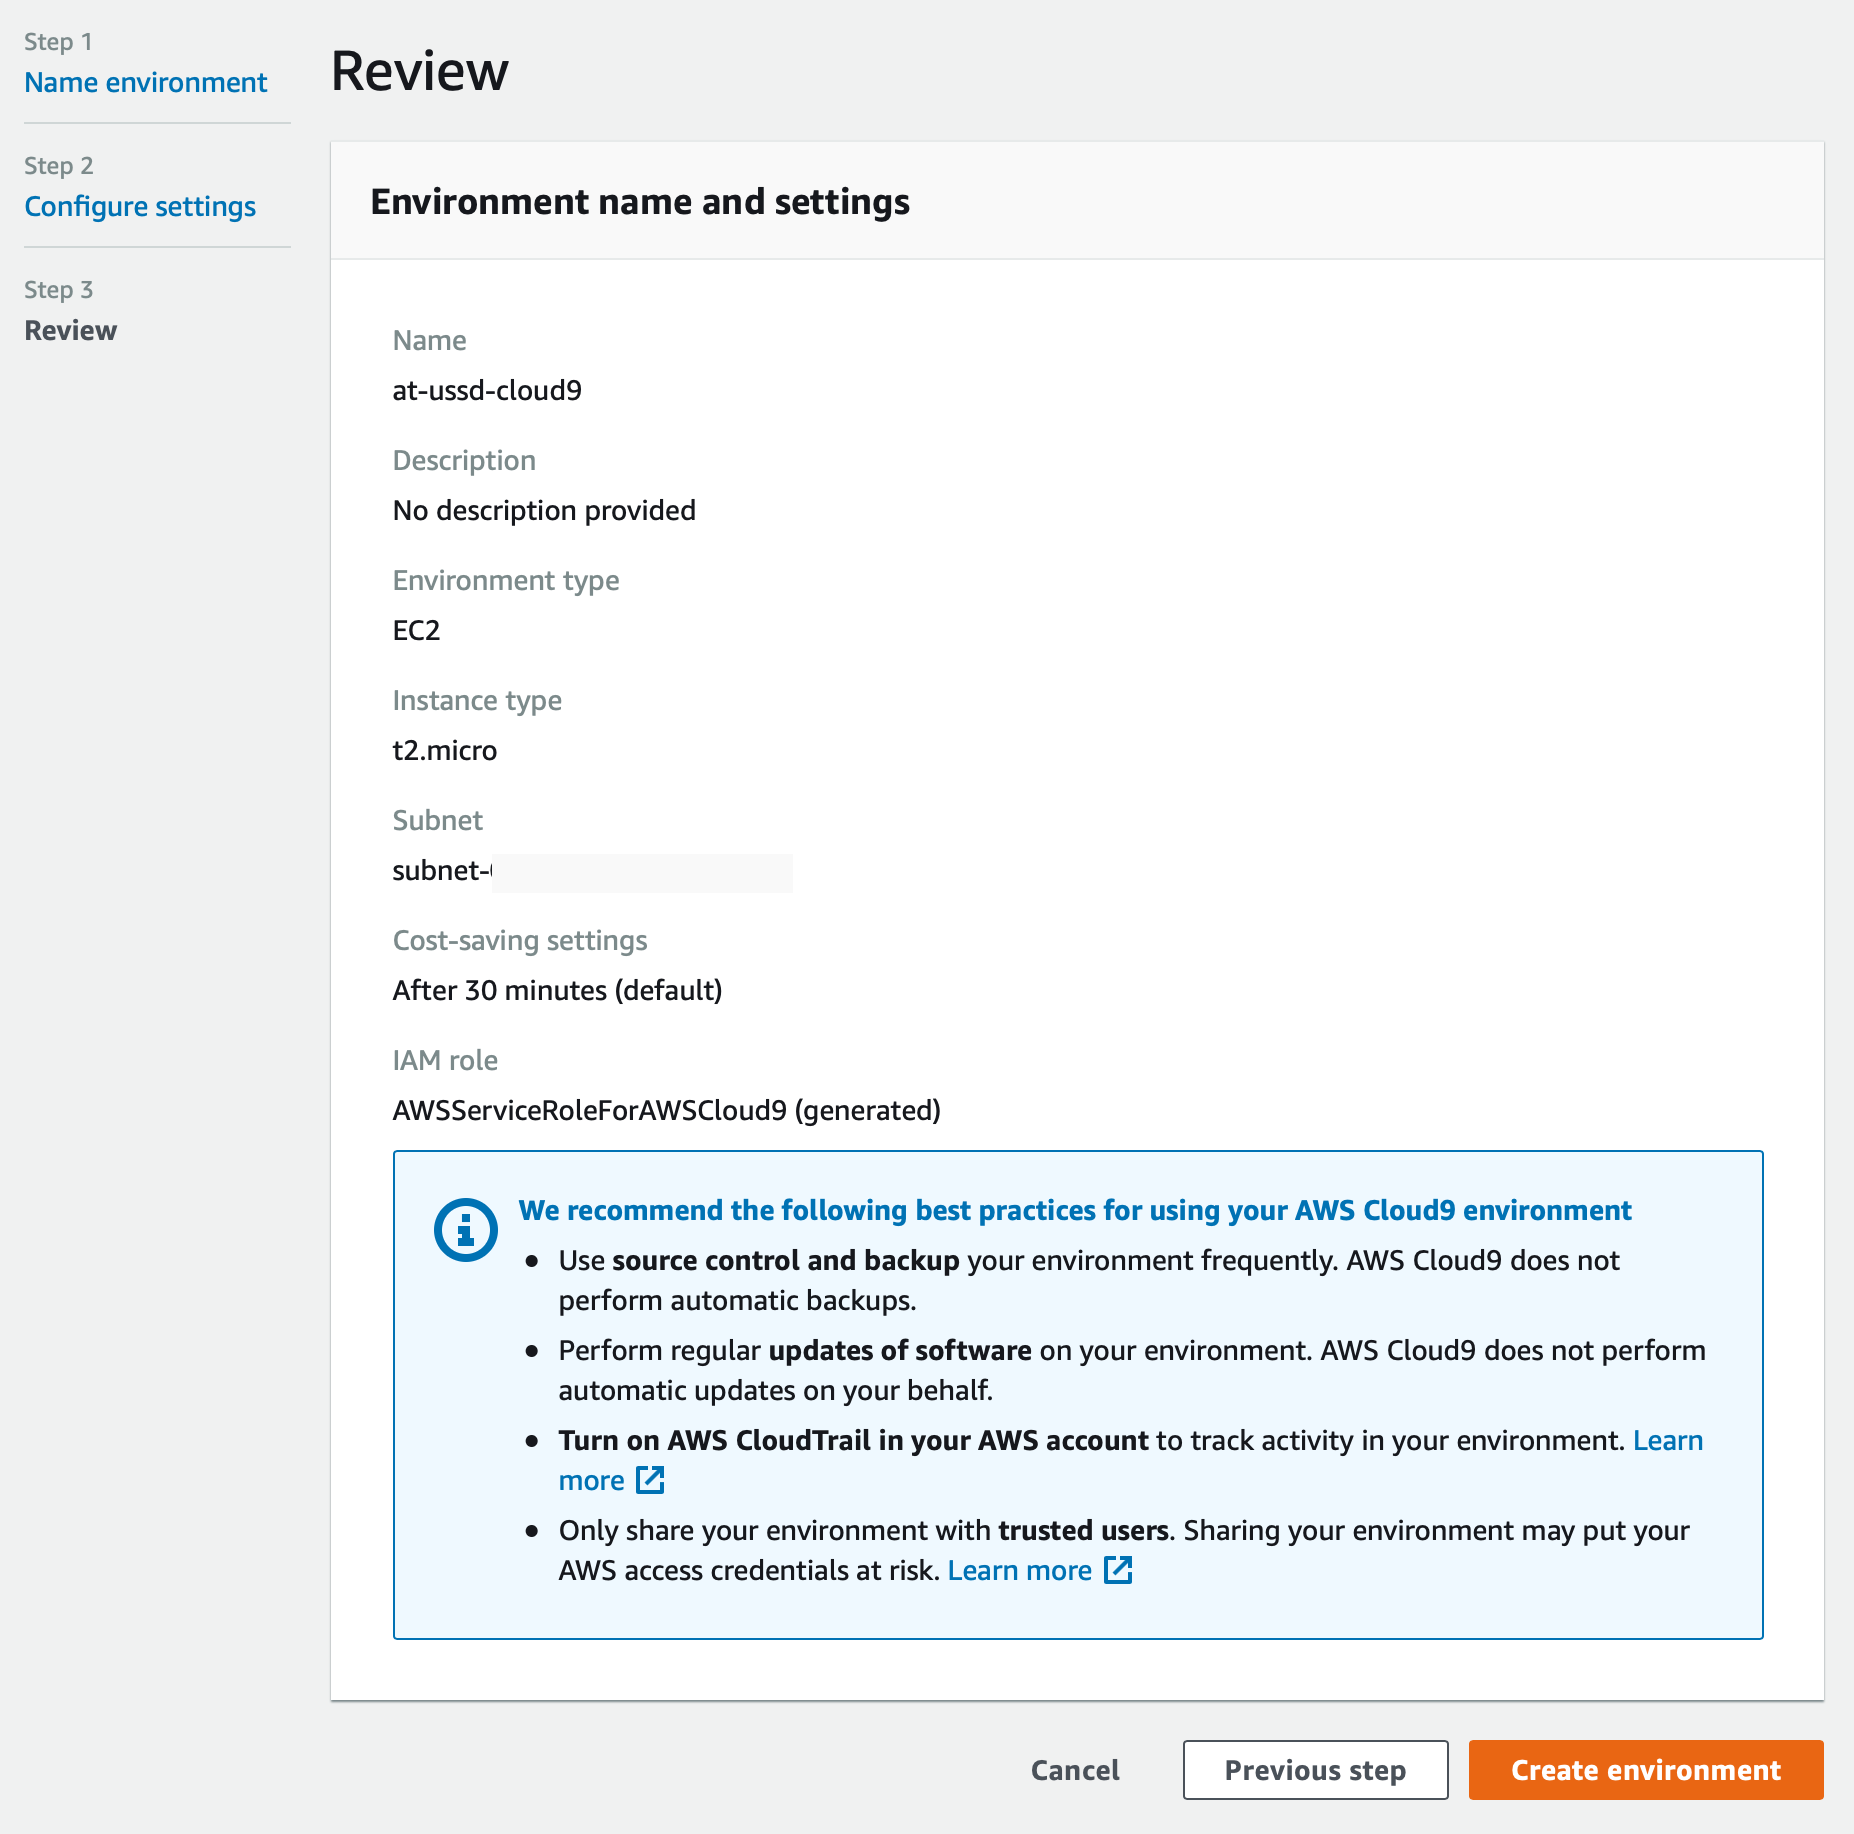
And we can select the ‘Create environment’ button to make our new client node.
At this point, our Cloud9 node will attempt to load. However, before we can use Cloud9, we must give it access to open connections to our database. Becuase of this, we can cancel the Cloud9 loading by pressing option-w if you are on a mac.
VPC Security Groups
To make sure that our cloud-9 environment has access to our RDS cluster, we must set up an inbound rule that faciliates this kind of communication.
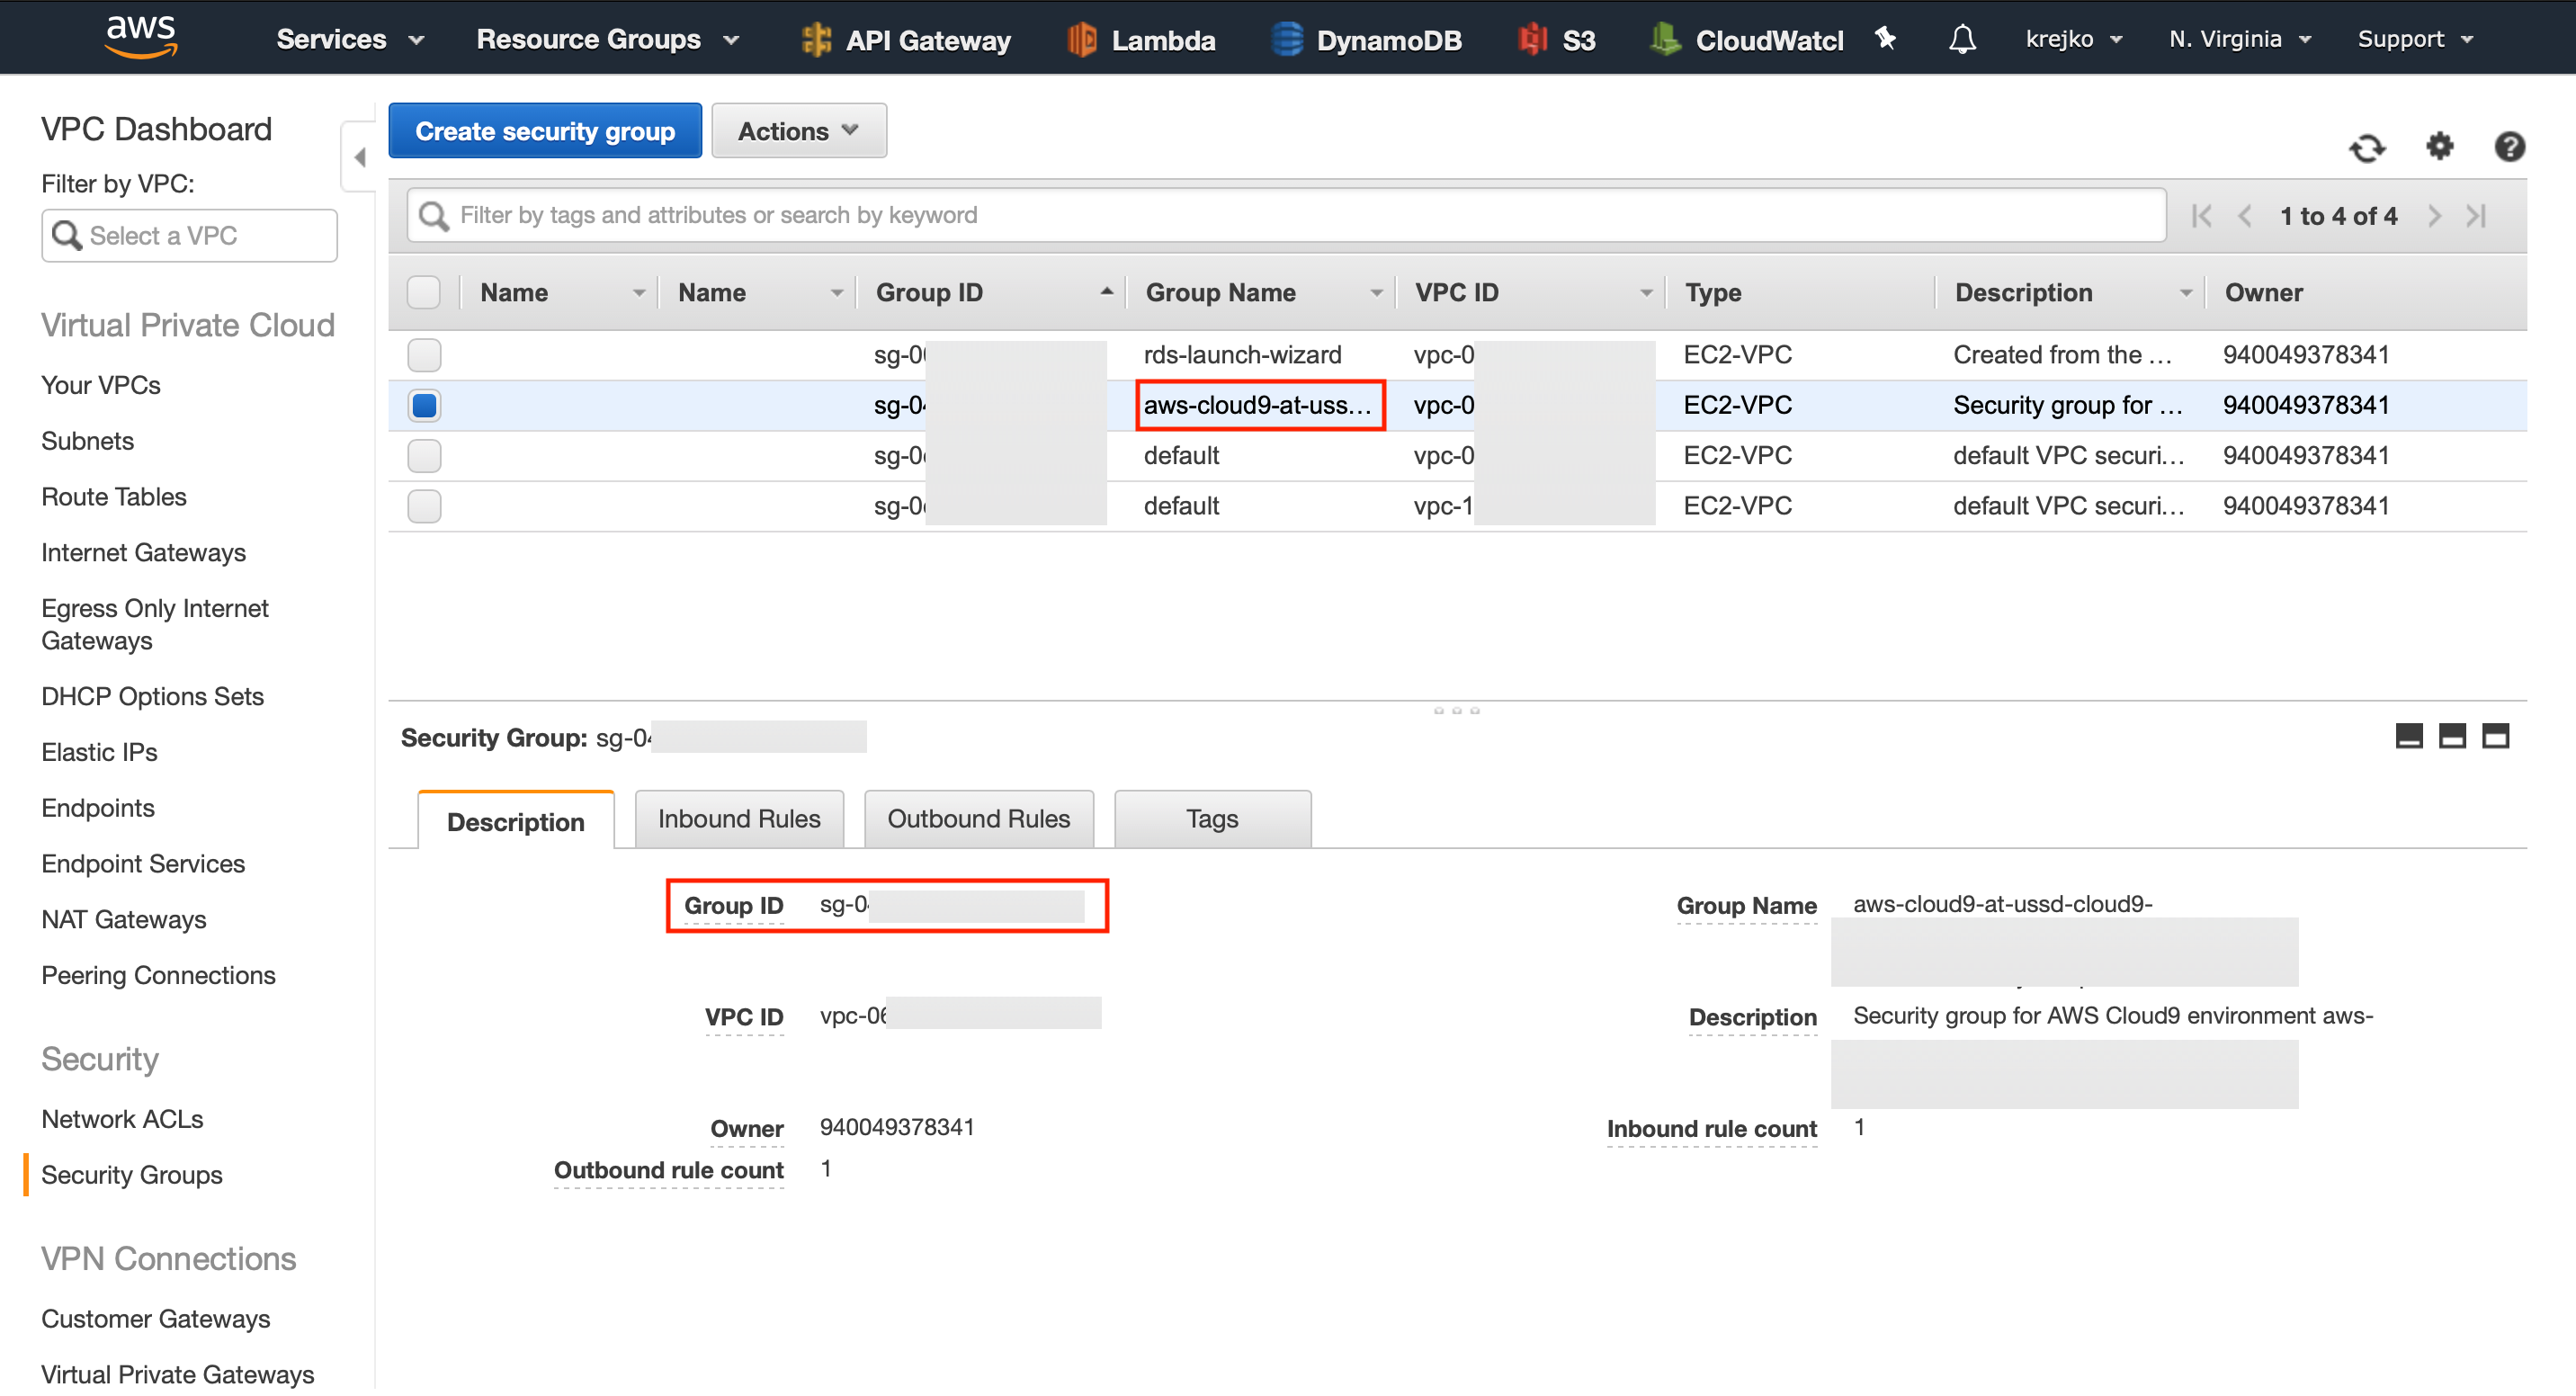
Navigate back to the main AWS site, and this time select the VPC service. We want to navigate to the ‘Security groups’ sub-section on the left side menu. Once our security groups has loaded, the first group we want to locate is the one used with our cloud-9 environment. Select this group and then make a note of its Group ID.
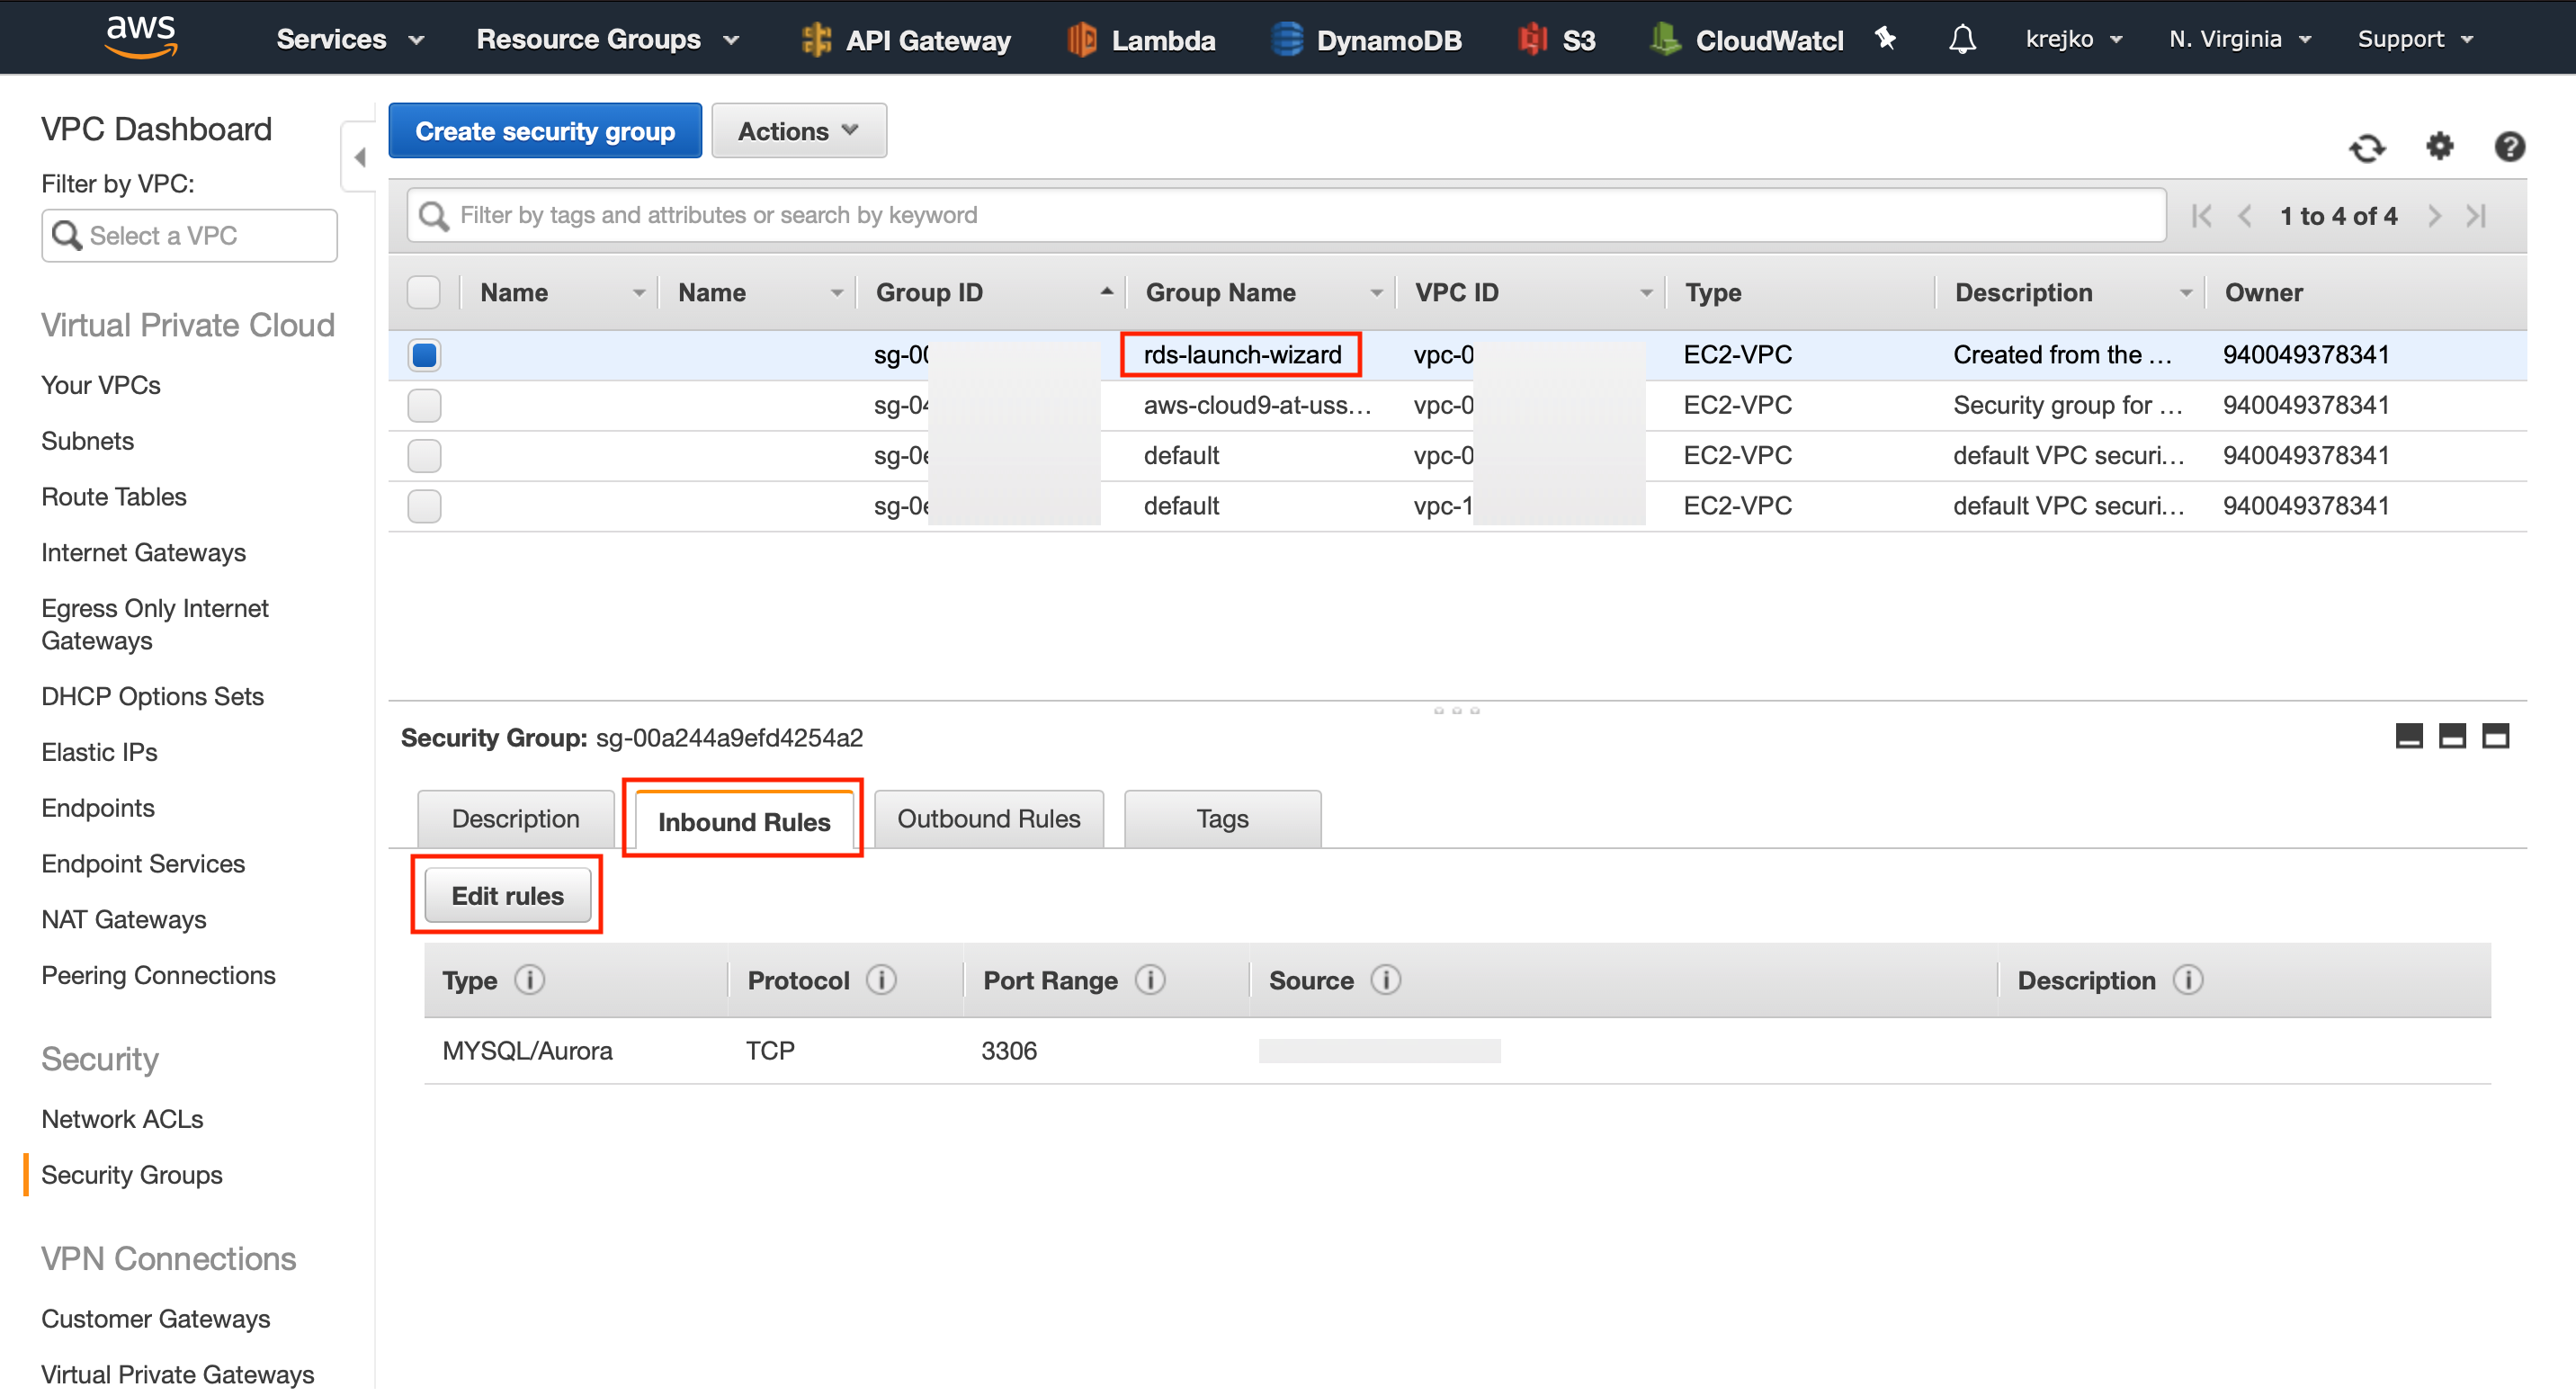
Next, we want to locate the group that is used with our rds cluster. Select that security group to bring up its configuration options. We want to modify the ‘Inbound Rules’ of this security group. To do this, we must press the ‘Edit rules’ button.
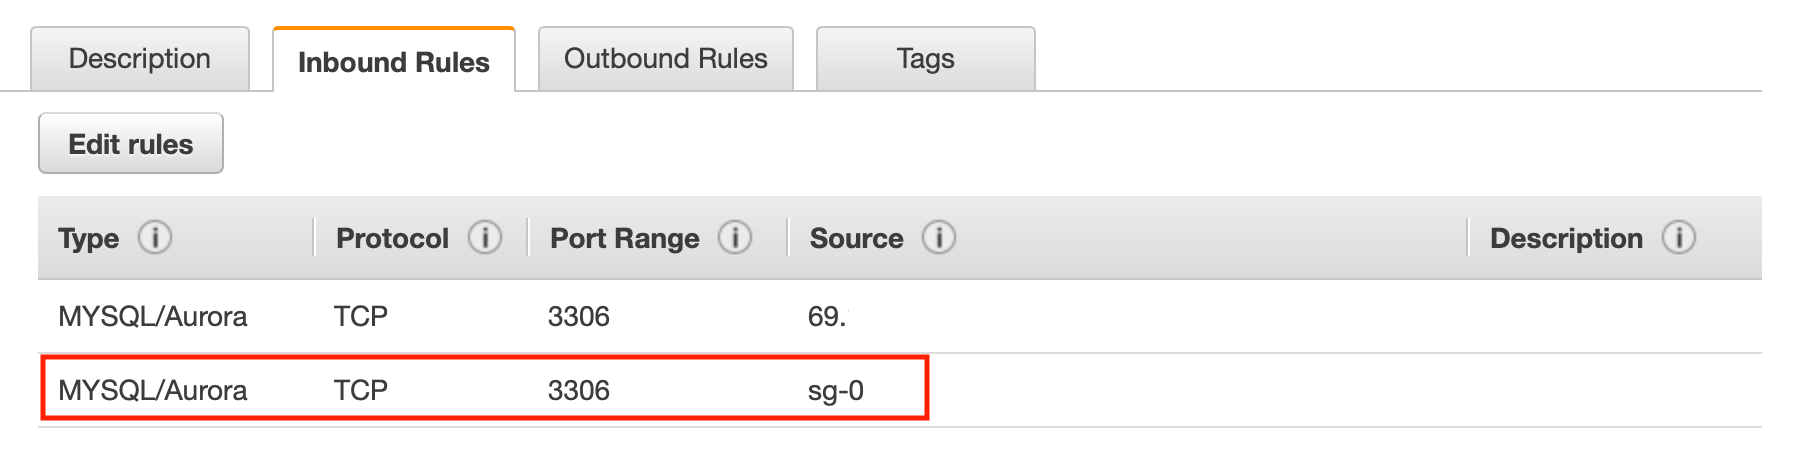
From here, select ‘Add Rule’, set the type to ‘MYSQL/Aurora,’ and paste the Cloud9 Group ID into the ‘Source’ text field.
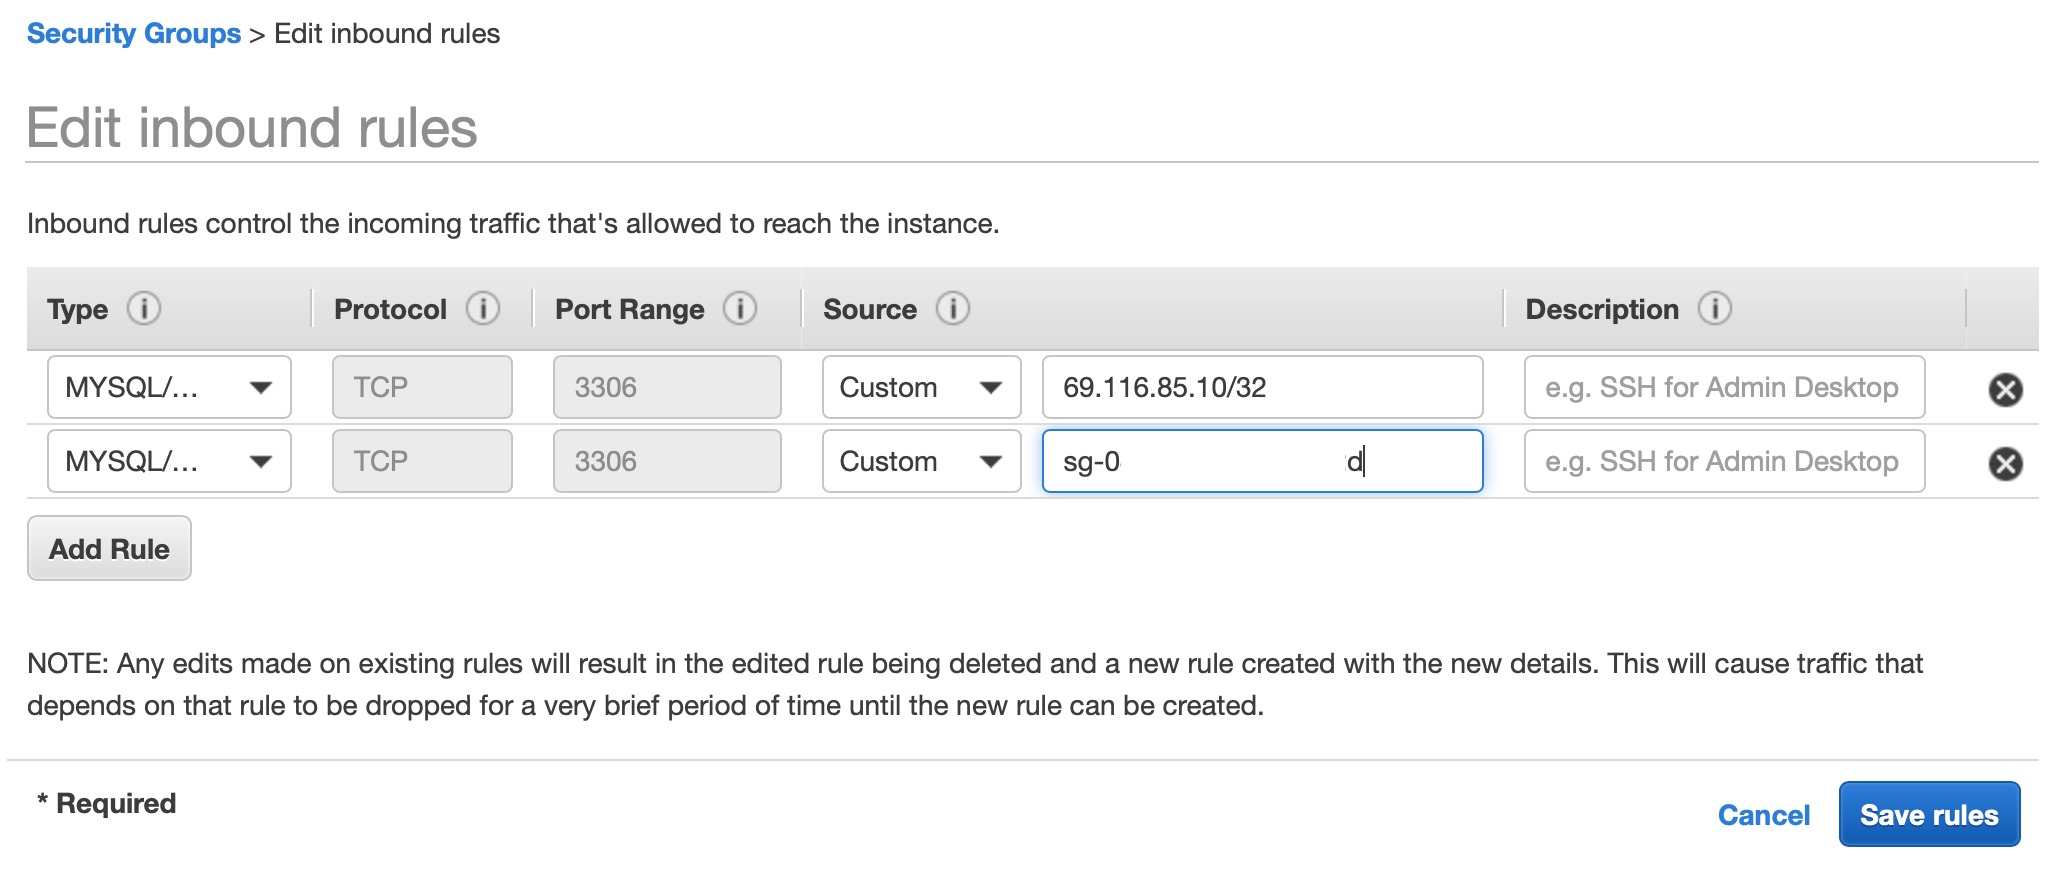
Press ‘Save rules’ to continue.
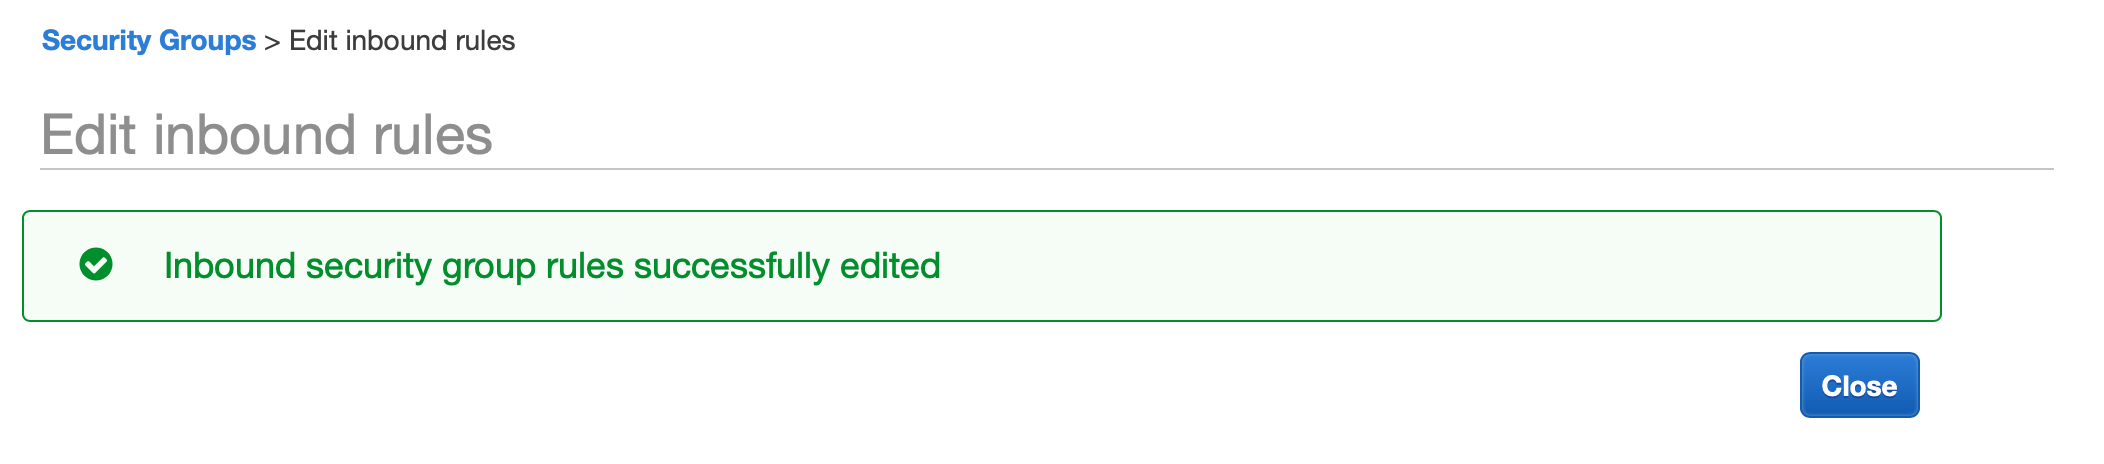
You should see a confirmation that the settings were updated successfully. Close this dialog to be taken back to the security groups. From here, we should be able to view our newly added inbound rule.
Testing our MySQL Client Node
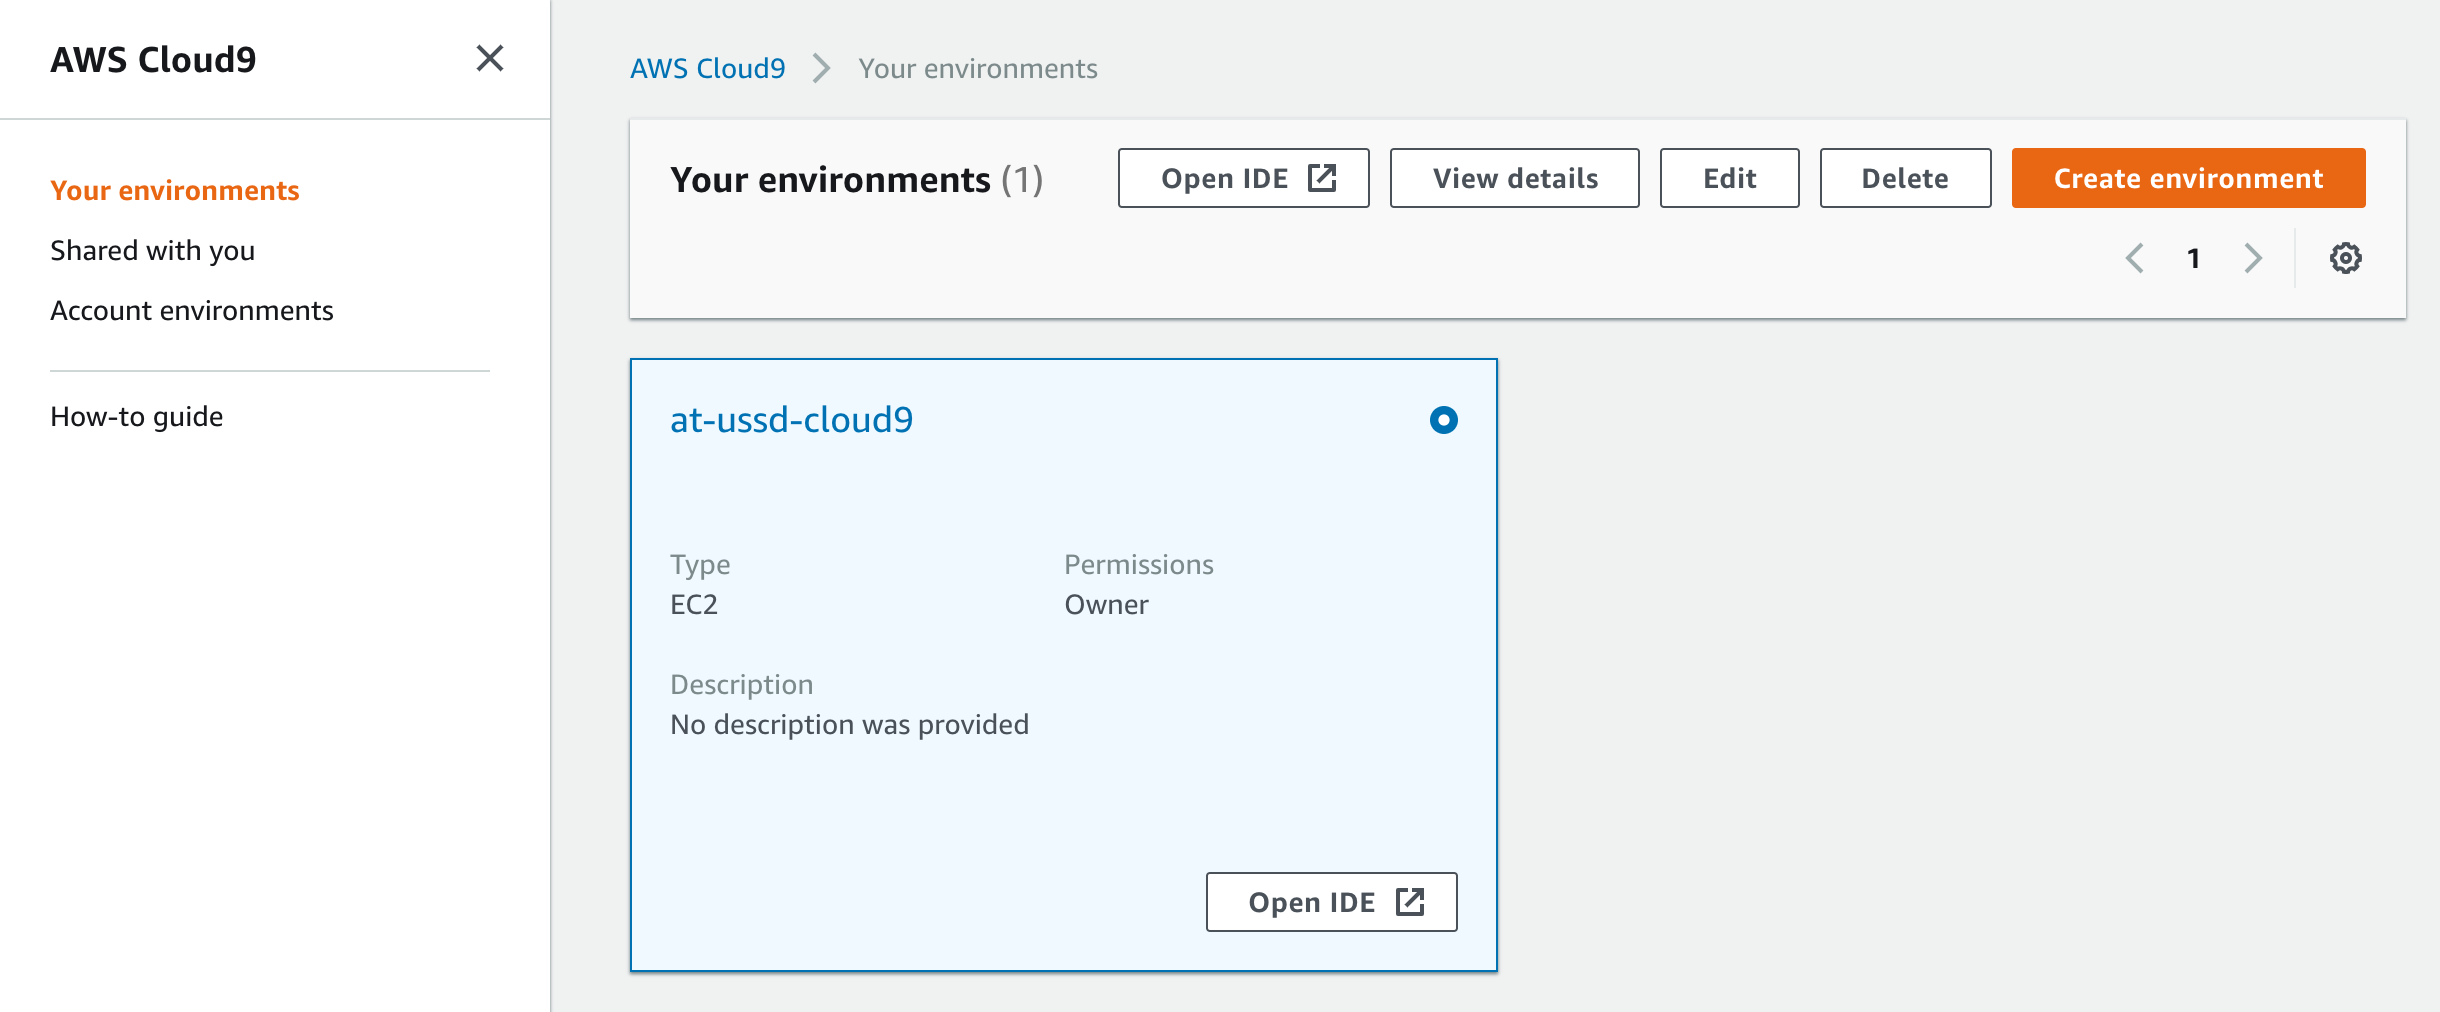
Now that we have our security groups correctly configured, it’s time to make sure we are able to connect to our serverless database. Navigate back to Cloud9 and our our dashboard, press the ‘Open IDE’ button.
Please note, in order for Cloud9 to load successfully, you do need to be using a browser which supports third-party cookies, such as Google Chrome. If your browser does not support cookies (such as Apple’s Safari web browser), you may see the following error.
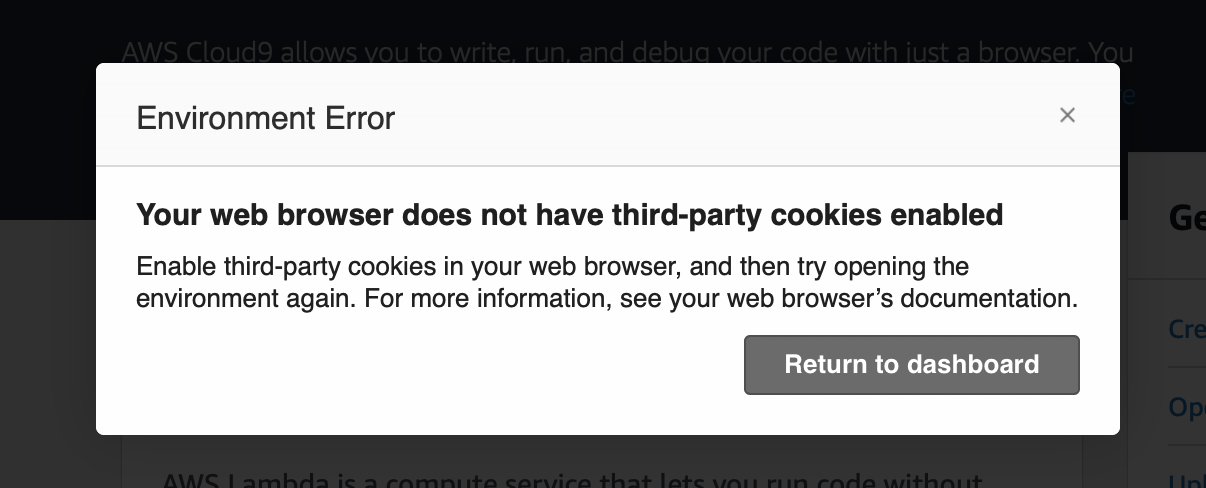
If you would prefer to use your current browser, you can follow this guide to enable cookies: https://offcampushousing.uconn.edu/auth/help-cookies
Once the Cloud9 IDE loads, we should see a page that looks like the following.
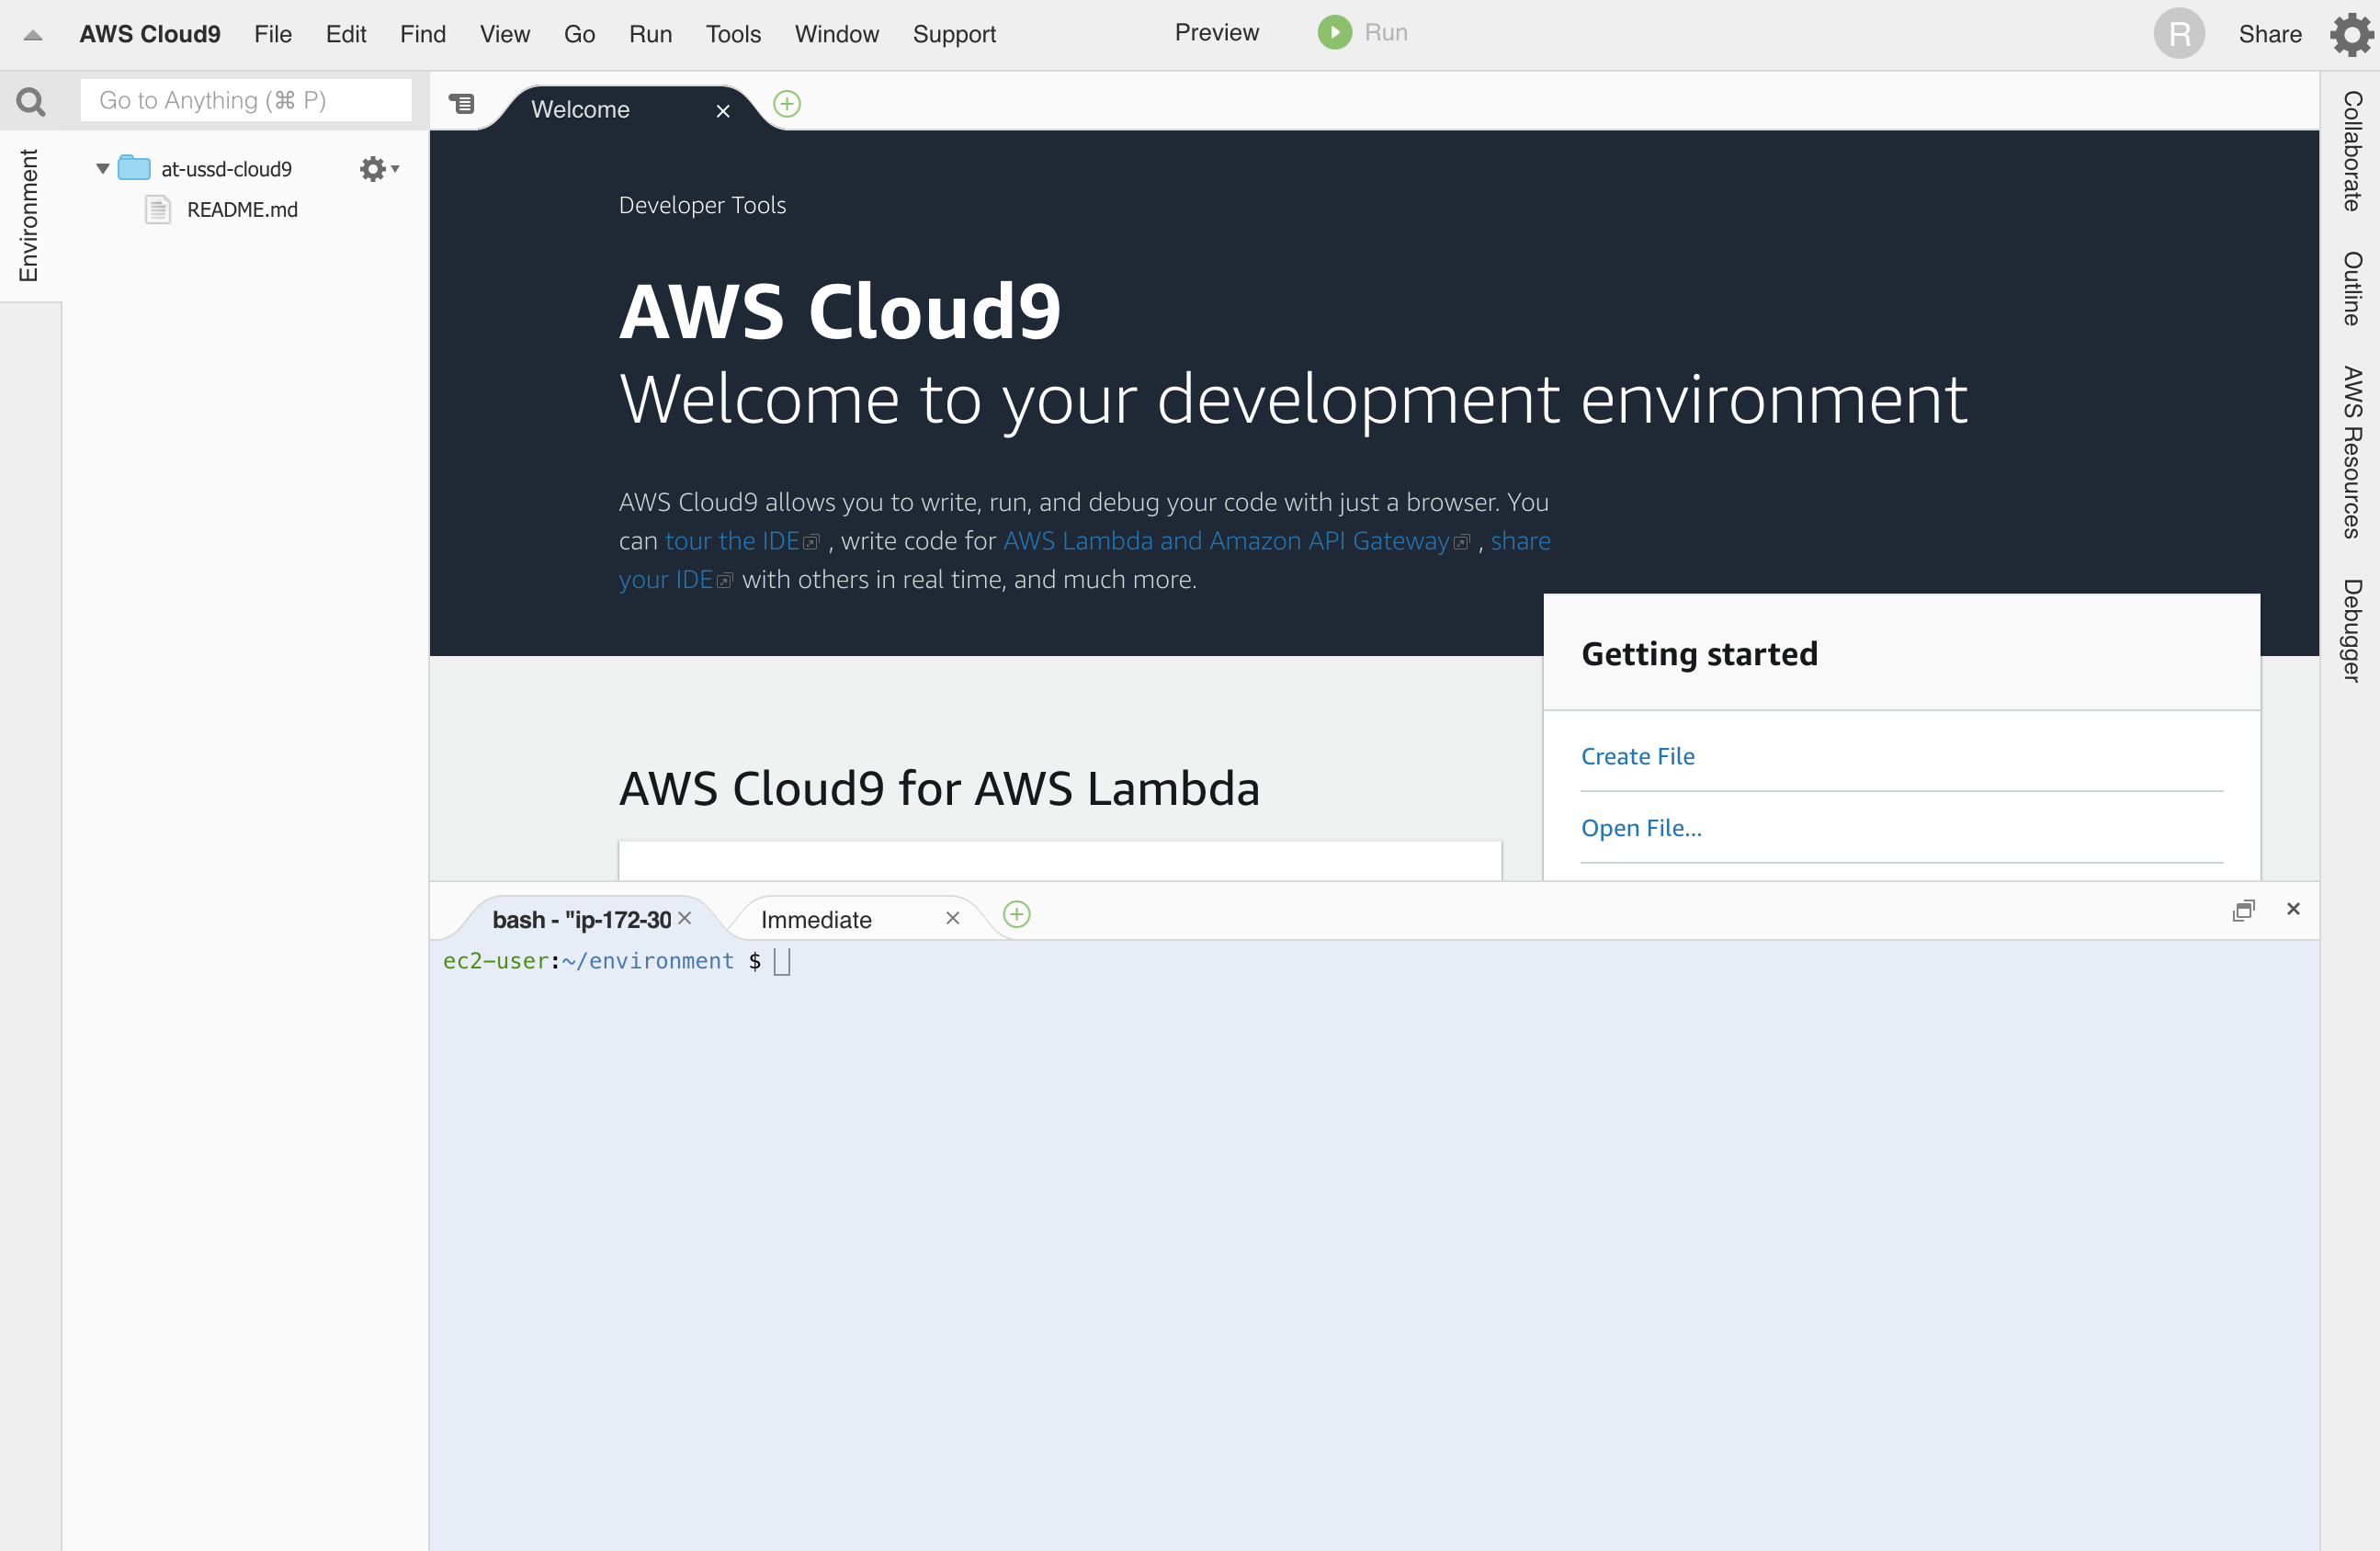
From here, we can use this node to issue commands to the various services that live in our virtual private cloud. For right now this is just our serverless database. To test the configuration of our security settings are correct, we will attempt to issue a command from our node to open a connection to our Aurora MySQL database. We can do this by submitting the following command:
mysql –user=at_ussd_master –password -h [db-endpoint-from-cluster-details]
After this command is sent, mysql should request our password. The password value should match the master password we set when initially configuring our new ‘at-ussd-db’ cluster.

If you are not familiar with command-line style password entry, please note that it is normal for typed characters to not show as dots or other masked input. Once your password has been entered correctly press enter. If the the connection was made successfully, you should see our MySQL’s database info shown as the header to our connection with our prompt now prefixed with ‘mysql>’.

If you get the password prompt a second time, this means that the password you typed was incorrect. If you receive a different error, that means that some of the previous settings were not configured correctly. In this case, please review the previous steps to ensure all of the information was set up each of AWS’s services correctly.
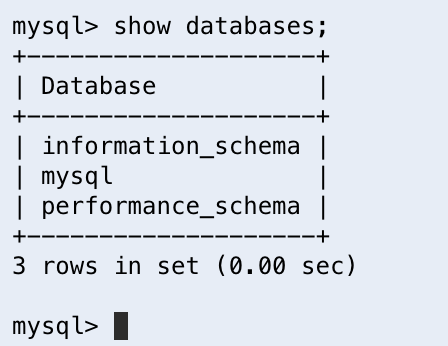
Once you are connected to our serverless MySQL database, we can now interact with MySQL no differently than any other command line connection. We can validate this by typing the command ‘show databases;’. When we press enter, we should see a list of all of the default databases that are automatically created for us on our MySQL server.
Now that we can connect to our serverless database, we are now ready to start configuring the schema we will use to store and query our application’s data.
Schema
In order for us to store data on our Database server, we must create a database for our application to use, and then tell our database what types of information we would like to save.
Please note before we proceed, there are tons of best practices to follow when initially configuring a database. These range from creating different users each with various levels of permissions based on access level necessary (such as application users shouldn’t have delete table permissions) to following common naming conventions. In this guide, we will follow some of the best practices but eschew others for the sake of simplicity. Please be sure to do a complete audit with a trained database administrator before using any database in a production environment to make sure your database is both performant and secure. While it may seem unecessary for early stage or small applications, it save you tons of time, money, and headache in the longrun.
For those interested, an incomplete list of best best practices can be found here: https://www.databasejournal.com/features/mysql/article.php/3918631/Top-10-MySQL-Best-Practices.htm
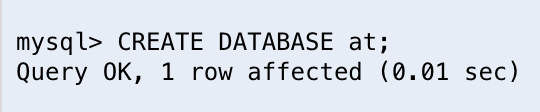
With that disclaimer out of the way, let’s continue creating our database so we have something for a database admin to later improve upon. To keep things simple, we will use the DB name “at” which is the abreviation for “Africa’s Talking”. Using our currently active MySQL connection, we can create our database by running the command:
CREATE DATABASE at;
After this line is run, we should see a success confirmation.
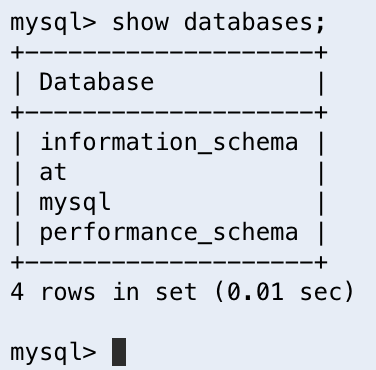
We can further verify by running show databases again to verify our new database is now in that list.
To make sure all of our future commands are applied to our new at database, we must inform MySQL that this is the database we would like to use for our active connection. We can do this by sending the command USE at;.
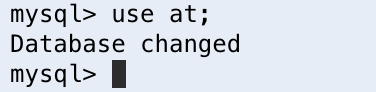
MySQL will confirm that this is the database we will use by reporting ‘Database changed’.
Please note that while MySQL will accept case-insenitive keywords, any identifiers (such as database, table, or column names) are case-sensitive. So while use at; and USE at; will both successfully change to our at database, USE AT; will throw an error becuase we do not have a database by the case-senative name AT.
Before we dive into creating a table and some columns for storing our data, let’s quickly review our goals and how different peices of data will help us achieve them. If you recall from our introduction, we would like to be able allow a user to sign-up and and identify a signed-up user by name. Quickly reviewing our previous tutorial, Africa’s Talking will give us the phone number of a user which we can use to determine if they are already signed up, but it is up to us to collect and store that user’s name. To extrapolate, this means that from the user, we are interested in two different pieces of information:
- Phone Number
- Name
Additionally, to follow database best-practices, we will also want an auto-incrementing identifier field, and non-database specific identifier that we can use to safely reference outside of our application. Both of these values should not be mutable and should not be based on user information due to it’s uncanny tendancy to change.
- Identifier (or id)
- Universally Unique Identifier (or uuid)
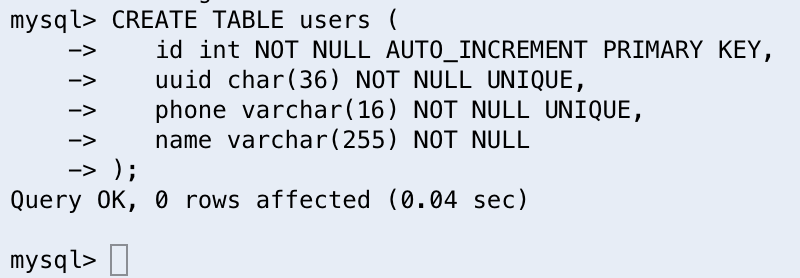
Putting all of this together, we have enough information to construct our create table statement.
CREATE TABLE users (
id int NOT NULL AUTO_INCREMENT PRIMARY KEY,
uuid char(36) NOT NULL UNIQUE,
phone varchar(16) NOT NULL UNIQUE,
name varchar(255) NOT NULL
);
A couple of notes about each of these fields
- id — this is the primary key. As such, it is set to auto-increment which will also guarantee it is never null.
- uuid — this is the publicly-safe reference to the record. Because is designed to identify a single record, it is also set to be not null and unique.
- phone — this value we will get from Africa’s Talking. We will use this value to determine if a session is for a new or current user. This value should also always identify a single user so it has also been marked as not null and unique. Additionally, we have used a varchar datatype to make sure no unintended modifications are made to our phone number values (like truncating zeros) and have set the max length to 16; one for a leading ‘+’ plus fifteen digits per the standards set by the International Telecommunication Union (https://en.wikipedia.org/wiki/Telephone_numbering_plan). By storing this value directly on the user, we are also making the assumption that each user will only use one phone number for accessing their account. Based on business needs, this can be separated into it’s own table at a later point.
- name — This is the most complicated and contested field of the bunch when it comes to following standards. Due to international and cultural differences, names come in all shapes and sizes. To make providing this value simple and to facilitate the majority of cases (surname only, first/middle/last, formal vs preferred, etc), we will simply collect a single field of information at max length and let the user provide whichever value they feel best suits them. While even this approach is not perfect, it should cover the majority of users of our system. One case we are requiring is that a user does provide a name. Even though it is true that some people don’t have a name, we will flag this column as not null because it is a bigger concern to us to make sure that users who do have a name don’t accidentally skip providing this input. A list of additional considerations to keep in mind when using a name field can be referenecd here: https://www.kalzumeus.com/2010/06/17/falsehoods-programmers-believe-about-names/
With all of in mind, we can run our create table statement so we have a place to store our user’s data
We can also view our newly created table by running the command show tables;.

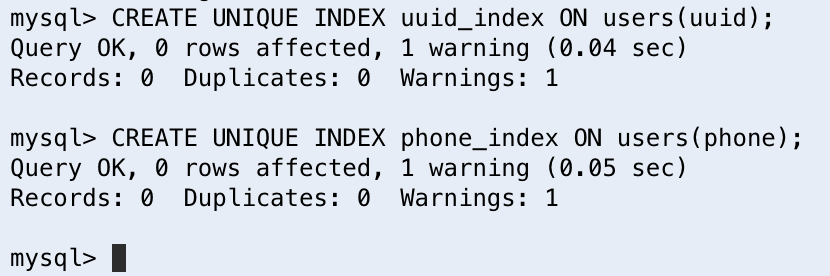
Next up, we want to make sure our database stays performant. To make sure that our lookups remain quick, we will want to put an index on each of the values we will want to use for a lookup or join. The columns that match this description include id, uuid, and phone number. However, we only need to add an index for uuid and phone number because primary keys (id) are automatically indexed.
To add these indexes, we will use the following commands:
CREATE UNIQUE INDEX uuid_index ON users(uuid);
CREATE UNIQUE INDEX phone_index ON users(phone);
Creating a test record
To make sure that our table is working correctly, let’s try creating a test user and see how our database is populated. For the guide we will be using a fake phone number. Take note that Africa’s Talking does add a country code prefixed with a plus sign so we will add the same to our test data:
INSERT INTO users (uuid, phone, name) VALUES (UUID(), ‘+11231231234’, ‘Test User’);

To read our newly created user, we can select all of the users in the table.
SELECT * FROM users;
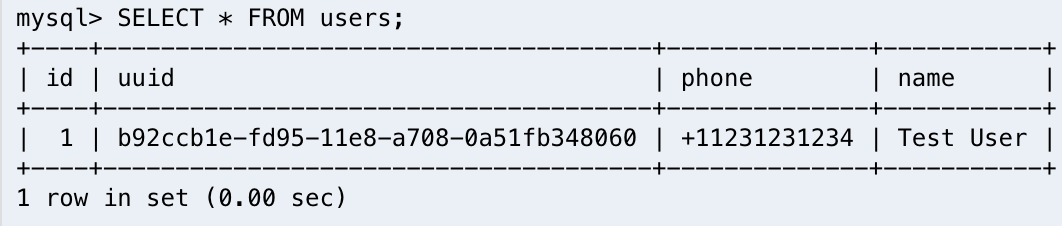
Here we can see that our new user has been created successfully.
Before we move on, let’s clean up after ourselves by removing our test record.
DELETE FROM users;
Integrating our DB with Lambda
The first step to integrating our Lambda function with our serverless database is ensure it has has the correct permissions.
Navigate over to IAM and let’s select the roles sub-menu on the lefthand side.
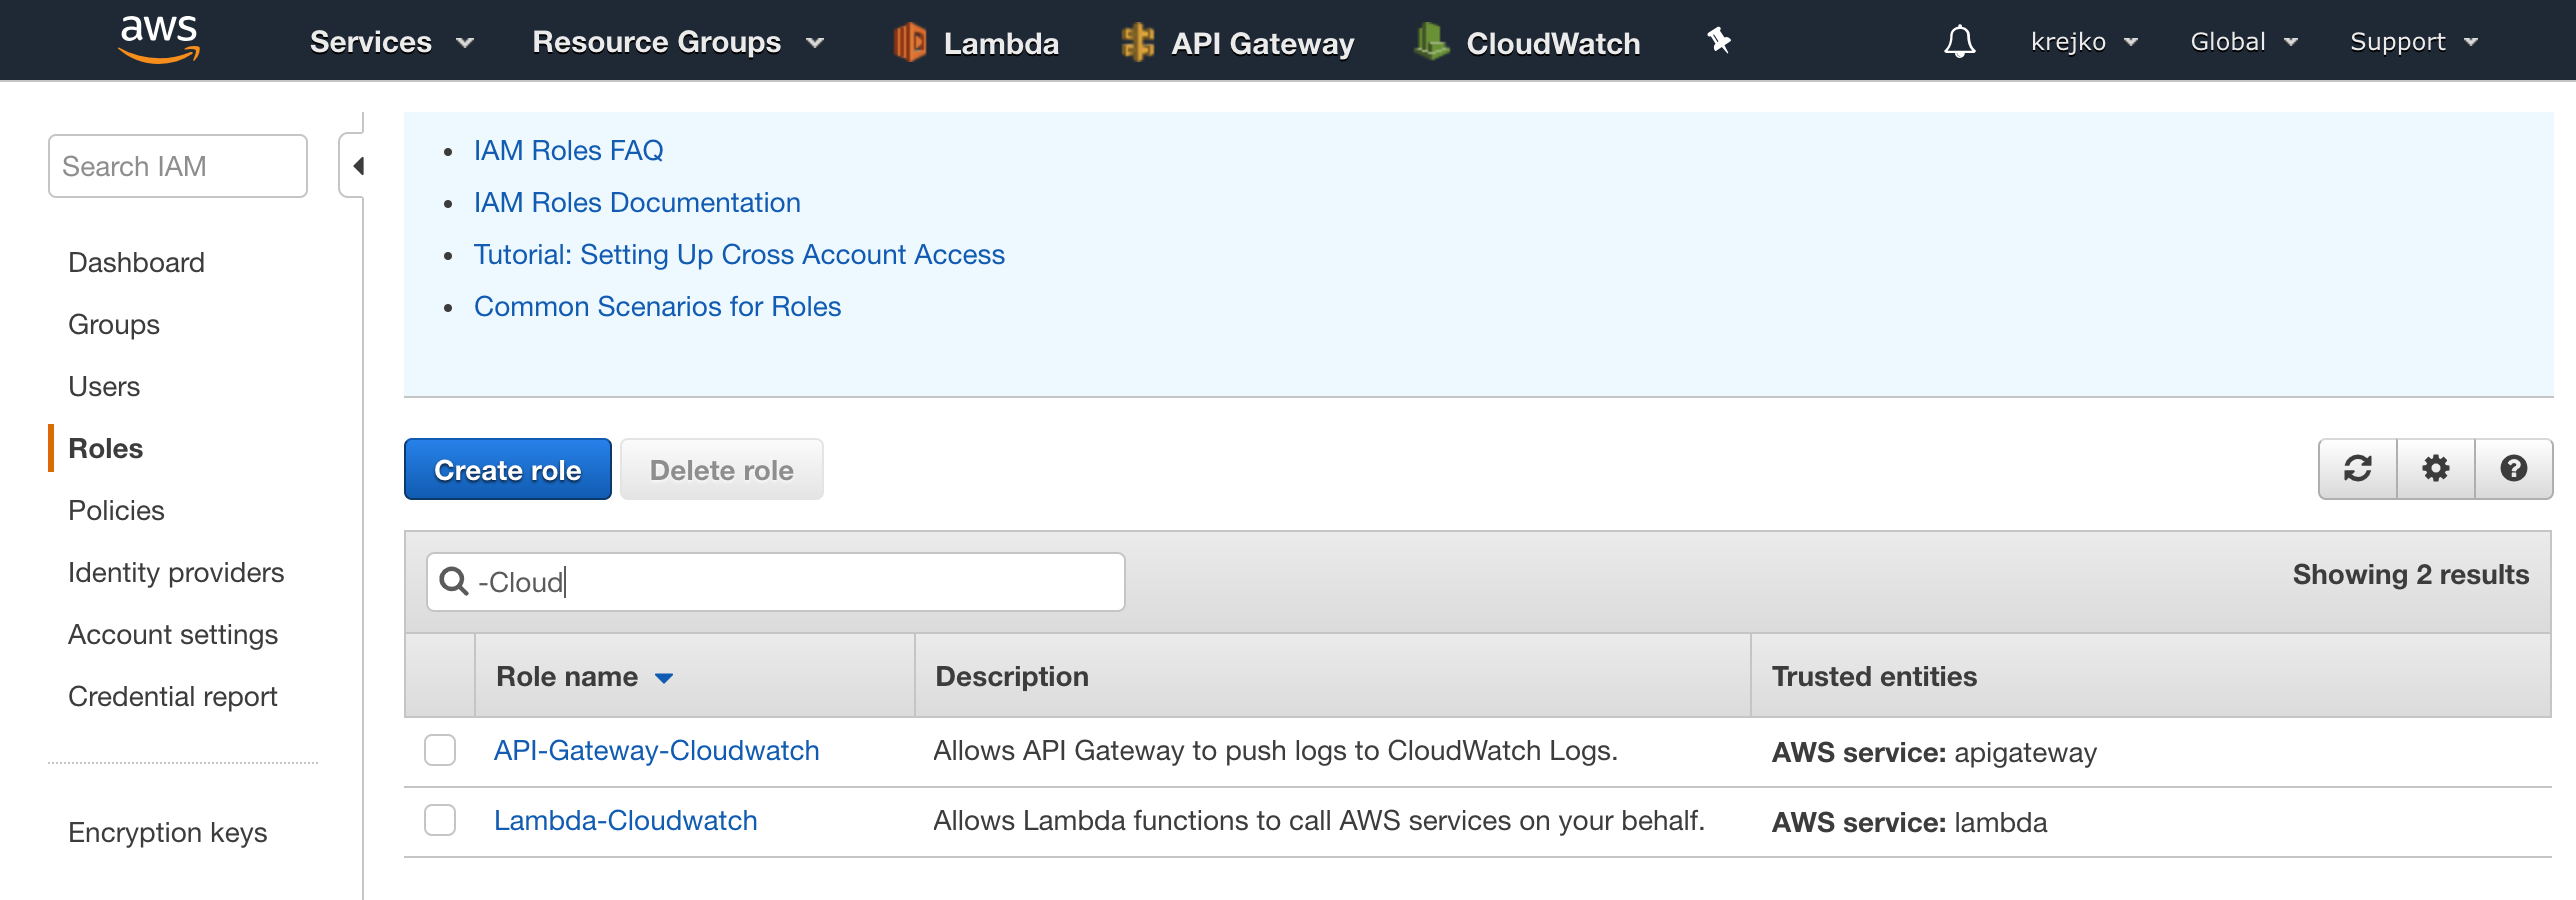
While our Lambda-Cloudwatch role was sufficient for our previous tutorial, to integrate with our RDS cluster, we are going to want a much more generalized role for our Lambda function. For this reason, we are going to select the ‘Create role’ button on this page.
Similar to the previous tutorial, we are going to select ‘Lambda’ as our AWS service, and then the “Next: Permissions” button.
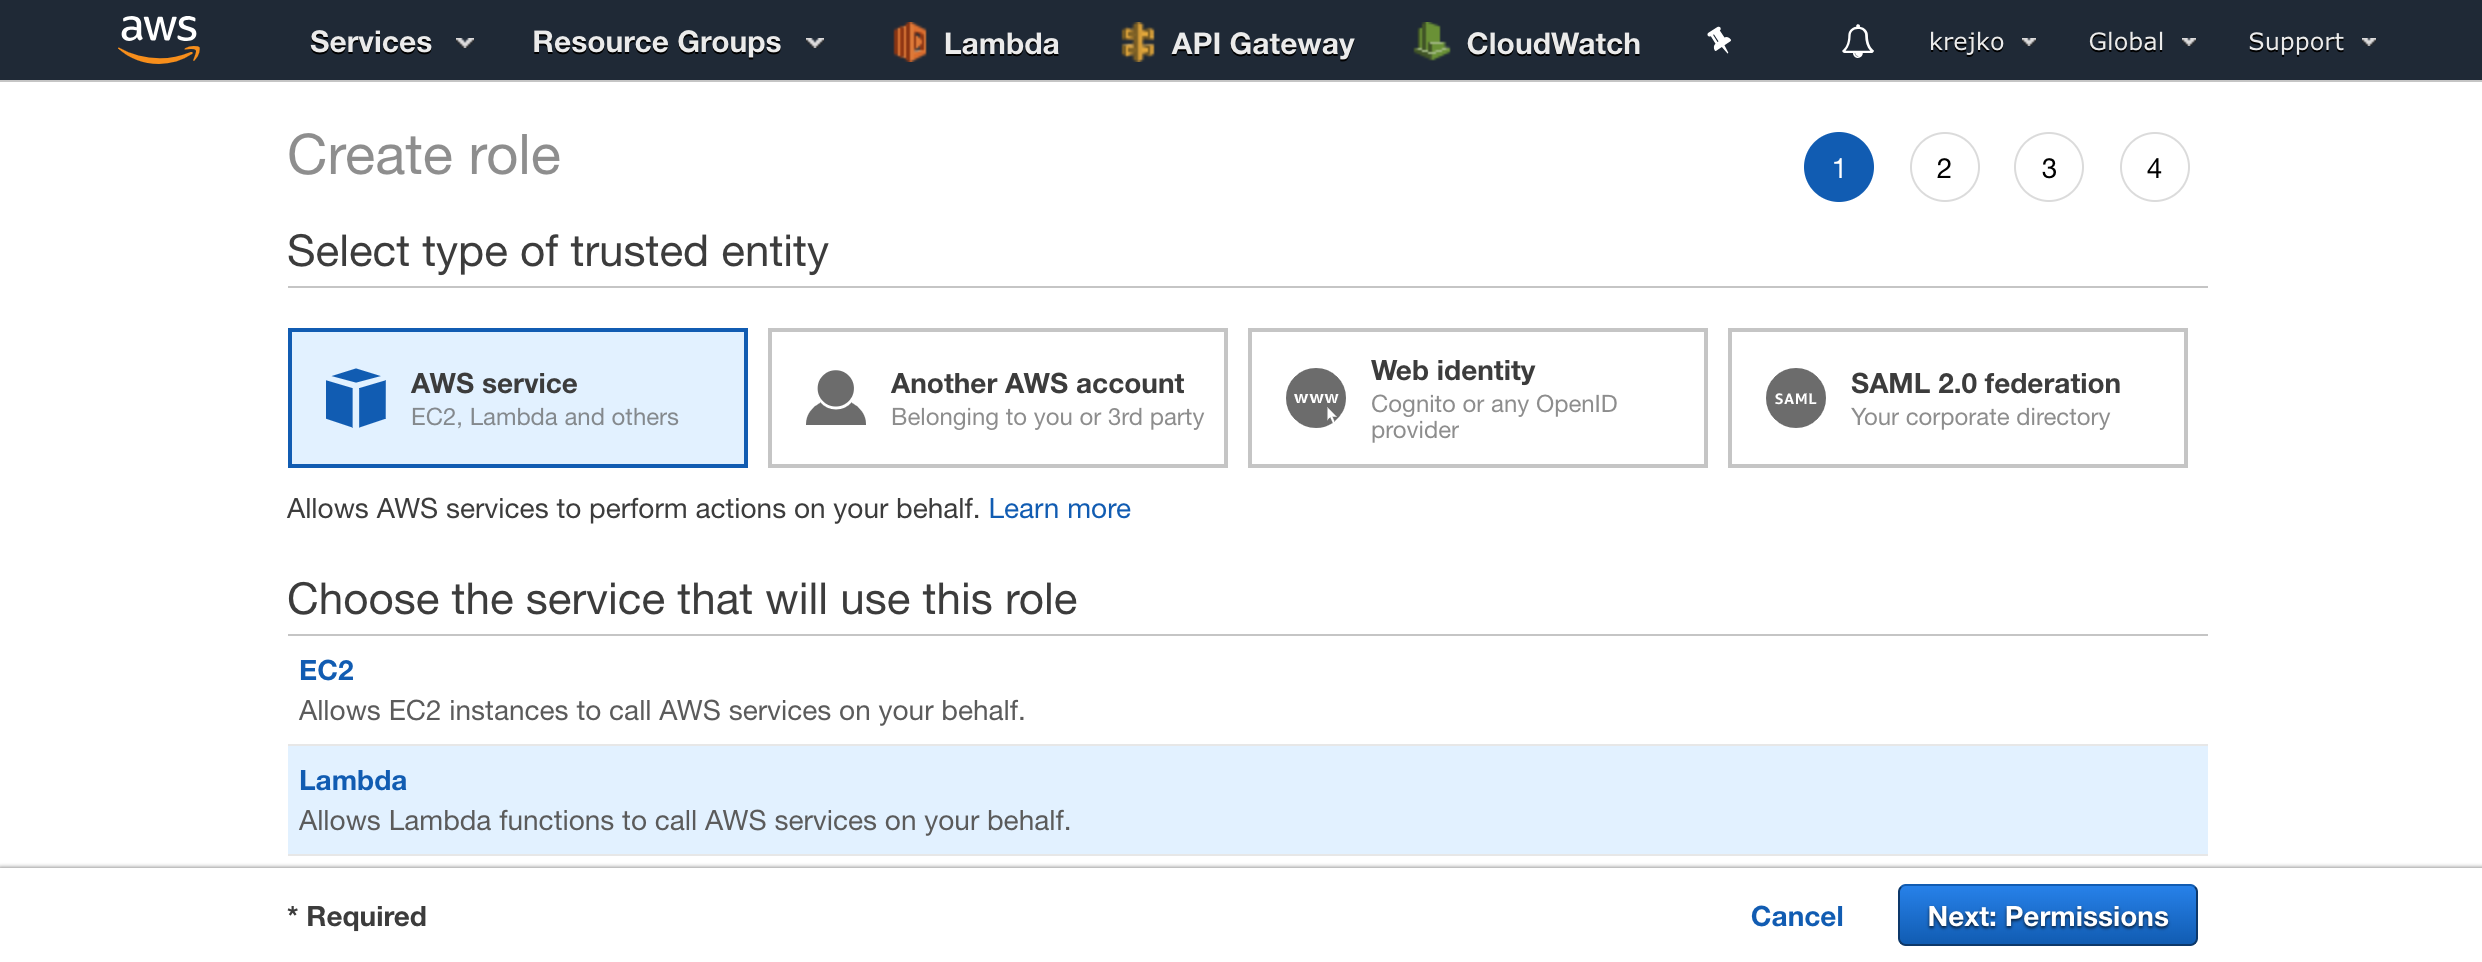
Also similar to the last time, we are going to first add the AWSLambdaBasicExecutionRole.

However, unlike the last time, we are also going to add AWSLambdaVPCAccessExecutionRole.

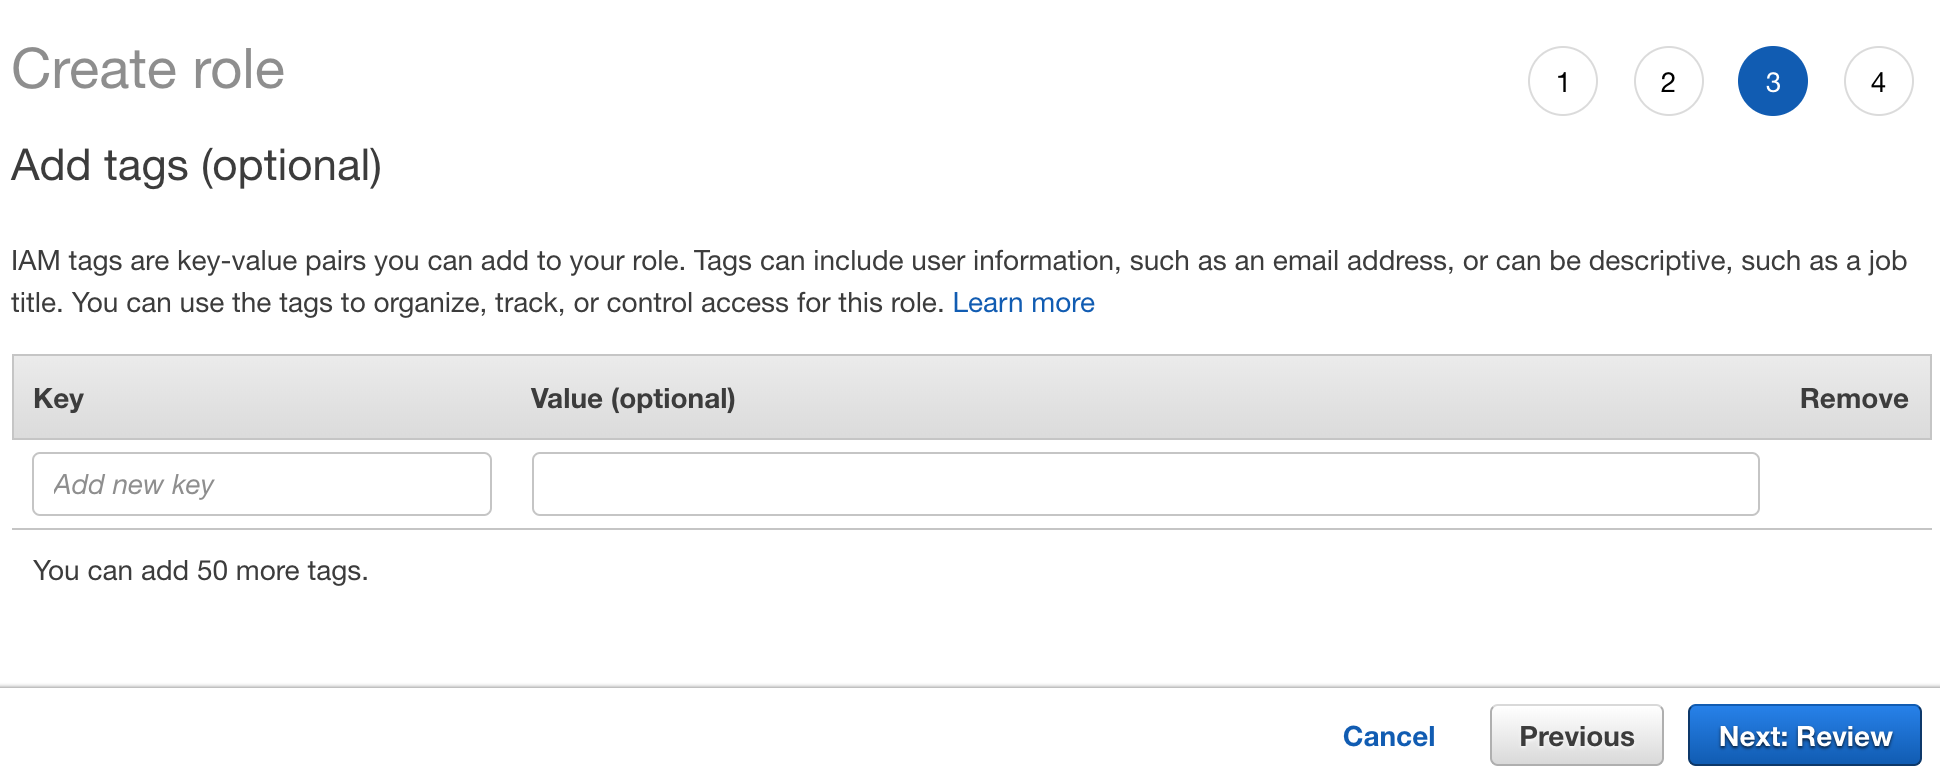
With these two policies selected for our new role, we can click the “Next:Tags” button at the bottom of the page. Tags are a new feature to IAM roles that we do not need, so we can click the ‘Next: Review’ button to continue to final step.
For this final step, we will want to give a more generalized name than our previous role, so it can be used with any of the policies we may need to add going forward. For this reason I am going to use the role name ‘at-lambda’.
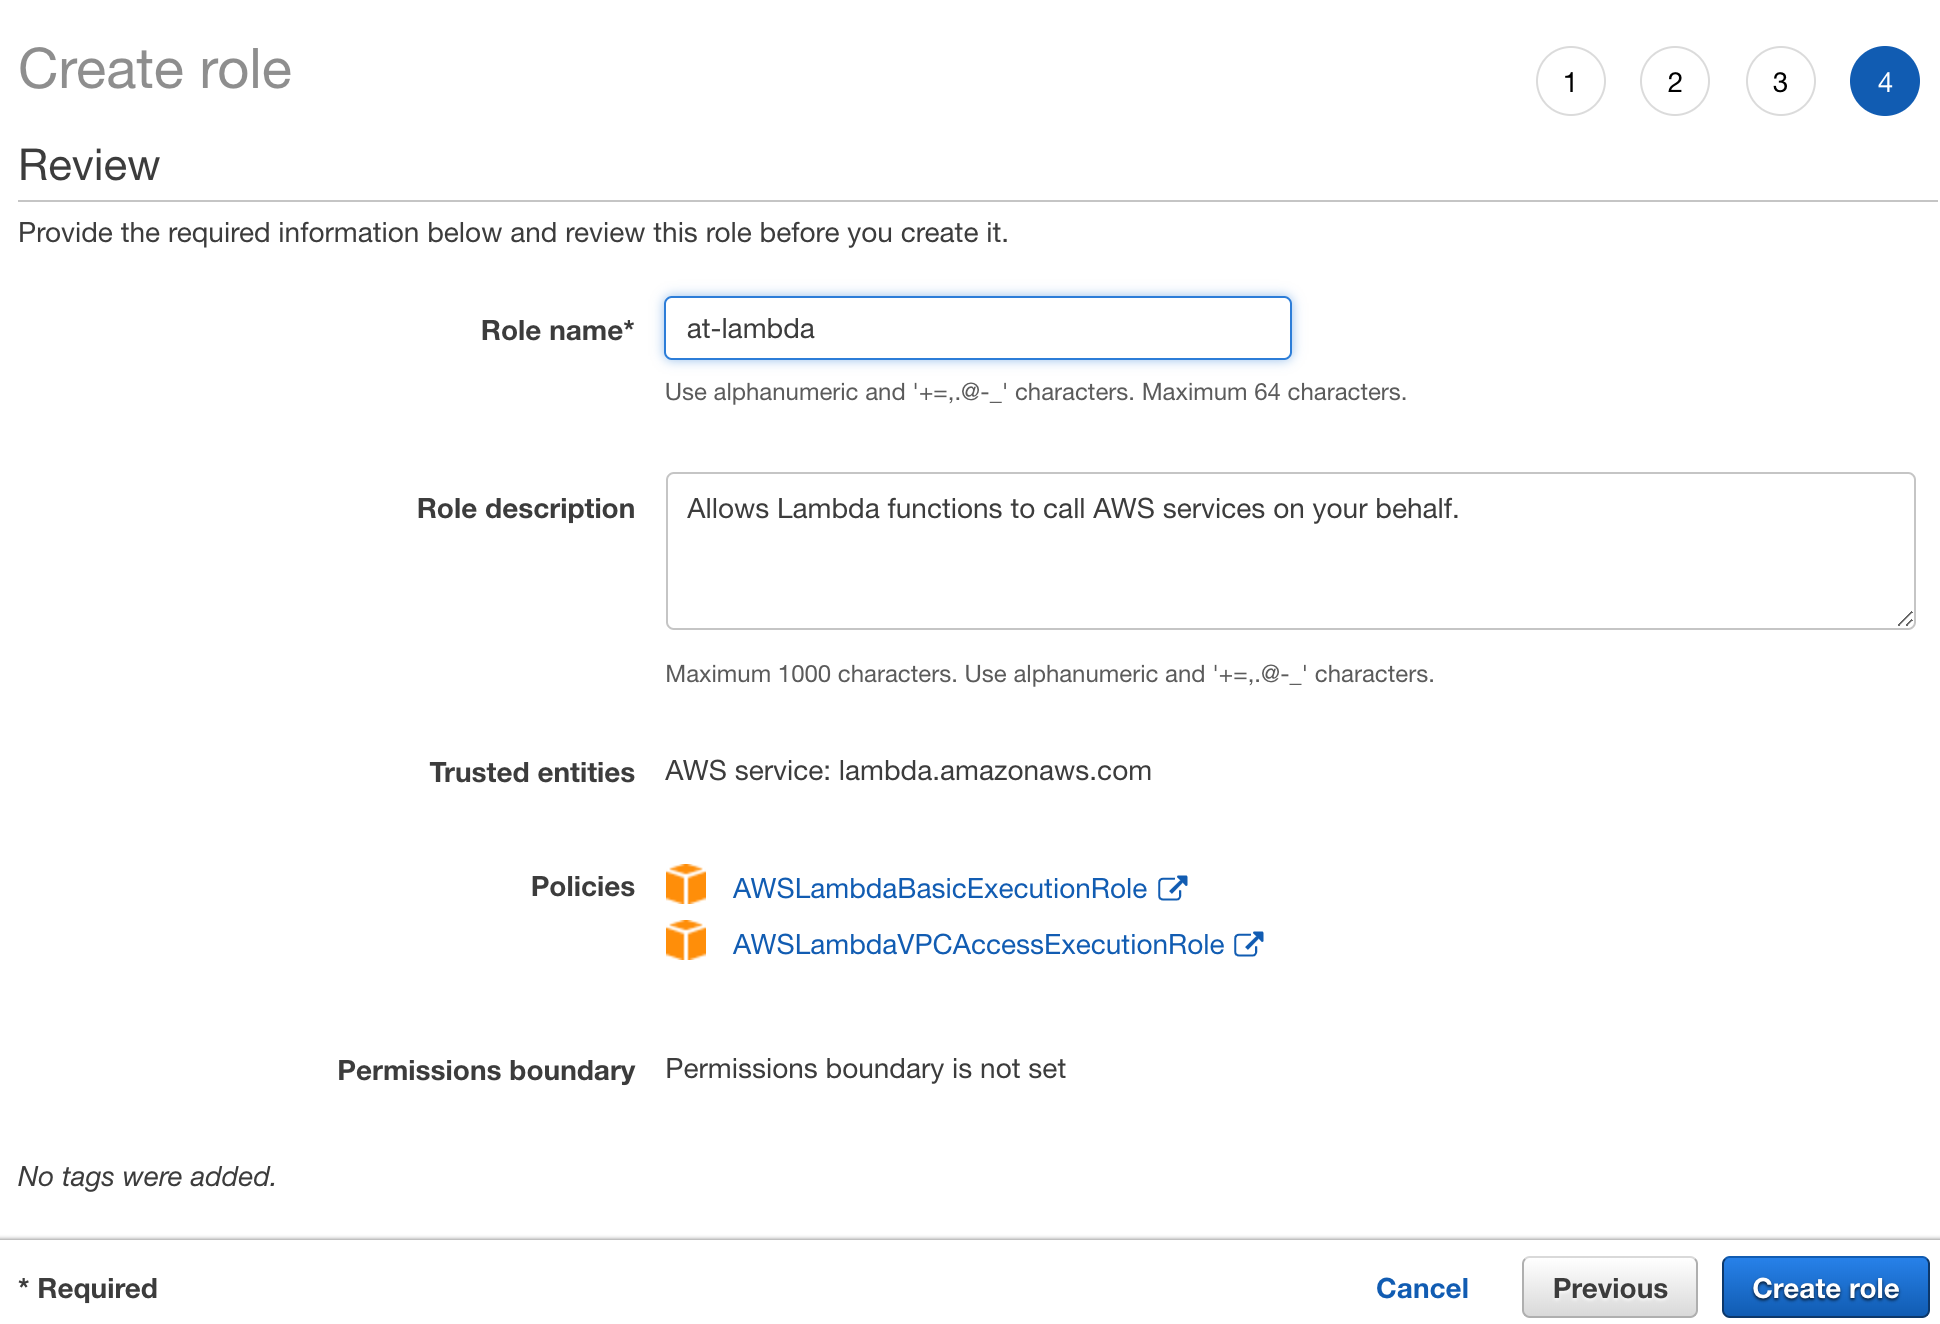
Once the role name has been added, let’s verify that both of of our policies have been added, and then we can select the “Create role” button.
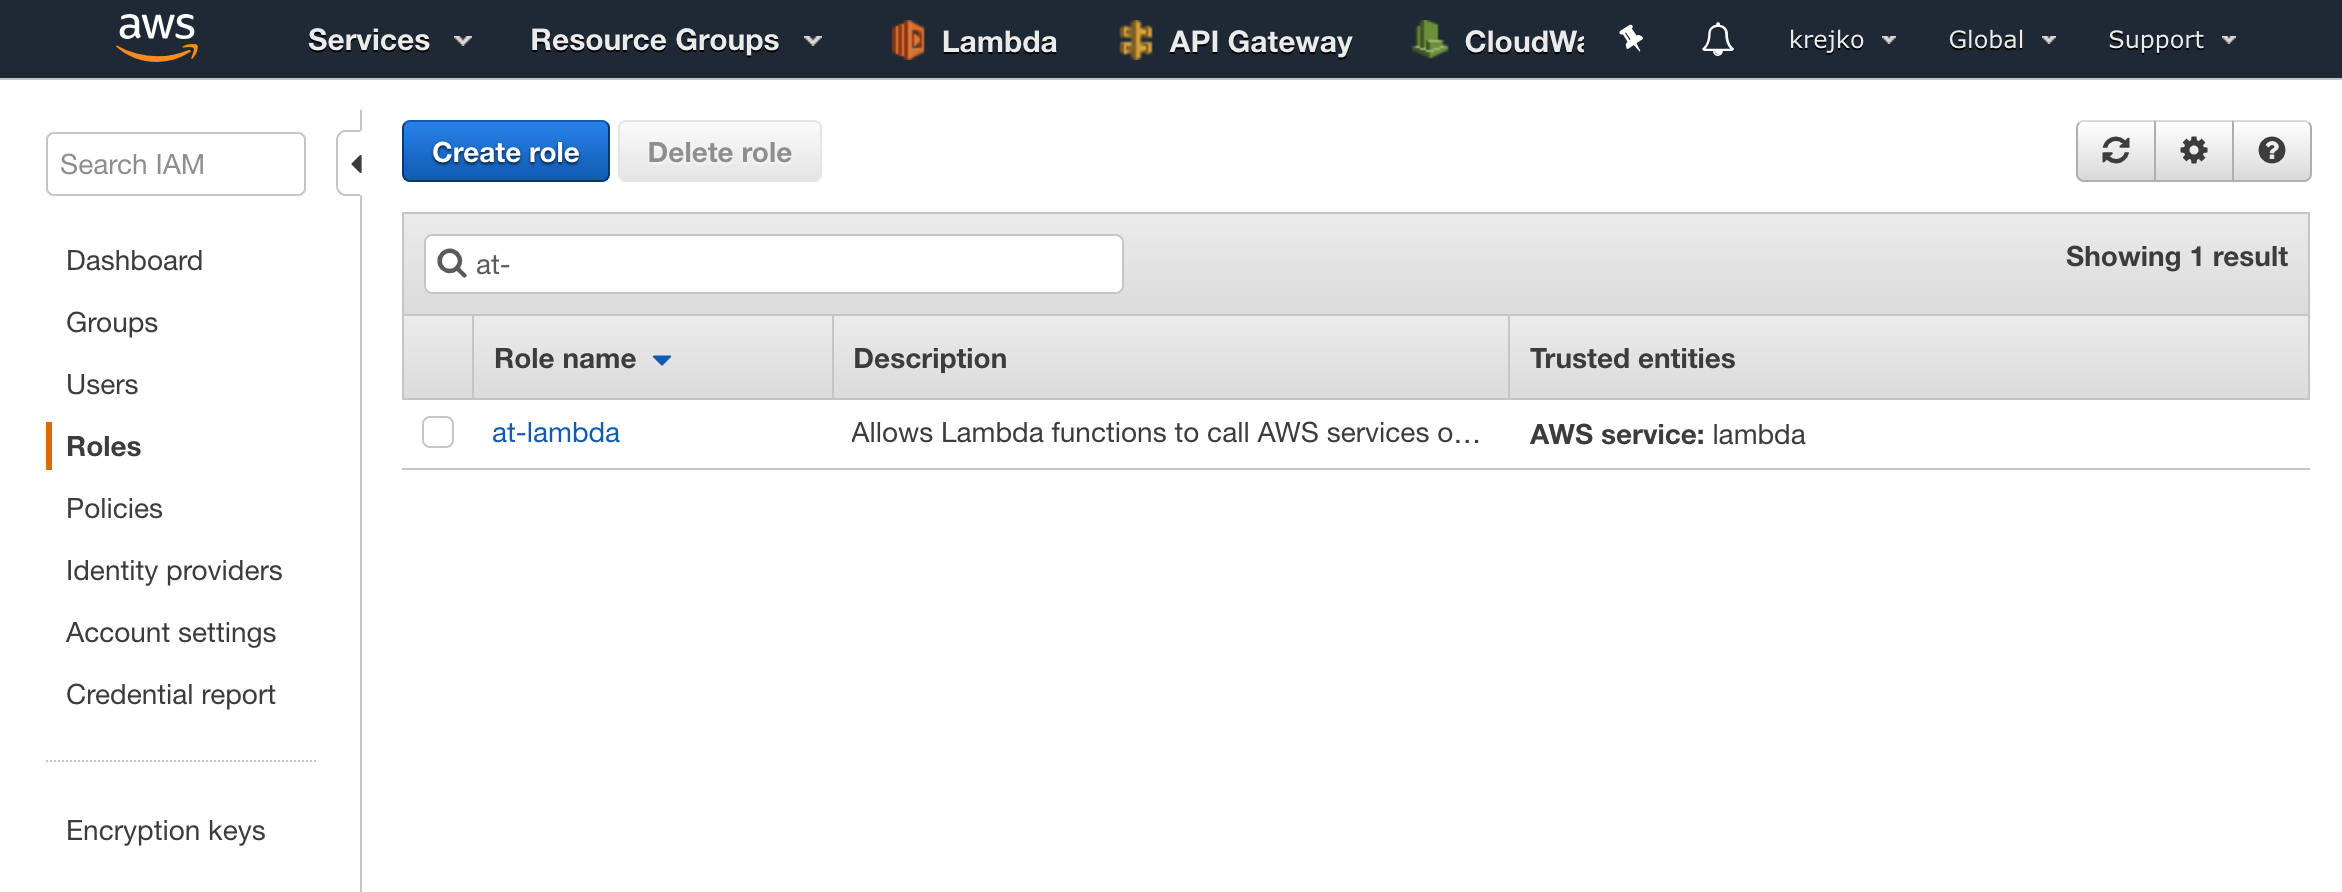
We should now see our new role in the list.
Once we have verified our new role has been created successfully, we can make sure our lambda function has the necessary dependancies for connecting to our database.
Node.js MySQL Dependencies
In order for us to connect to our node.js based Lambda function to our MySQL database in RDS, we must first make sure we have the mysql node module. To get this module, we will follow the same process as when we added our ussd-menu-builder module. A quick recap of the steps:
- Download a copy of our function
- Add our new module
- Zip and push our function back to AWS with new library included.
Unlike the previous article, this time we will assume that the aws-cli has already been installed and configured. If it has not been installed/configured or you are experiencing issues with the aws-cli, please reference Part 1.
1. Download our Lambda Function
To get a copy of our Lambda function available on our local machine, let’s head over to lambda and select our Africas-Talking-USSD function.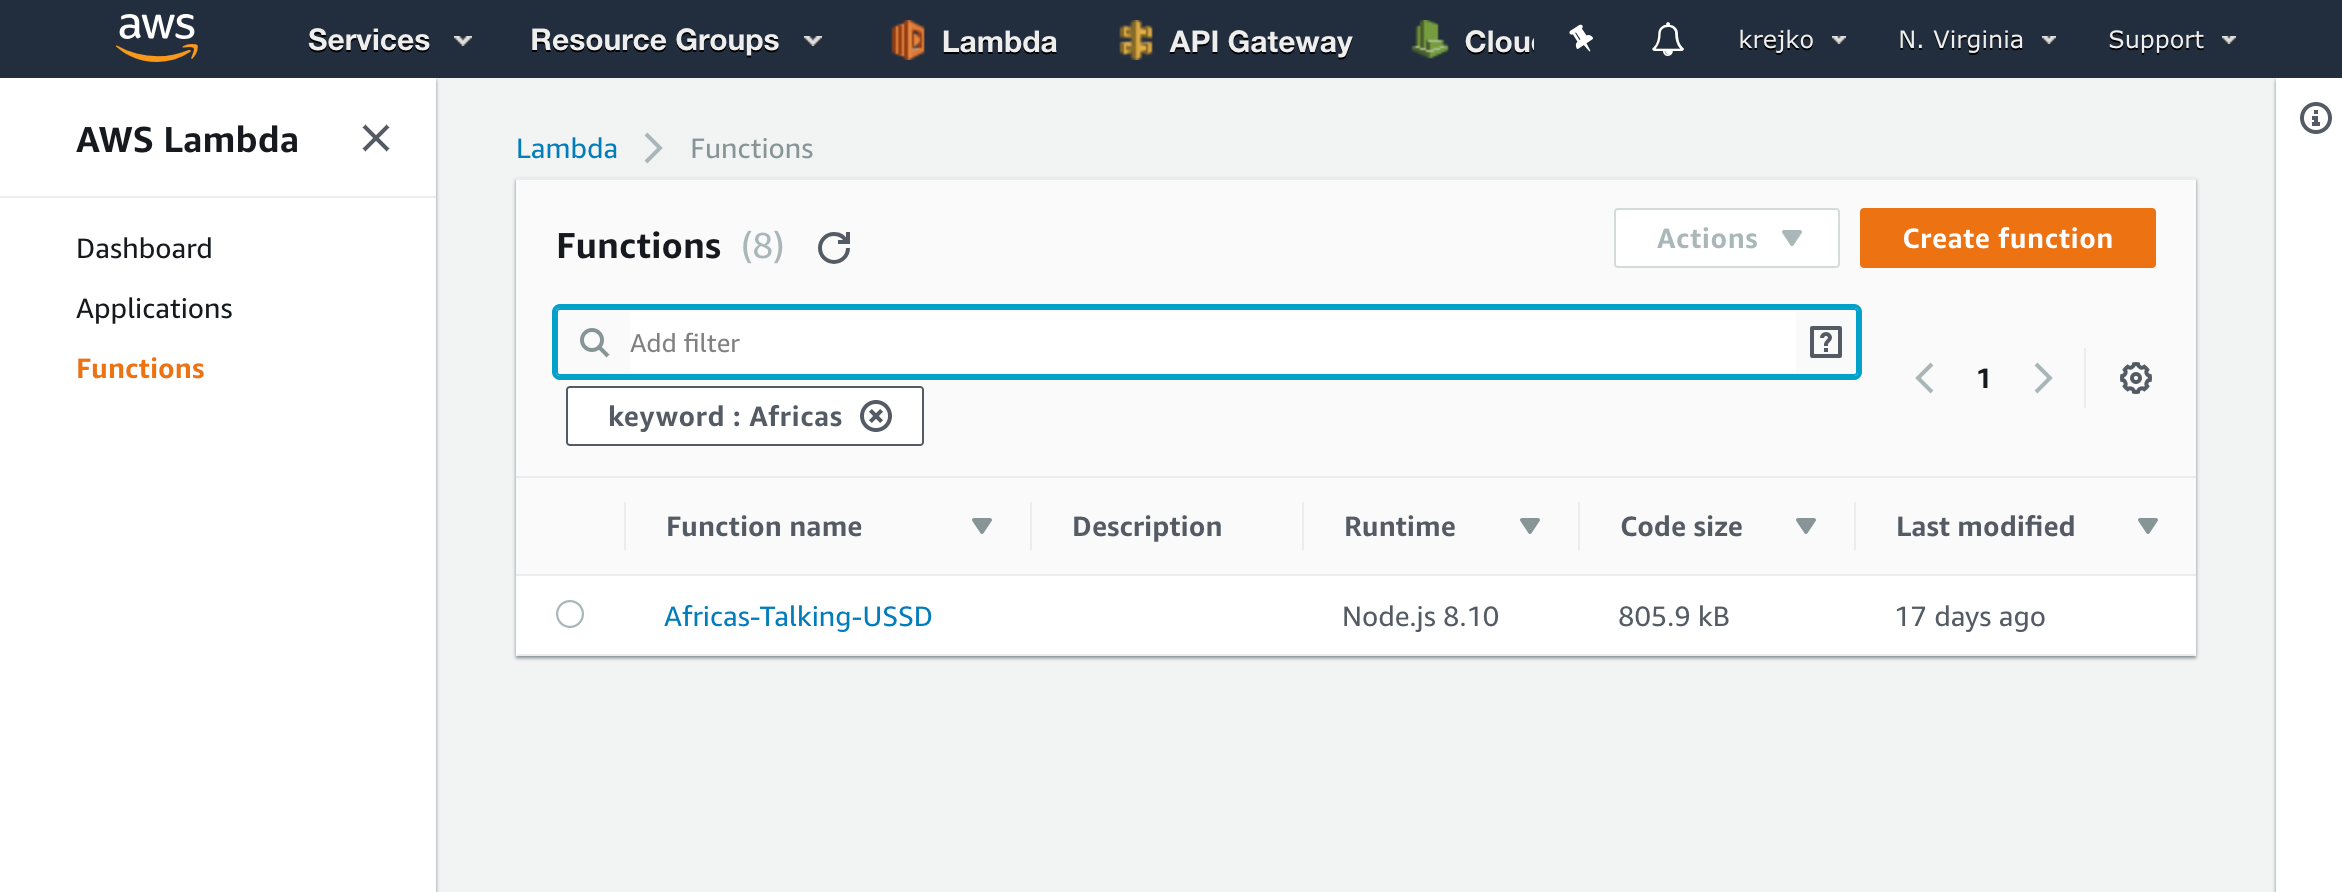
Once our function has loaded, we can select the “Actions” dropdown, followed by the “Export Function” button.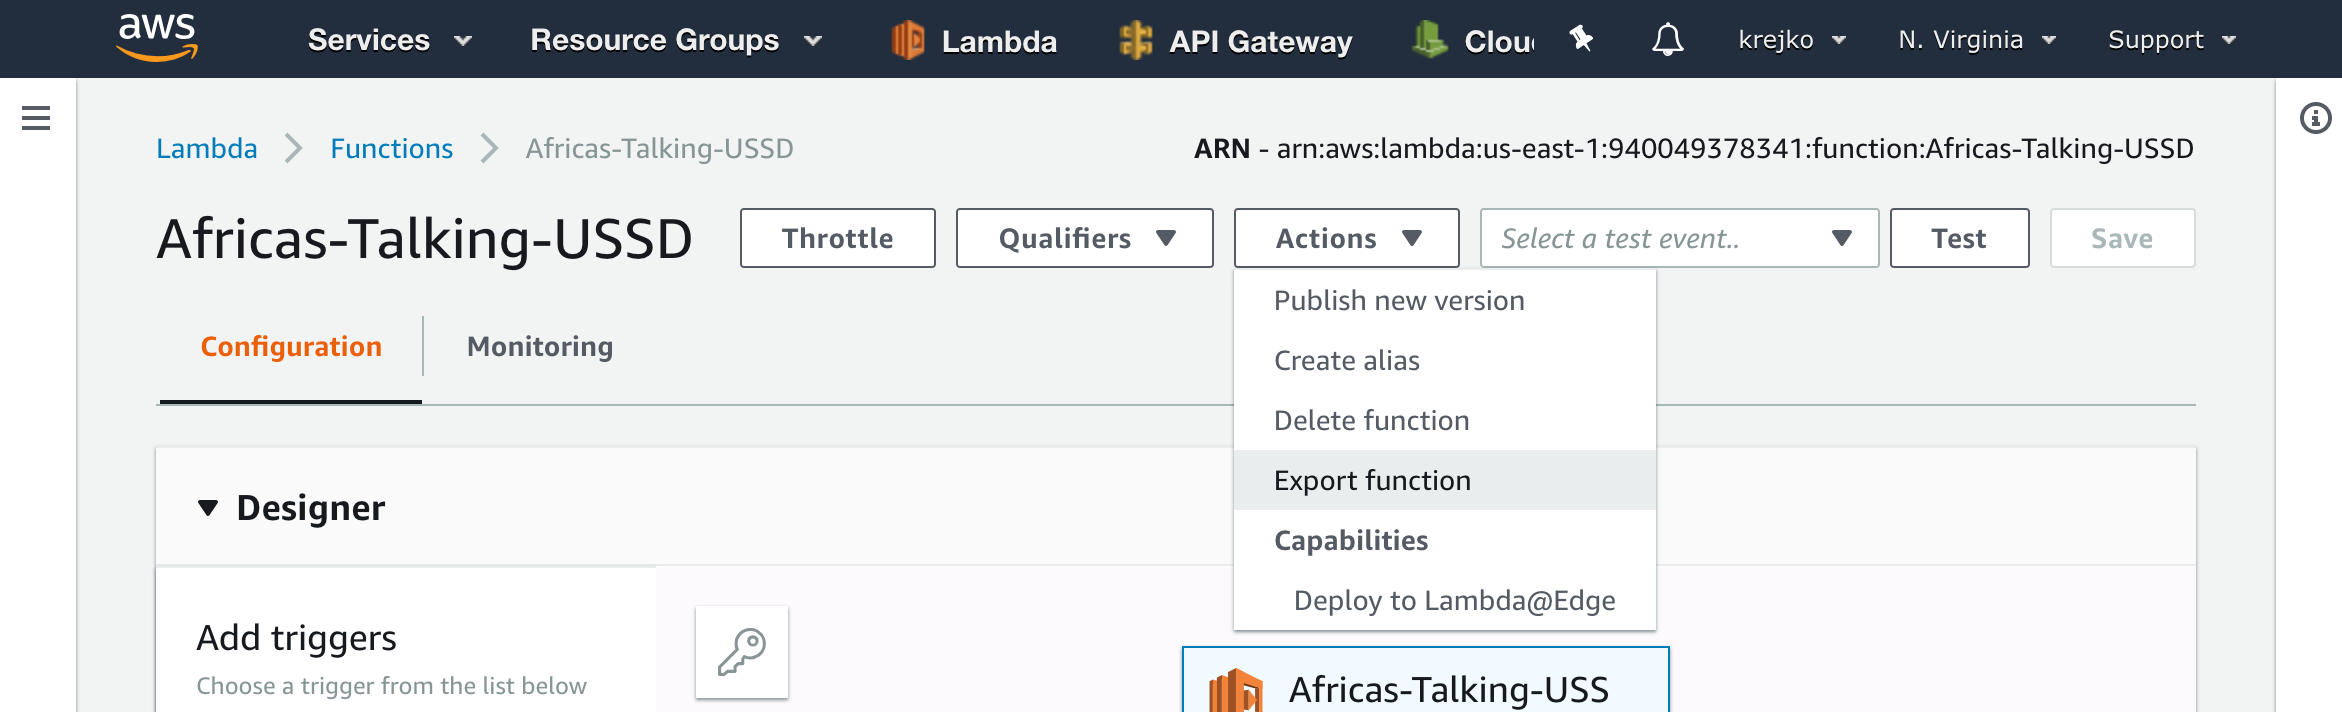

From here, we will be given an option on the format we would like to download. We should select the “Download deployment package’ option.
This will download a zipped copy of function that we can use to add our dependency. Lastly, if the file doesn’t automatically unzip after it has been downloaded, double click on the file to extract its contents.
2. Add MySQL Module
Once our files have been extracted, we should open up Terminal or the Windows equivalent of Bash and navigate into our newly extracted directory using the change directory (cd) command. When you list (ls) the contents of the directory you should see the following.
To add the new MySQL module, we can use the command:
npm install mysql –save
When the module has finished downloading, we should see a summary provided by node package manager indicating the operation’s success.

With this, our dependencies have been added to our function and we are ready to re-upload back to AWS.
3. Zip and upload
To get these packages uploaded to AWS, we first need to zip them into a single file. This can be done using the command zip -X -r modules.zip *. Next we must send this file to our lambda function using the command: aws lambda update-function-code –function-name Africas-Talking-USSD –zip-file fileb://modules.zip. When complete, it will output a JSON output confirming the upload was successful.
{
“FunctionName”: “Africas-Talking-USSD”,
“FunctionArn”: “arn:aws:lambda:us-east-1:940049378341:function:Africas-Talking-USSD”,
“Runtime”: “nodejs8.10”,
“Role”: “arn:aws:iam::940049378341:role/Lambda-Cloudwatch”,
“Handler”: “index.handler”,
“CodeSize”: 1116618,
“Description”: “”,
“Timeout”: 3,
“MemorySize”: 128,
“LastModified”: “2018-11-28T22:26:03.568+0000”,
“CodeSha256”: “QXXHfKMudYkjHe21KZsEojaWbcmM+k7+7tjNC2jUx4c=”,
“Version”: “$LATEST”,
“TracingConfig”: {
“Mode”: “PassThrough”
},
“RevisionId”: “51b30fa6-a534-4197-b25c-cb5299b09686”
}
Now, when we navigate back to our Africas-Talking-USSD lambda function (or refresh the page if it’s already pulled up), we should now see that we have the mysql package and all of its dependencies in the node_modules directory included as a part of our function.
With the necessary library now available to our function, the next step is to update our code so we can connect to our database.
Updating Our Function’s Code
Before we get too crazy with our new mysql integration, we first want to make sure everything is set to allow our function to connect to our serverless database. Our first step to do this, is to import our new library, and to create a connection object. We can do this with the following code directly below where we require our ussd-menu-builder library:
var mysql = require(‘mysql’);
var connection = mysql.createConnection({
host: “”,
user: “at_ussd_master”,
password: “”,
database: “at”,
});
Please note that the host (RDS Aurora endpoint) and password values in the snippet above are placeholders. Be sure to update these values so they match your own serverless database’s configuration.
Next, we will use this new connection object to execute a sample query. This will validate that there are no errors when interacting with our database. We can do this with following code snippet placed at the top of our exports.handler function:
connection.query(‘SELECT * FROM users’, function (error, results, fields) {
if (error) {
console.log(“Error: “, error);
connection.destroy();
throw error;
} else {
// connected!
console.log(“Results: “, results);
console.log(‘Fields: ‘, fields)
connection.end(function (err) {
console.log(“Connection ended”, err)
context.succeed(‘END Success’);
});
}
});
Take note that now, instead of using the callback as we did when returning our menus in the previous guide, we are now using the succeed method on the context object. Without this change, the lambda function will instead return timeout errors instead of successfully connecting to our database and returning our results.
Also observe that we are returning ‘END Success’ as the response from our successful connection so that Africa’s Talking sees our response as valid. This is necessary because we have temporarily removed the USSD Menu Builder implementation that would normaly manage this for us.
To make sure that our database conenction succeeds and we get the result we are expect, let’s simplify our function by commenting out all of the other code in the method. This can be done easily by highlighting the code we would like to omit from execution and pressing the command + / key on a Mac. You will notice double slashes will be placed in front of each line that was highlighted. Later when we incorporate our database results with this code, we can easily use the same keyboard shortcut to undo this change.
The code that gets executed should look like the following.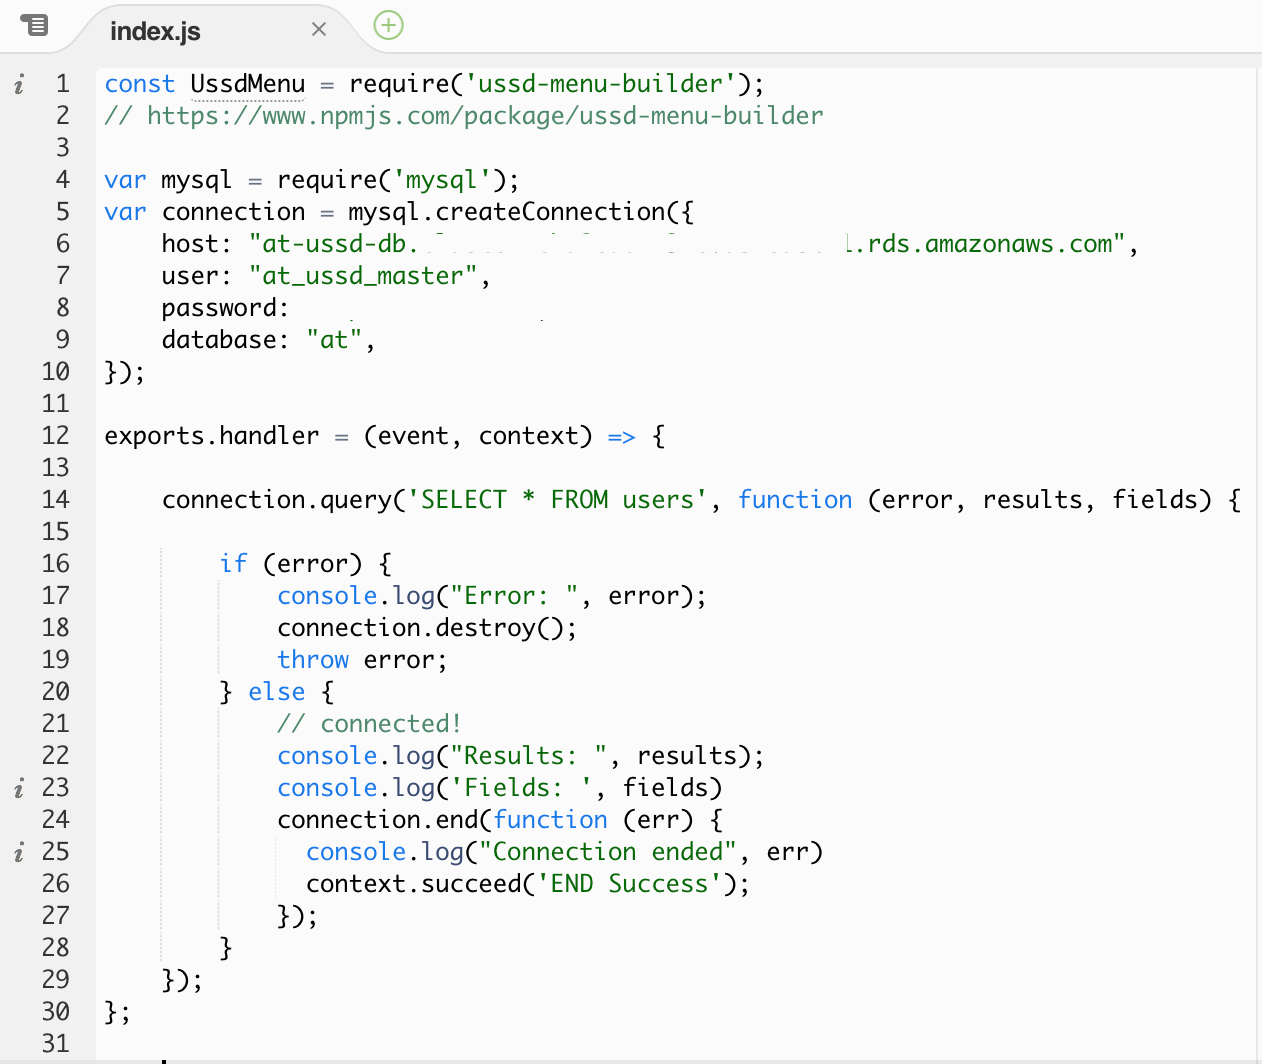
In the photo above, I have deleted instead of commented-out the code for brevity.
Before we save and test our function, we should also be sure to update the role and security settings of our function to use our new at-lambda permissions. Scroll down and locate the ‘Execution Role’ section of the function’s settings. We will want to keep ‘Choose and existing role’ as the first option, but update the second ‘Existing Role’ dropdown to now be our at-lambda role.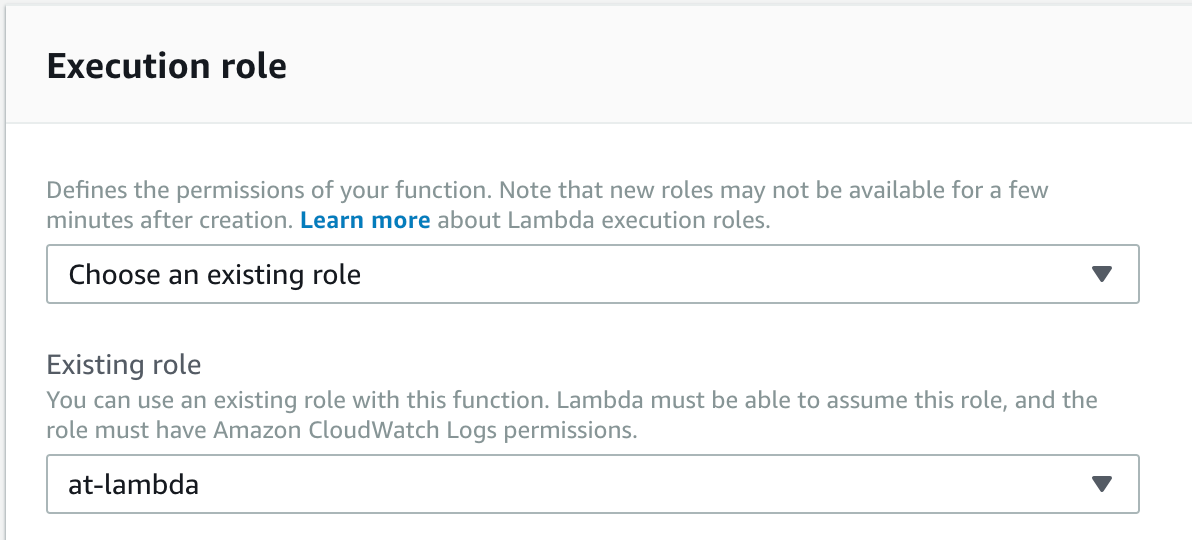
Lastly, let’s give our function the same security settings as our cloud9 node so our function can also open connections to our database. Below the ‘Execution Role’ section let’s locate the ‘Network’ settings. We will set our ‘VPC’ settings to match the same Virtual Private Cloud that we used for our RDS Aurora database and Cloud9 node. We also must select the a few subnets (at least two) to ensure our function remains highly available. Finally, we should select the security group we used with cloud9 because we have already verified this group’s settings are permitted to make the database connection we need. Long term, we should create our own security group for this function, but for getting things up and running the first time, this should work for our needs. Our network settings should look something like the following configuration.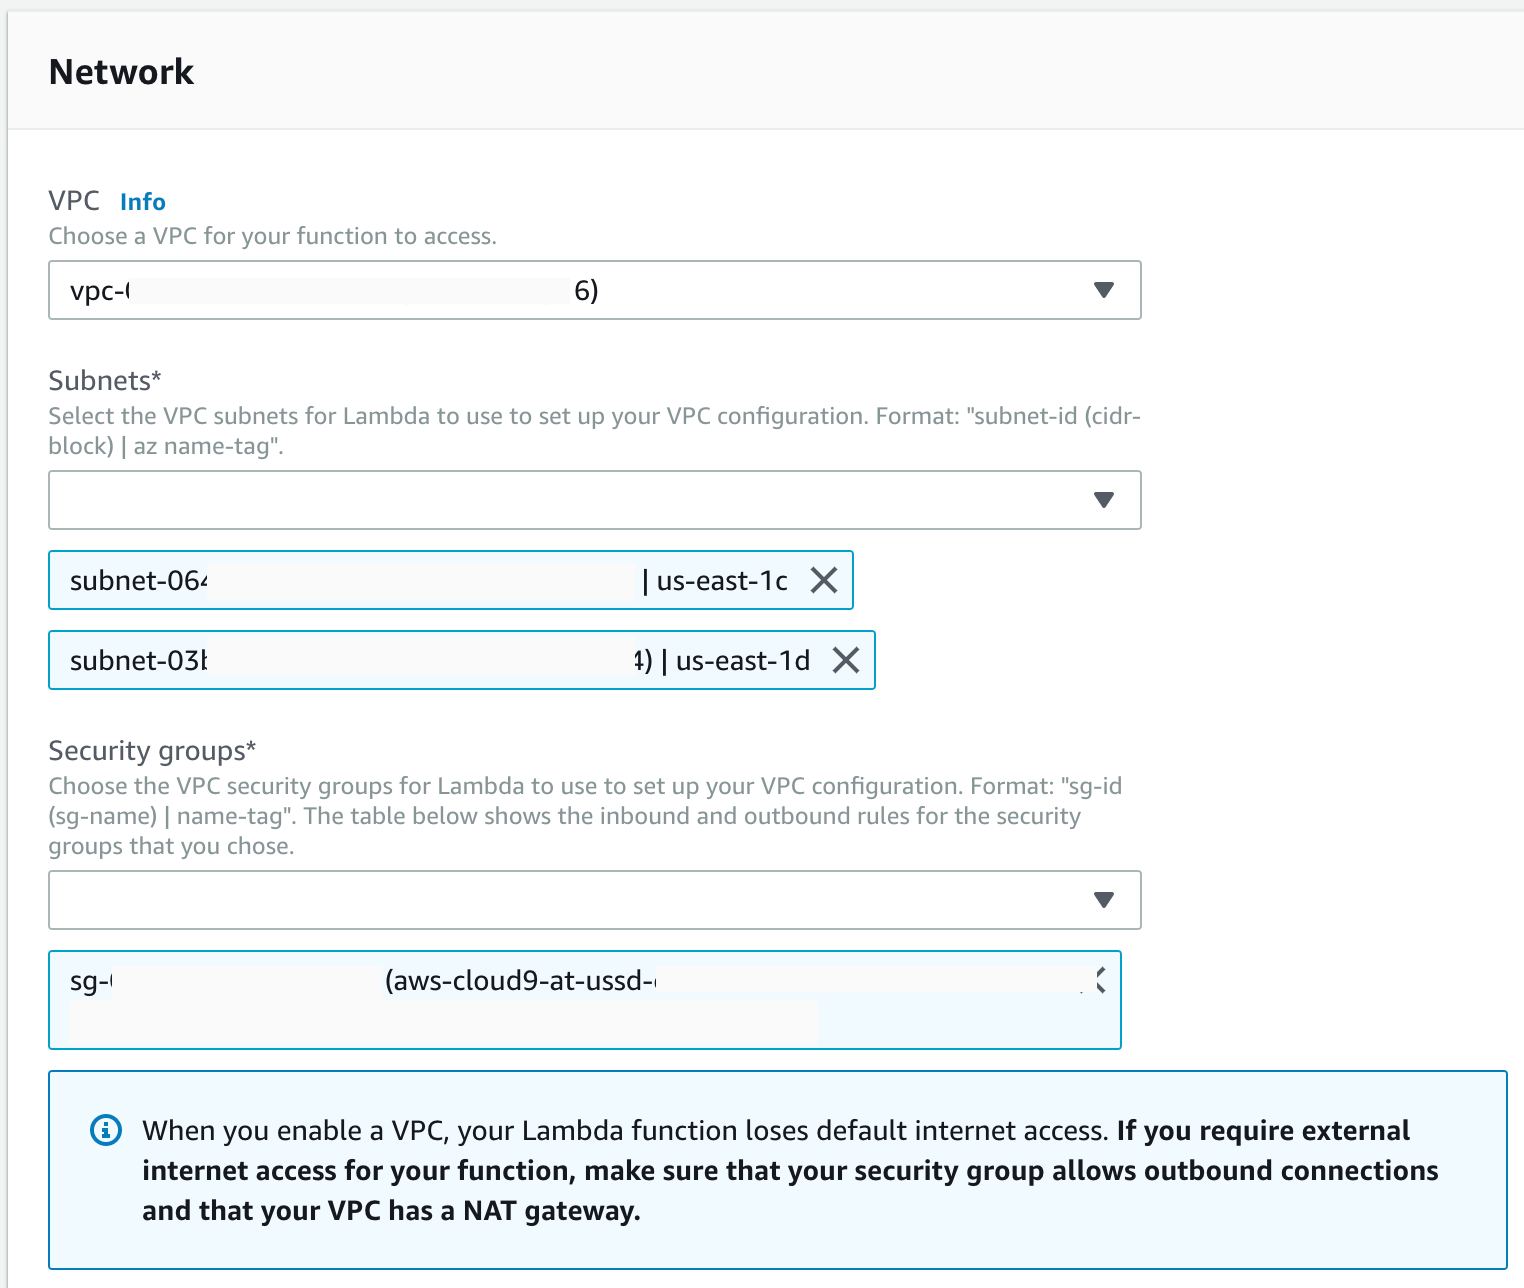
Do note, by putting our lambda function in the same virtual private cloud, it will remove internet access from the function. While this does make the function more secure, it can also prevent integrating with other 3rd party services.
With these last changes, we should now have all of the necessary infrastructure for our Lambda function to communicate with our Aurora database.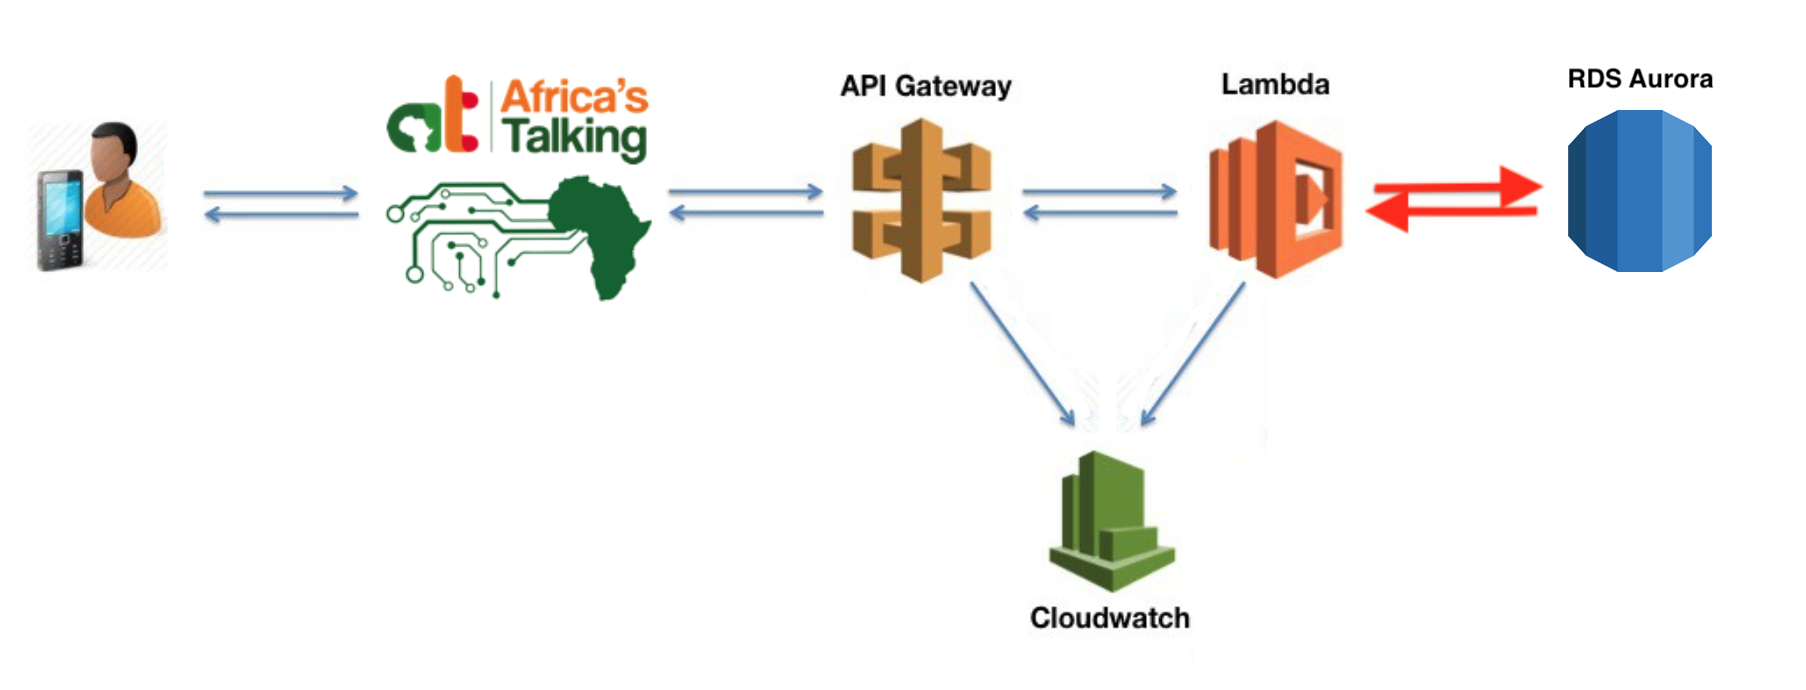
Let’s save our function so we can test our database connection.
Testing Our ‘Lambda ← → Aurora’ DB Connection
To test our connection, let’s return to the Africa’s Talking simulator and dial up our USSD short code. As a quick recap, the simulator can be started by using your account to sign in to Africa’s Talking, selecting the ‘Go To Sandbox App’ Button, and then selecting ‘Launch Simulator’ Button on the bottom of the left side menu. If you don’t remember what the short-code was that you assigned to your USSD app, you can unfold the ‘USSD’ option on the left menu and select ‘Service Codes’. If you have more than one service code, find the one that matches the callback URL of your deployed API Gateway development environment.
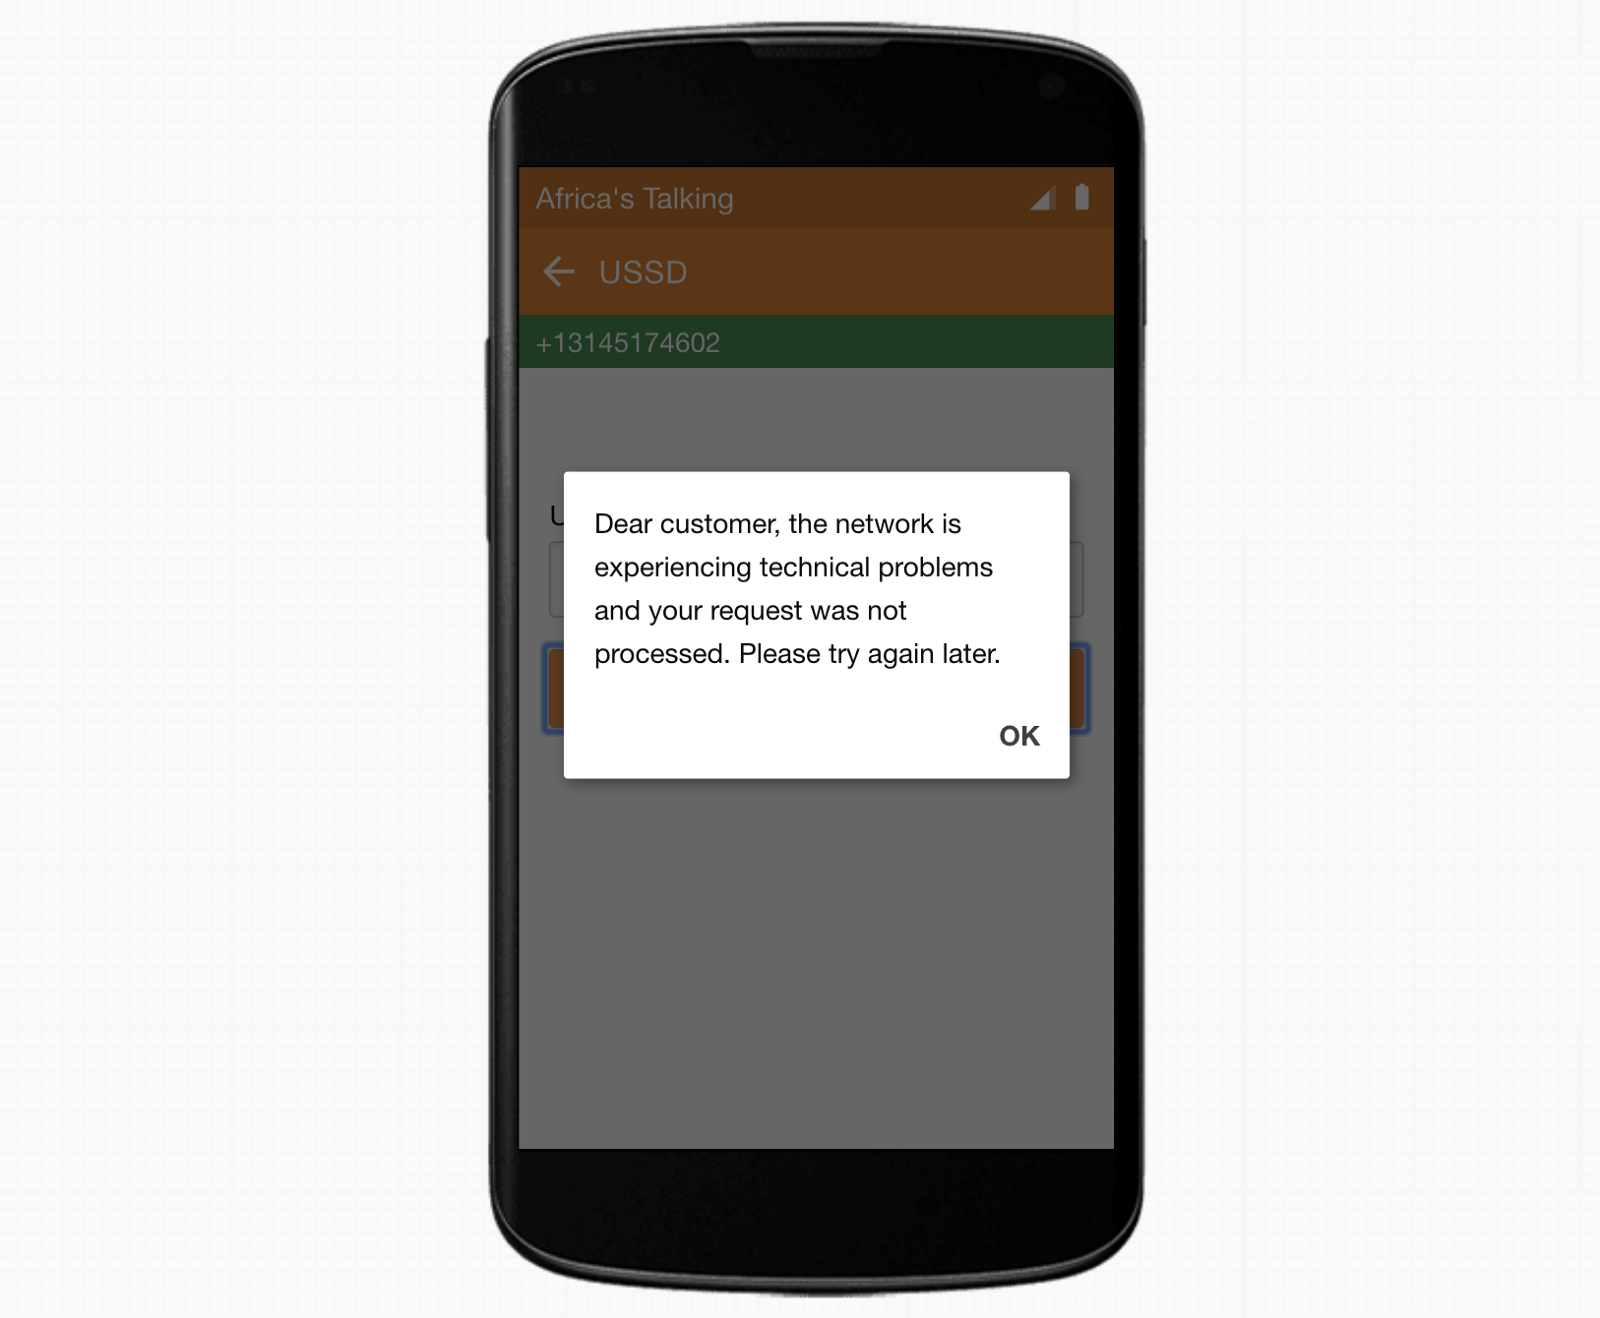
Once the simulator is booted, you have provided your phone number for testing, and have typed in the USSD short-code for your application, you will see one of two different error messages depending upon how much time has elapsed between when you last used your lambda function and database connection.
Option 1: You may receive an error message.
If you did receive an error message, wait 15–30 seconds and try again. It make take a few tries, but If everything is set up correctly, you will eventually receive the success message.
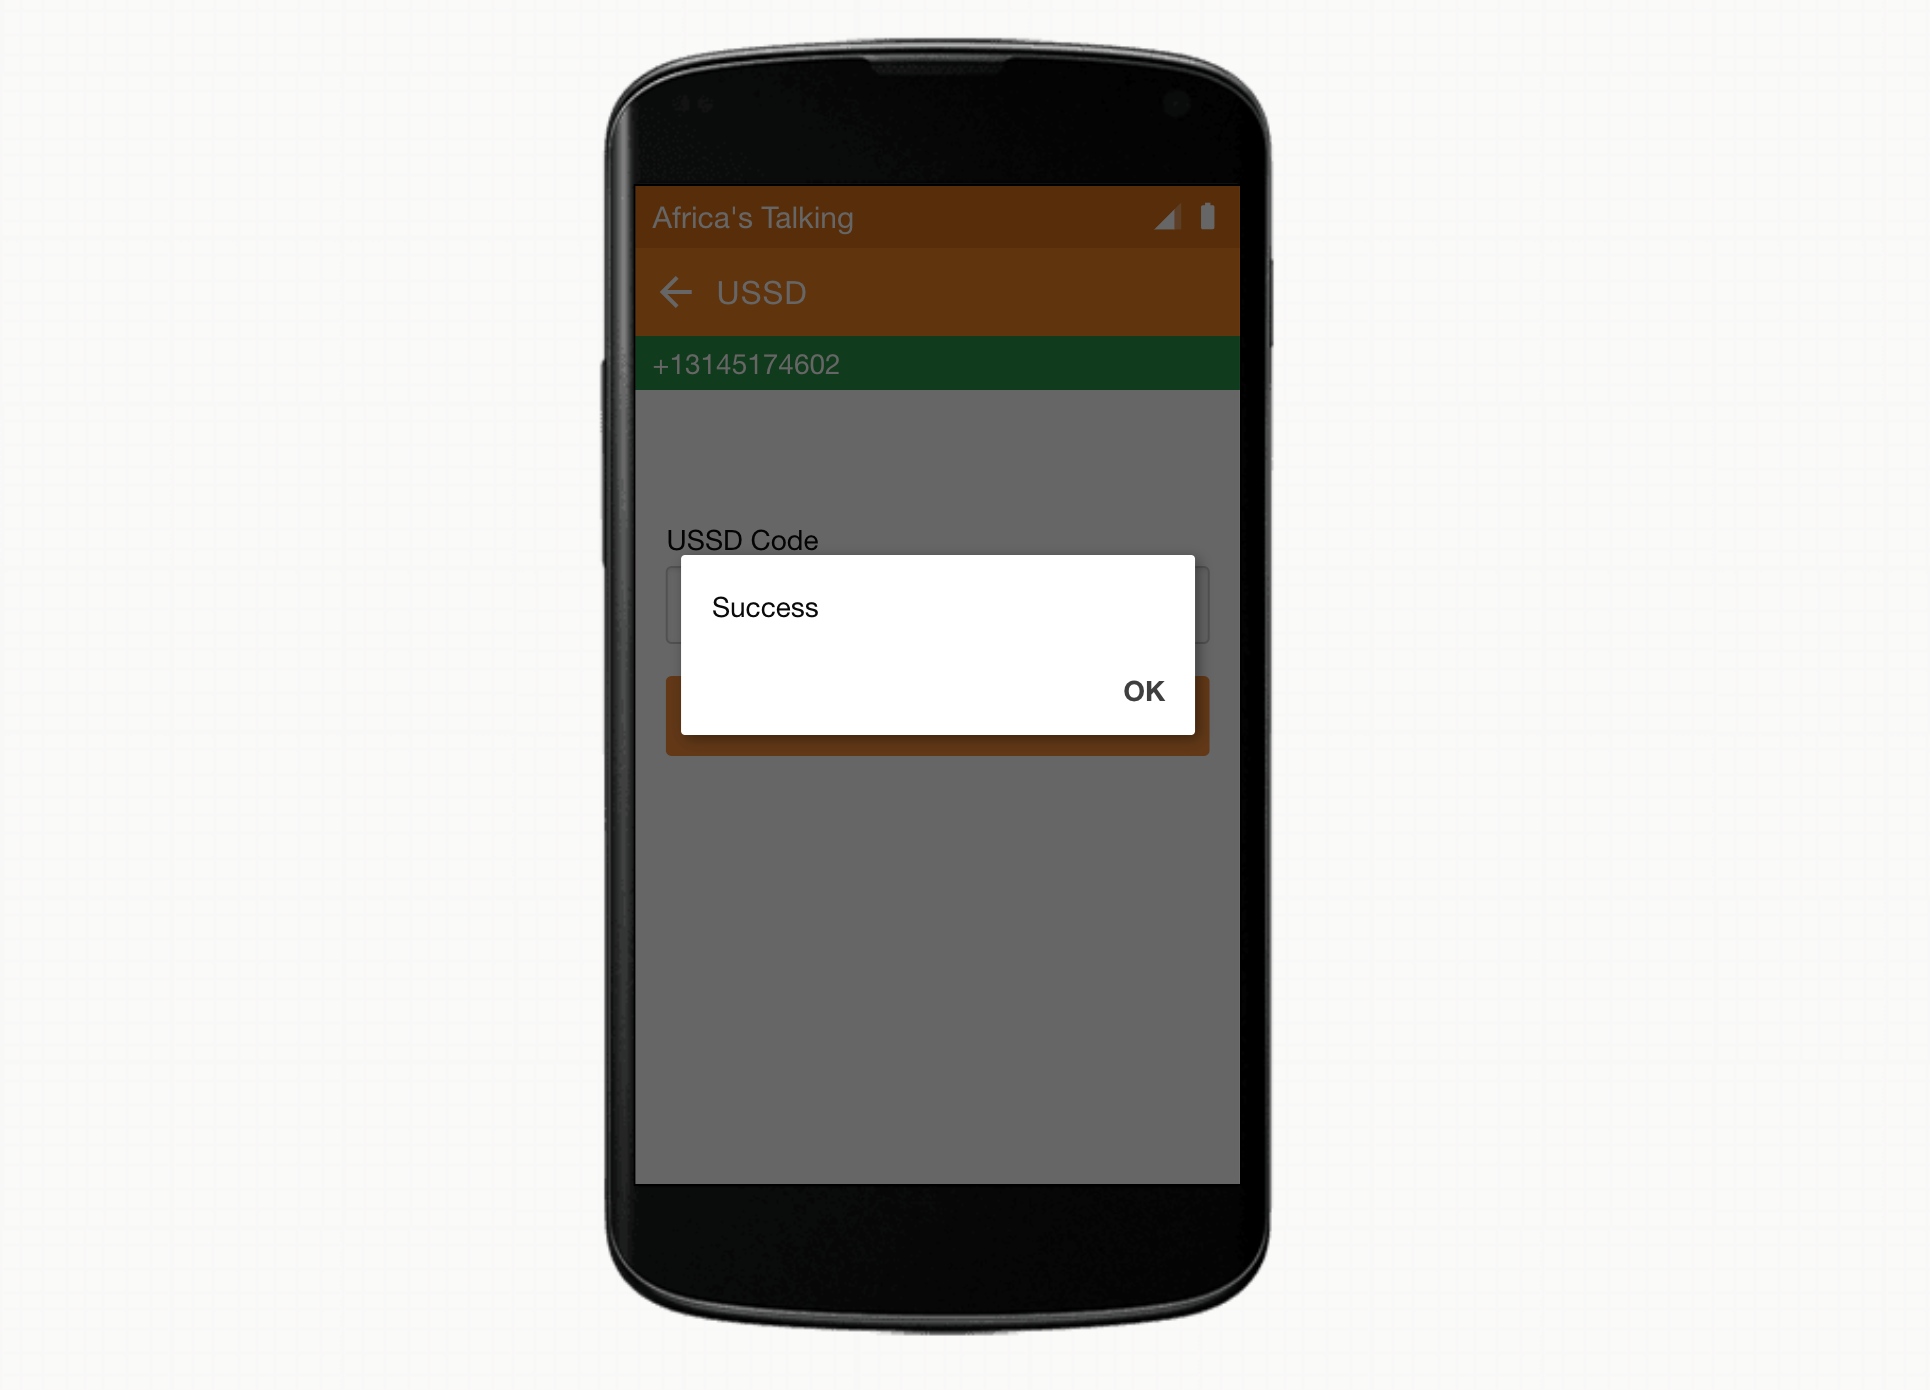
Option 2: You may receive the ‘Success’ message.
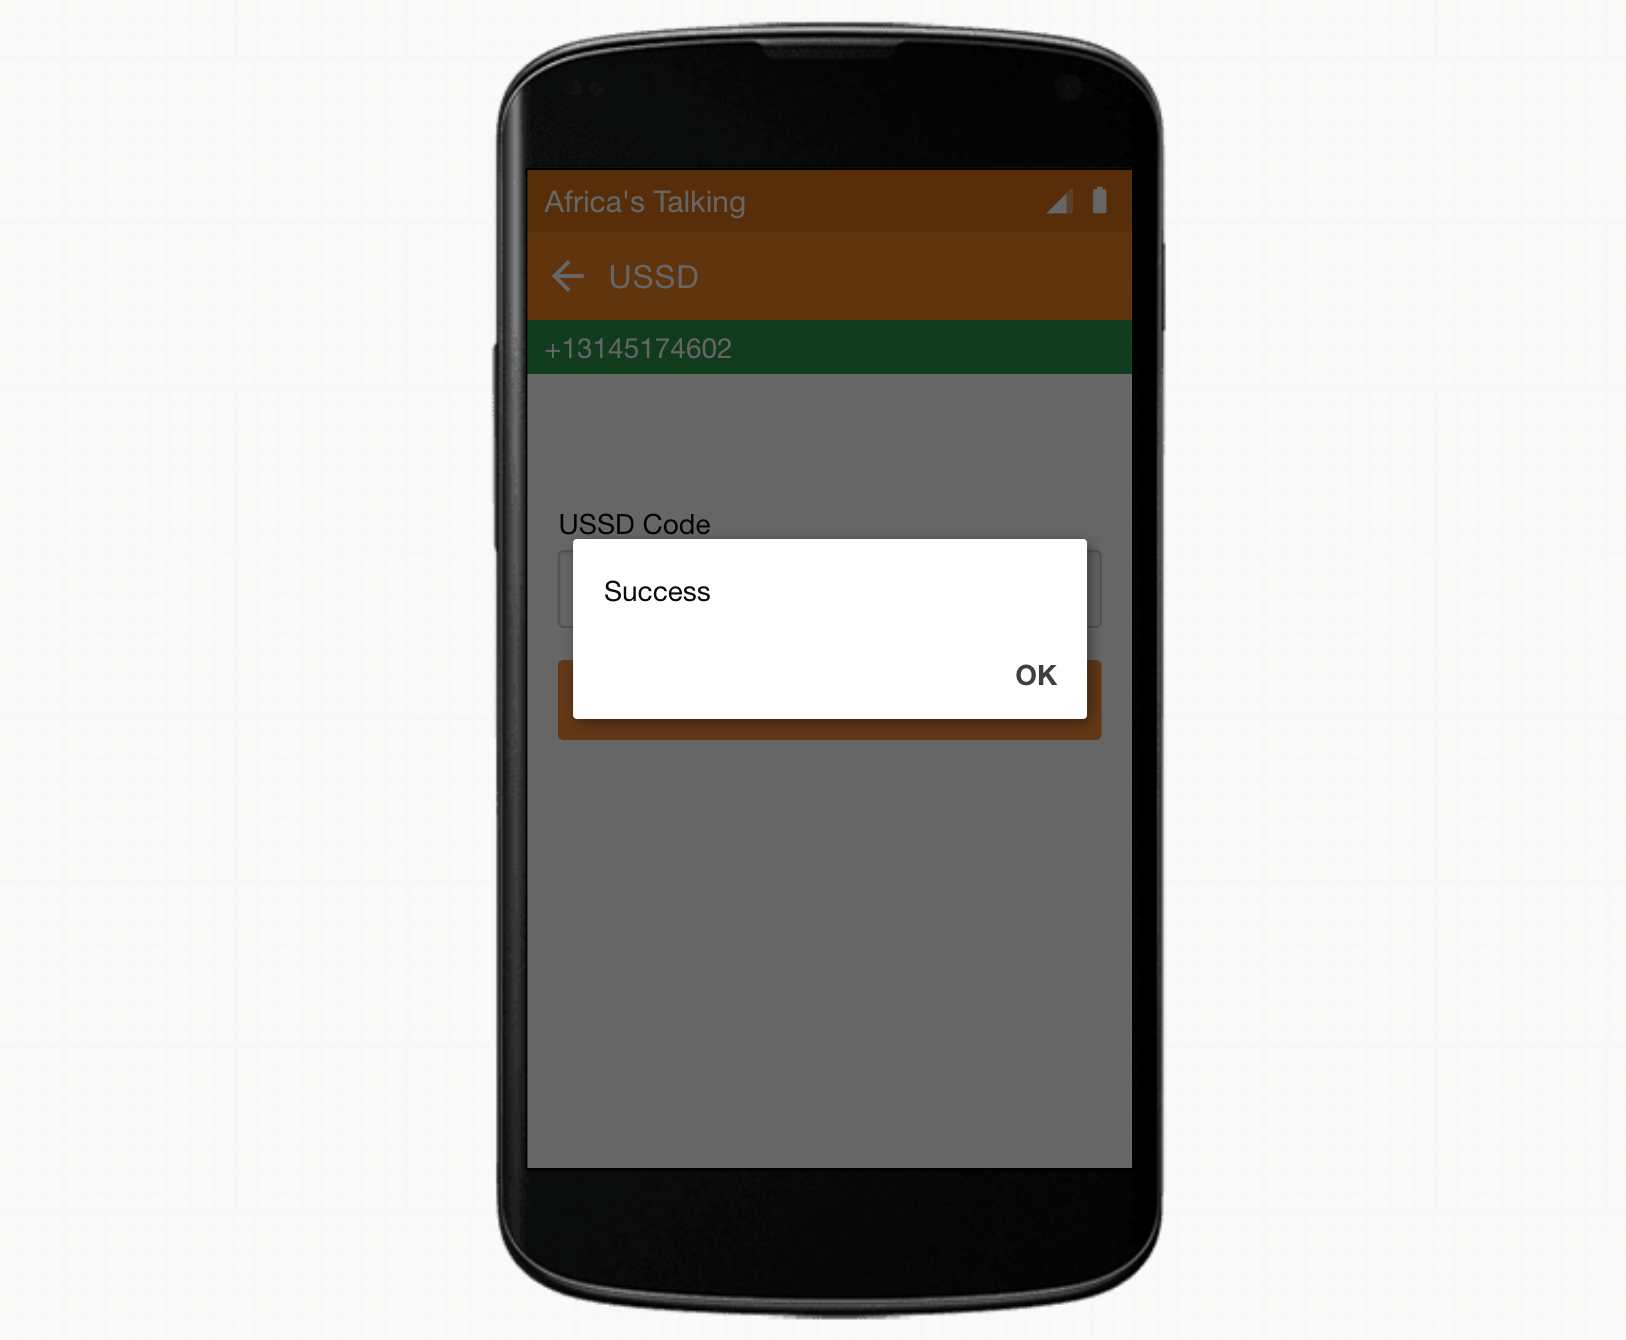
For anyone that received the error message, you can follow along with the debugging of this next step. If you received a success message, go on a 6 minute break (database timeout is 5 minutes if you remember from our configuration), come back to try again and you will likely encounter this error. In either case, you should be able to follow along with the fix that will prevent this from occuring in the future.
So, let’s figure out what is happening. If we navigate back to the sessions page of our Africa’s Talking USSD application, and then show the details of the failed request, we will see a curious app response and message:
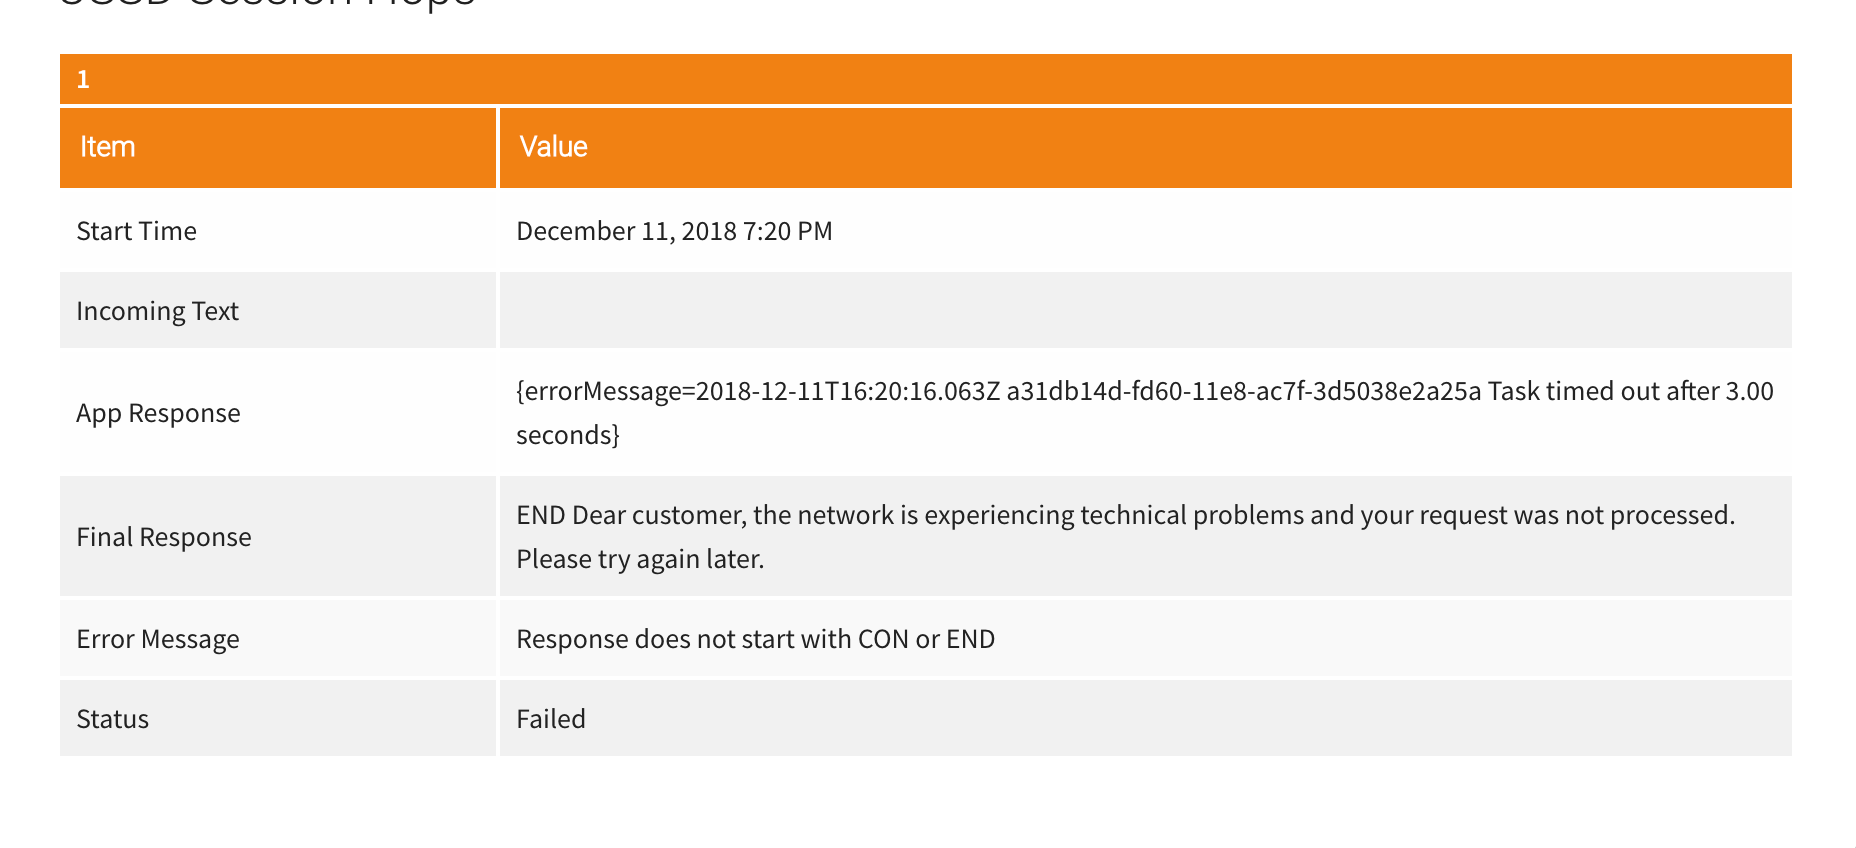
App Response | {errorMessage=… Task timed out after 3.00 seconds}
Error Message | Response does not start with CON or END
What could be going on? If we recall from when we set up our Aurora Database and Lambda function, we provided timeouts for when Amazon will unload instances of our application services from memory to help reduce our costs.
Fixing Timeout Issues
With some research, we can see that Lambda can take 5 seconds to warm up (or more because we are using a VPC) and Aurora Serverless database can take up to 30 seconds to ‘unpause’ our database. If we check the default value of the connectTimeout configuration option of our database connection, we can see that this has been set to only 10 seconds (10 seconds * 1000 milliseconds). To fix this issue, we should update our database connection configuration to keep the connection open for up to twice our expected unpause time, 60 seconds. Returning to our lambda function, we should add the last line to our configuration object:
var connection = mysql.createConnection({
host: “…”,
user: “at_ussd_master”,
password: “…”,
database: “at”,
connectTimeout: 60 * 1000,
});
Do note that because this value is expected in milliseconds, we need to multiply our seconds value by 1000 to arrive at our desired unit of time.
At this point, we should save these changes and can try our connection again. But, an astute observer will notice that the error message we received previously specifically mentioned the task timed out after 3.00 seconds, not 10 seconds. That is a strong indication that while this update is necessary, it is not the source of the error we are receiving.
Seeing how we have already updated our database connection settings, what’s left for us to check is our Lambda settings. Let’s scroll down to the “Basic Settings” for our Lambda Function.

Bingo. Here we can see that our Lambda function is configured to not run longer than 3 seconds, which matches exactly the timeout we are seeing in our error message. To make sure that our Lambda function will still be around when our database successfully connects, let’s also update this value to 60 seconds, or 1 minute.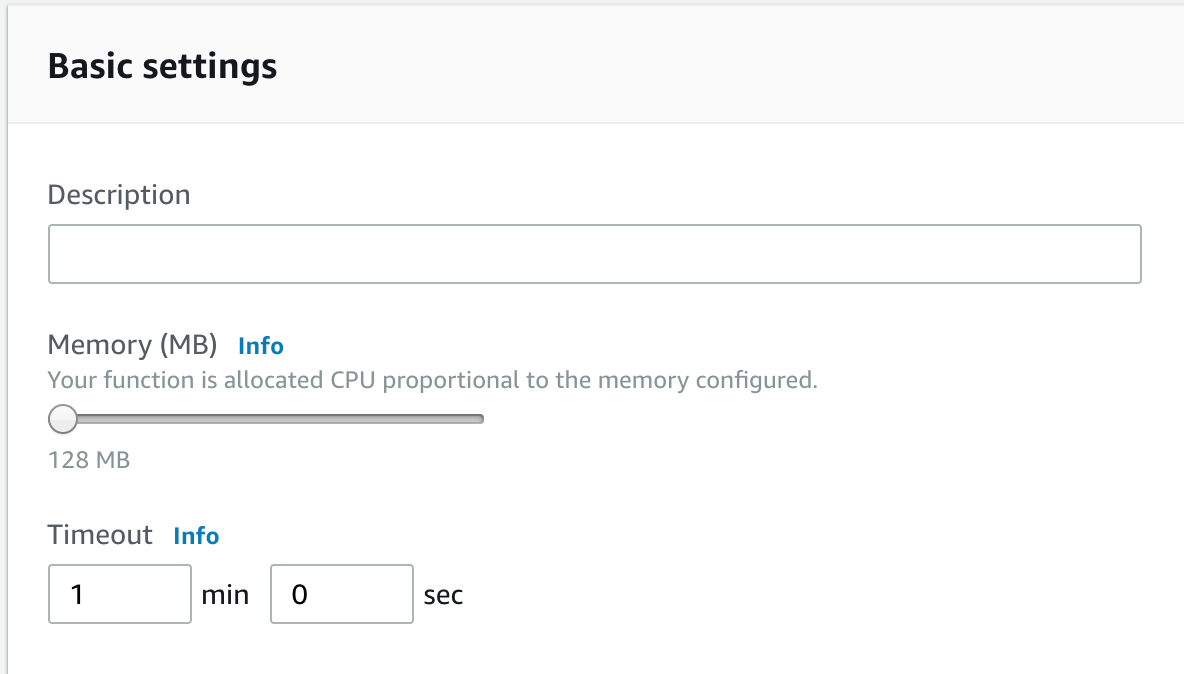
With this update, let’s save our lambda function and verify we are no longer be receiving task timed out after 3.00 seconds error messages when testing our USSD App.
You would think that we should now be able to return to our simulator, launch our USSD short-code, and receive our ‘Success’ message 100% of the time, regardless the amount of time we have spent away from our application. However, there is one other critical limitation we have overlooked: API Gateway has a maximum integration timeout of 29 seconds. This means that when our application is unpausing and ‘warming up’, API Gateway will return at 504 Timeout before the the process is complete. To get around this limitation, we will need a new way to invoke our function: an EC2 instance acting as an Application Load Balancer.
Replacing API Gateway with an Elastic Load Balancer
First off, let’s discuss exactly what a load balancer is. A load balancer is an application or service that acts as a single point of contact for an application and then distributes the load over multiple instances of an application. This allows an application to remain fast and responsive as traffic increases due to multiple instances being able to process requests simultaneously. Additionally, load balancers can also increase an applications speed by directing requests to instances that are geograpically closer to the requesting client reducing the application’s latency.
Price
Before diving into the implementation, let’s quickly discuss how much this new load balancer is going to cost.
According to Amazon’s Elastic Load Balancer pricing page, for an Application Load Balancer (the type we will use), utilization is billed on two factors:
- $0.0225 per Application Load Balancer-hour (or partial hour)
- $0.008 per LCU-hour (or partial hour)
To quote amazon’s pricing page again:
An LCU measures the dimensions on which the Application Load Balancer processes your traffic (averaged over an hour). The four dimensions measured are:
- New connections: Number of newly established connections per second. Typically, many requests are sent per connection.
- Active connections: Number of active connections per minute.
- Processed bytes: The number of bytes processed by the load balancer in Gigabytes (GB) for HTTP(S) requests and responses.
- Rule evaluations: It is the product of number of rules processed by your load balancer and the request rate. The first 10 processed rules are free (Rule evaluations = Request rate * (Number of rules processed — 10 free rules)
You are charged only on the dimension with the highest usage. An LCU contains:
- 25 new connections per second.
- 3,000 active connections per minute.
- 1 GB per hour for EC2 instances, containers and IP addresses as targets and 0.4 GB per hour for Lambda functions as targets
- 1,000 rule evaluations per second
To put this in context:
Let’s assume your application receives an average of 1 new connection per second, each lasting 2 minutes. A client sends an average of 5 requests per second and the total processed bytes for requests and responses is 300 KB per second. You have configured 60 rules on the load balancer to route your client requests. We calculate your monthly Application Load Balancer costs using pricing in the US-East-1 Region as follows:
- New connections (per second): Each LCU provides 25 new connections per second (averaged over the hour). Since your application receives 1 new connection per second, this translates to 0.04 LCUs (1 connection per second / 25 connections per second)
- Active connections (per minute): Each LCU provides 3,000 active connections per minute. Your application receives 1 new connection per second, each lasting 2 minutes. This translates to 120 active connections per minute, or 0.04 LCUs (120 active connections per minute / 3,000 active connections per minute)
- Processed Bytes (GBs per hour): Each LCU provides 1 GB of processed bytes per hour. Since each client connection transfers 300 KB of data per second, it translates to 1.08 GB per hour or 1.08 LCUs (1.08 GB/1 GB).
- Rule Evaluations (per second): For simplicity, assume that all configured rules are processed for a request. Each LCU provides 1,000 rule evaluations per second (averaged over the hour). Since your application receives 5 requests/sec, 60 processed rules for each request results in a maximum 250 rule evaluations per second (60 processed rules — 10 free rules) * 5 or 0.25 LCU (250 rule evaluations per second / 1,000 rule evaluations per second)
Using these values, the hourly bill is calculated by taking the maximum LCUs consumed across the four dimensions. In this example, the processed bytes dimension (1.08 LCUs) is greater than new connections (0.04 LCUs), active connections (0.04 LCUs), and rule evaluations (0.25 LCU) resulting in a total charge of $0.00864 per hour (1.08 LCUs * $0.008 per LCU) or $6.22 per month ($0.00864 * 24 hours * 30 days).
Adding the hourly charge of $0.0225, the total Application Load Balancer costs are:
- $0.03114 per hour ($0.0225 hourly charge + $0.00864 LCU charge); or
- $22.42 per month ($0.03114 * 24 hours * 30 days).
While our utilization will be far below this during the development of our application, it’s good to keep mind how the price will be affected as users adopt our service.
Implementation
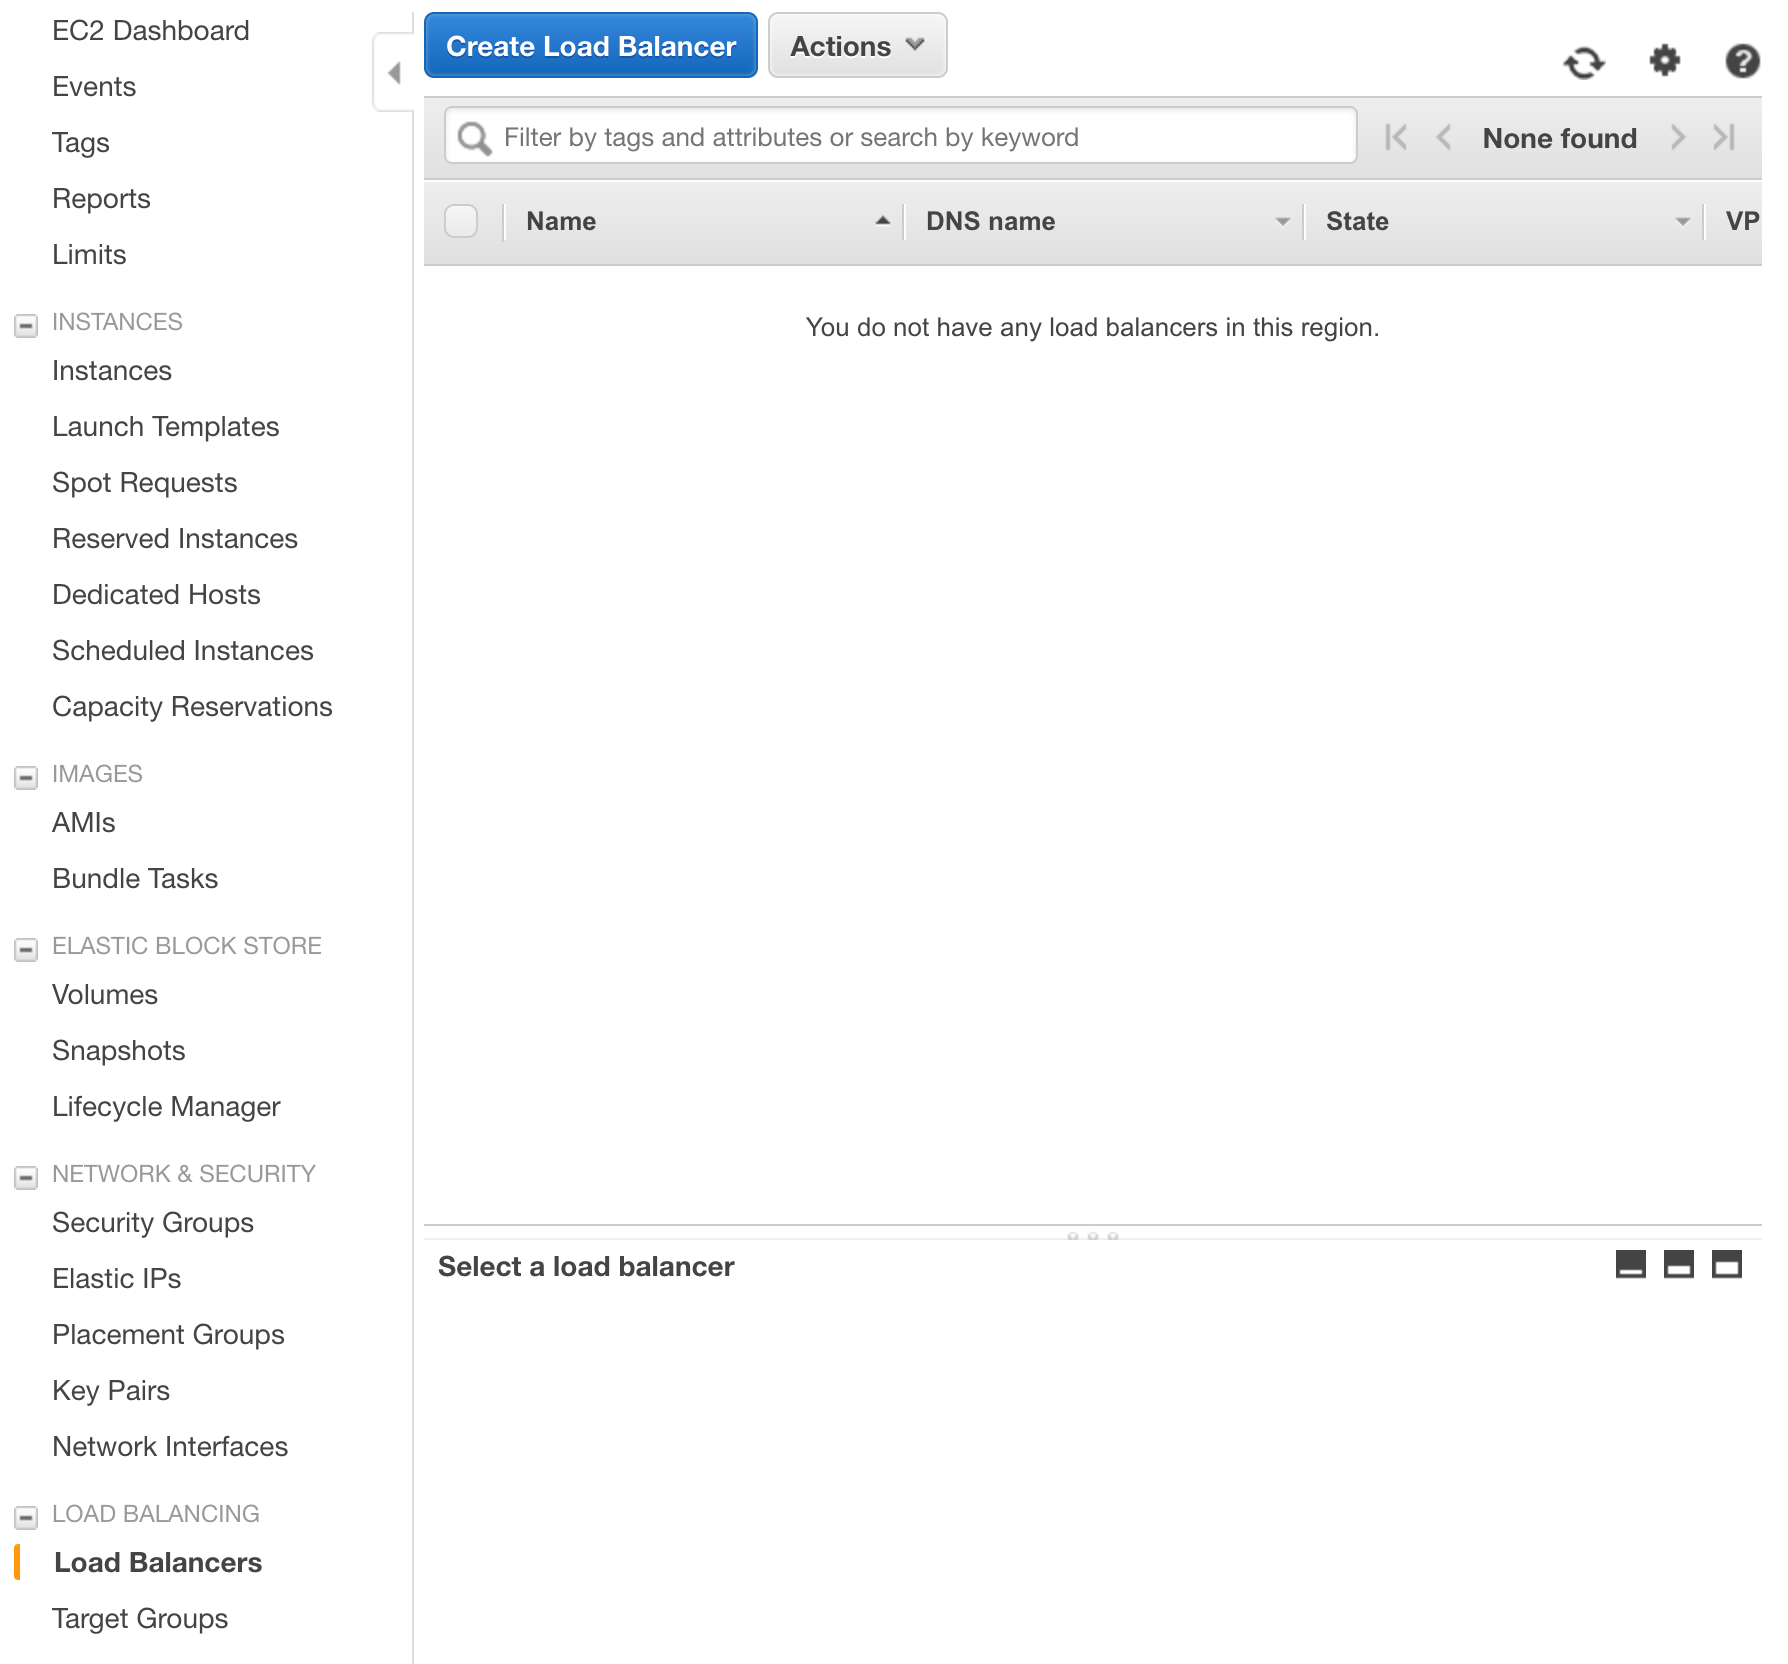
To get started with our elastic load balancer, let’s navigate to Amazon’s EC2 service. Before creating our instance, verify that the same region as our Lambda function is selected. On the left side menu, we want to select the “Load Balancers” option located under the ‘LOAD BALANCING’ section. Here we will select ‘Create Load Balancer’.
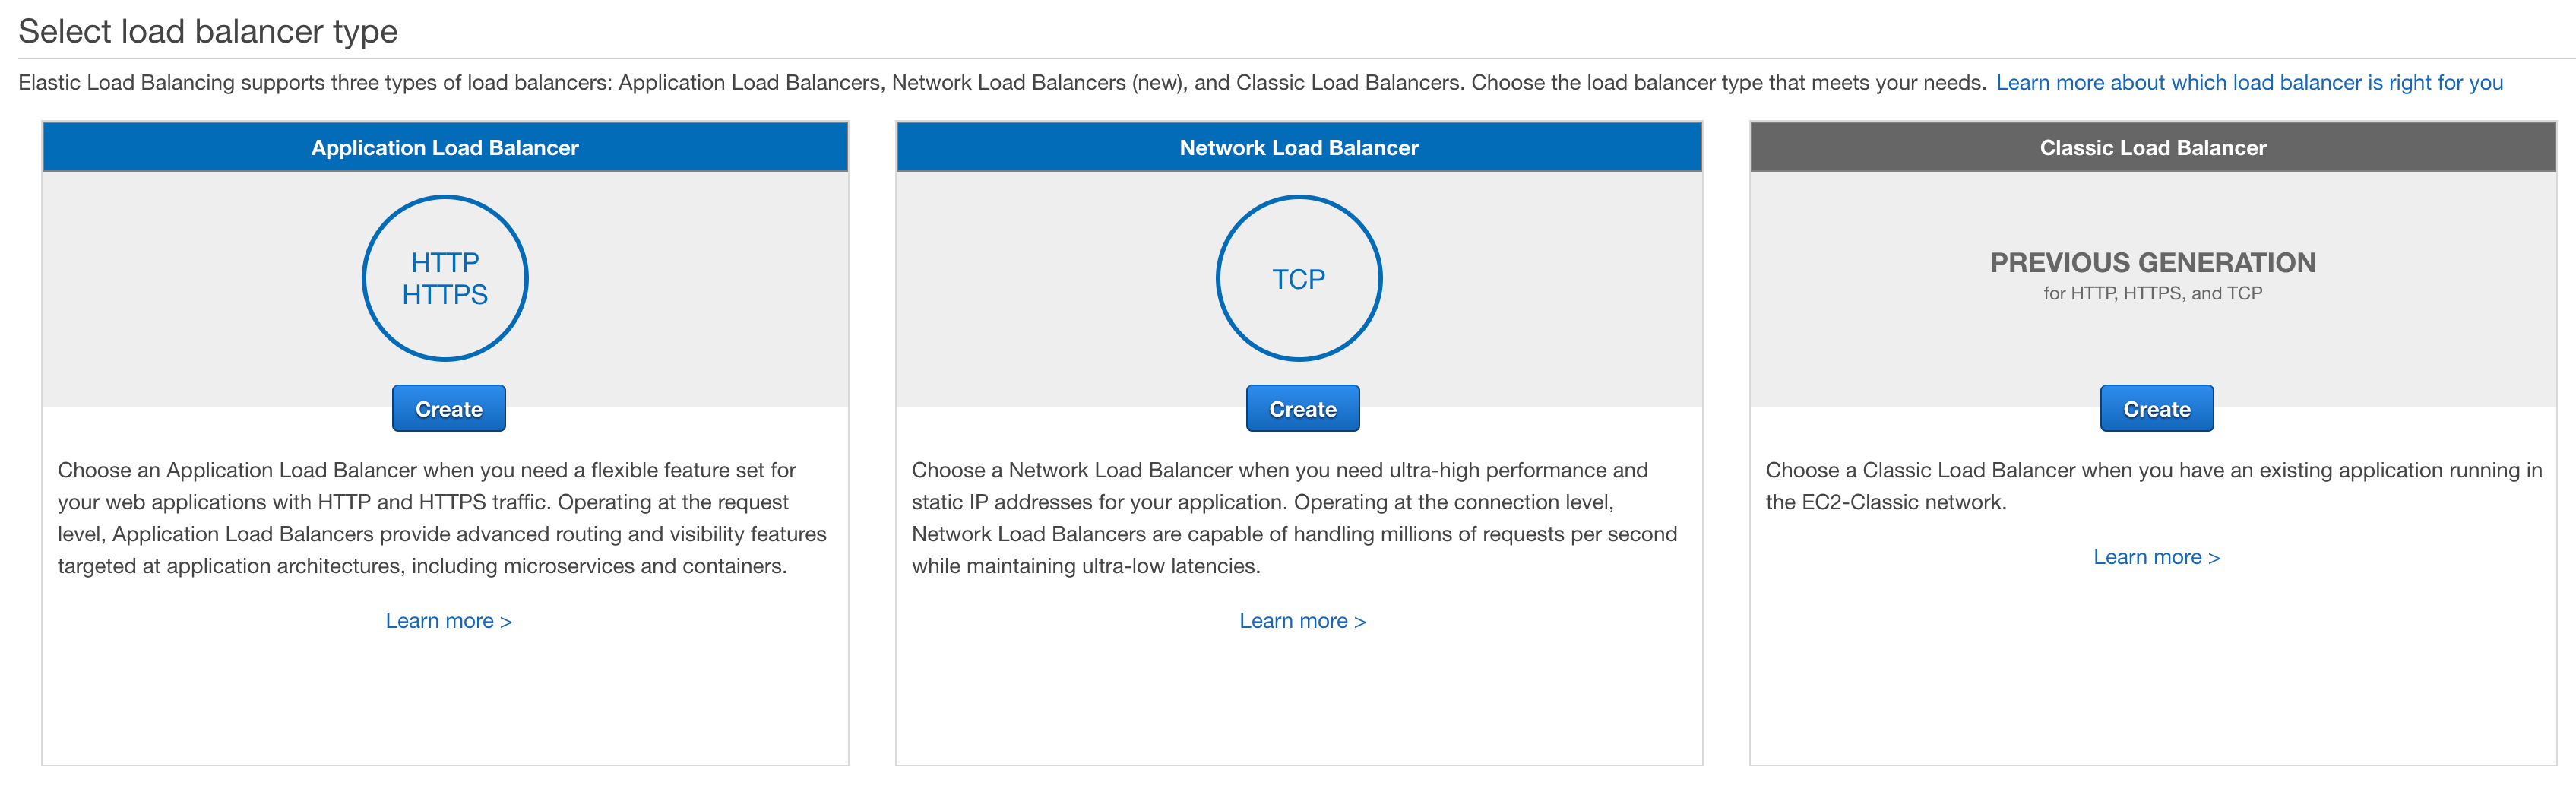
When the create menu loads, we will select an Application Load Balancer as the type to create.
Next, we must configure our new application load balancer. First, we must provide a name. To match the naming scheme we used for our RDS settings, I will be using the name ‘at-alb’ as an abreviation for ‘Africa’s Talking — Application Load Balancer’. For the Scheme, IP address type, and Listeners, we will keep the default values of ‘internet-facing’, ‘ipv4’, and ‘HTTP’ + Port: ‘80’. Lastly, let’s verify that our VPC is selected along with each of the subnets used by our Lambda function and RDS Aurora Database.
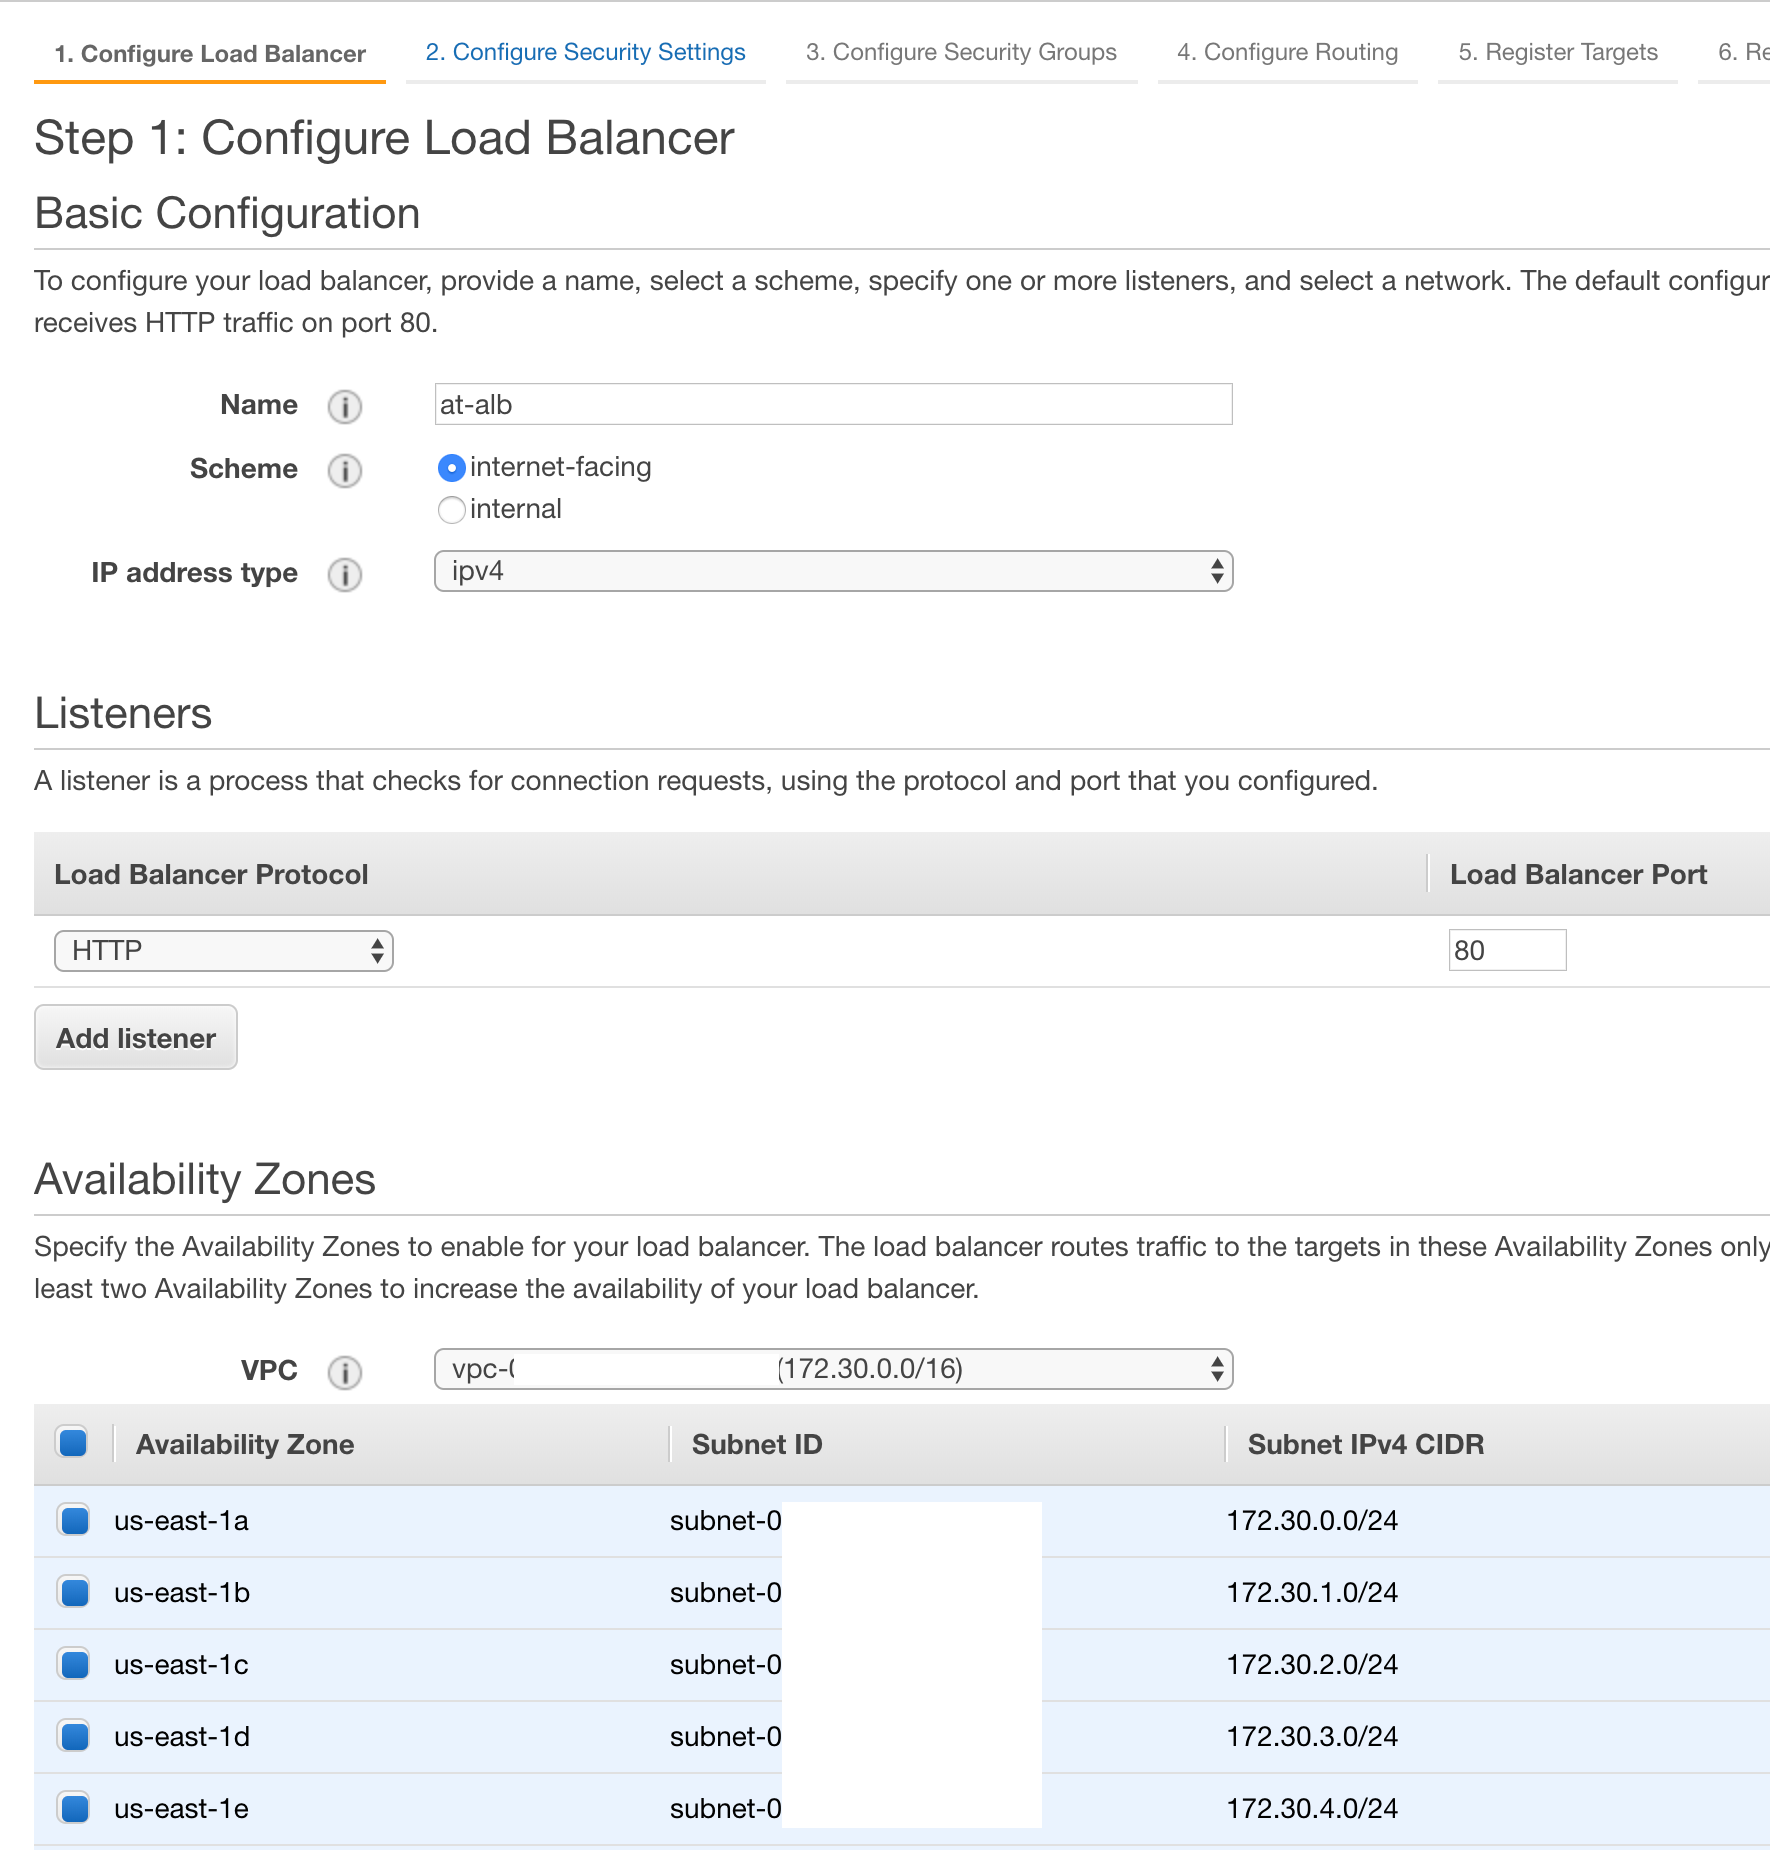
Once your load balancer has the correct settings, we can hit the ‘Next: Configure Security Settings’ button.

On this page, we would get the option to configure our SSL settings if we had chosen HTTPS as a supported protocol on the previous page. However, to keep things simple for this tutorial, we will only be using HTTP. For this reason, we can skip this page by pressing the ‘Next: Configure Security Groups’ button.
On the security groups page, we want to make a new security group that only allows the type of traffic we have approved for our load balancer: HTTP (TCP) requests on port 80. To make this new security group, we will press the “Create a new security group’ radio dial. This page should be pre-populated with all of the rules necessary for our load balancer to function.
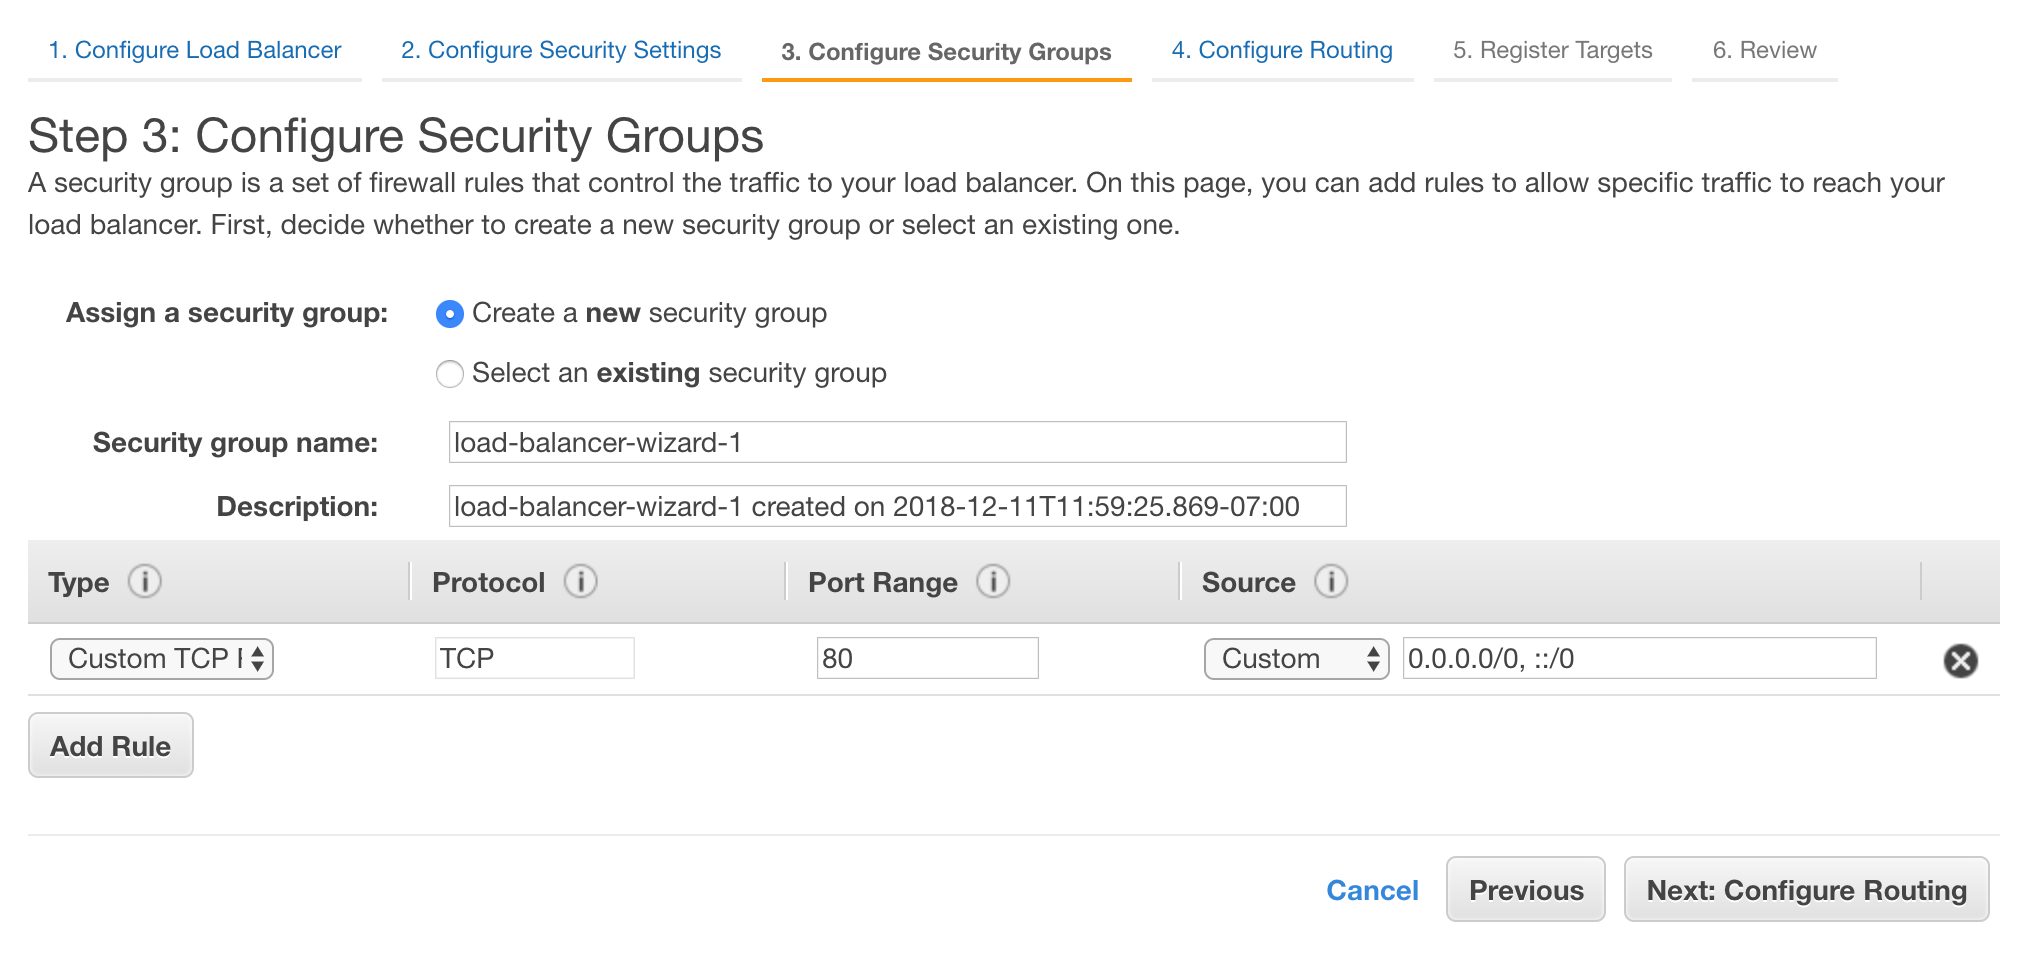
We can select the ‘Next: Configure Routing’ button.
The “Configure Routing’ page is used to map our incomming requests to targets (instances or services) that can handle these requests. In our case, we want to create a new target group that has our Lambda function listed as being capable of fuliflling the request. Let’s verify that the ‘New Target Group’ dropdown is selected from the first dropdown, and we will assign a name ‘at-ussd-tg’. Lastly, let’s select ‘Lambda function’ as the target type. We can leave the ‘Health Check’ checkbox unselected.
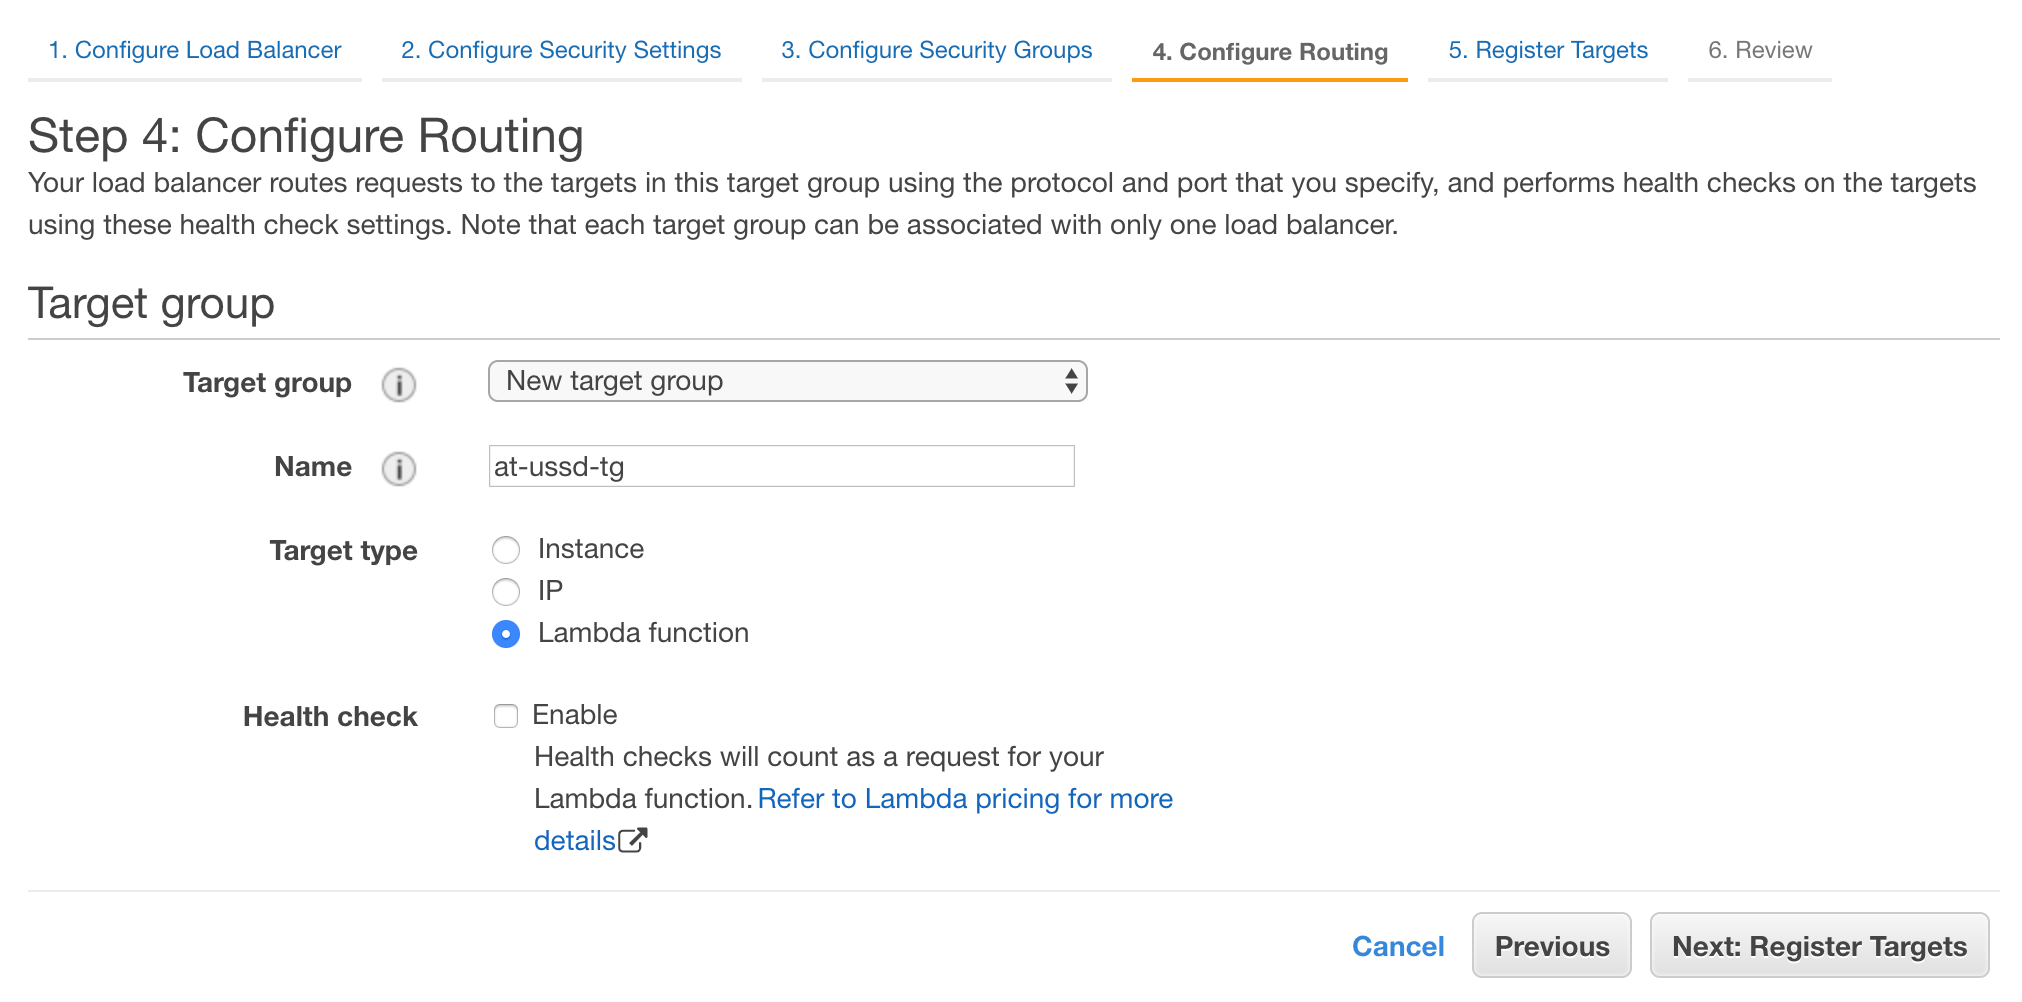
Select the “Next: Register Targets” option to continue.
On the “Register Targets”, we can select the one lambda function to use with our target group. Let’s select our lambda function and use the the “$LATEST” version as the target to invoke.

Here we can select “Next: Review” to go over all of our settings.
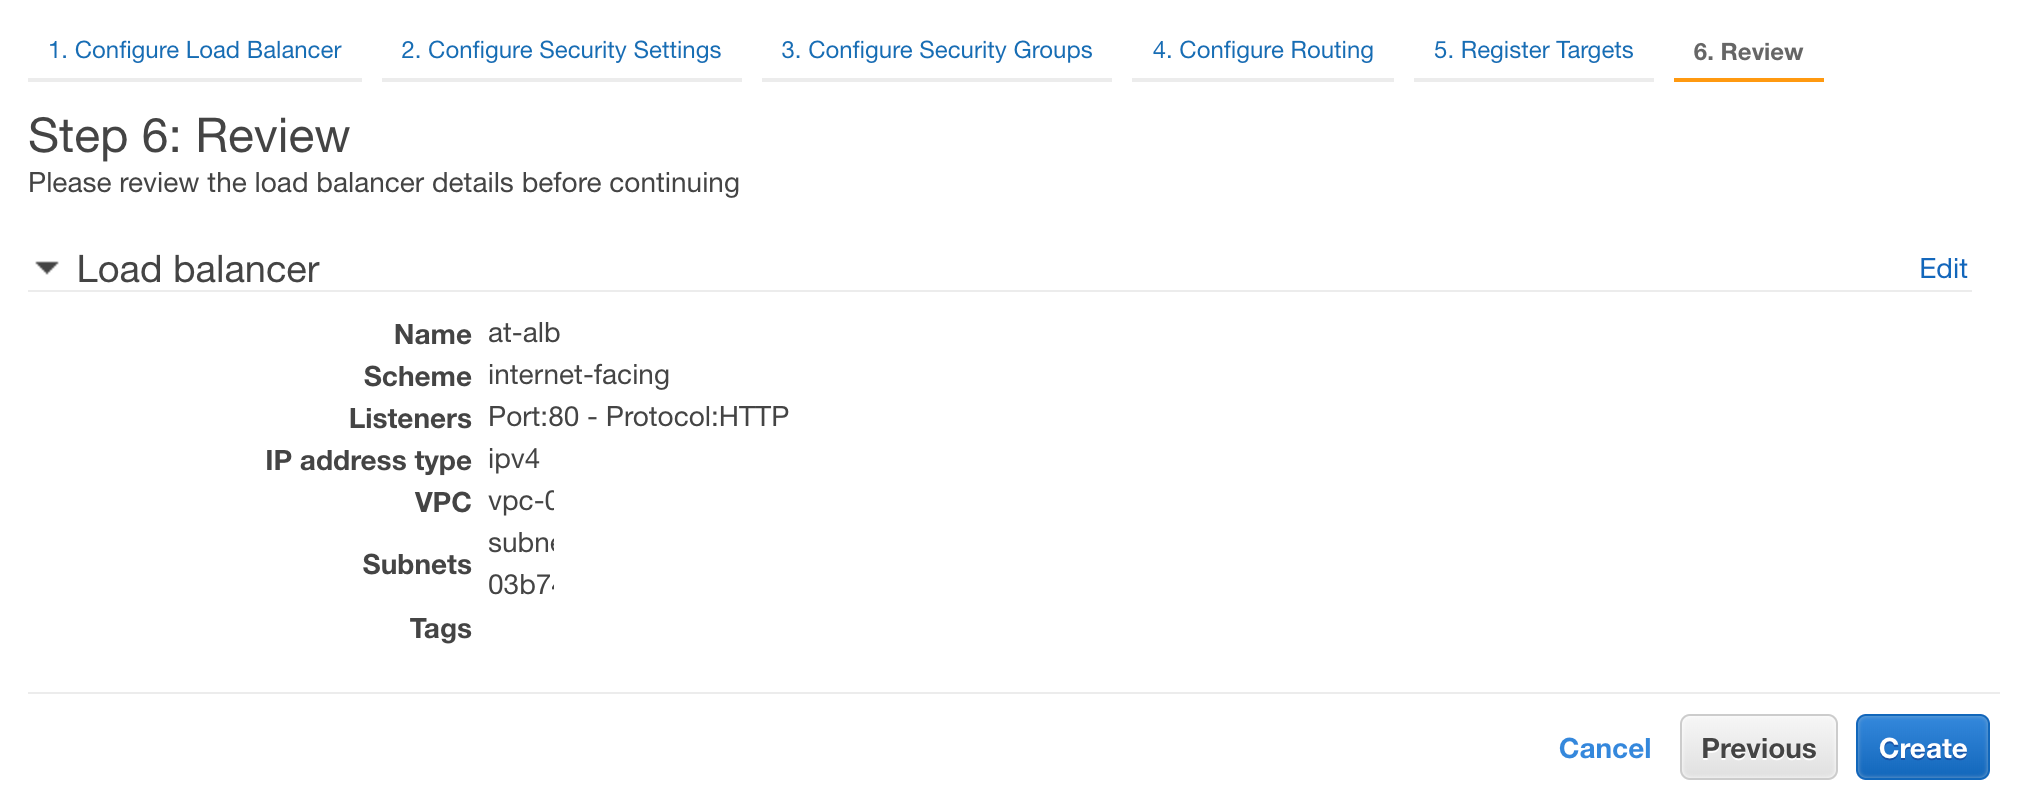
If all of our settings match our expectations, we can select the “Create” button.
If creation completes, successfully, we should see the following message.
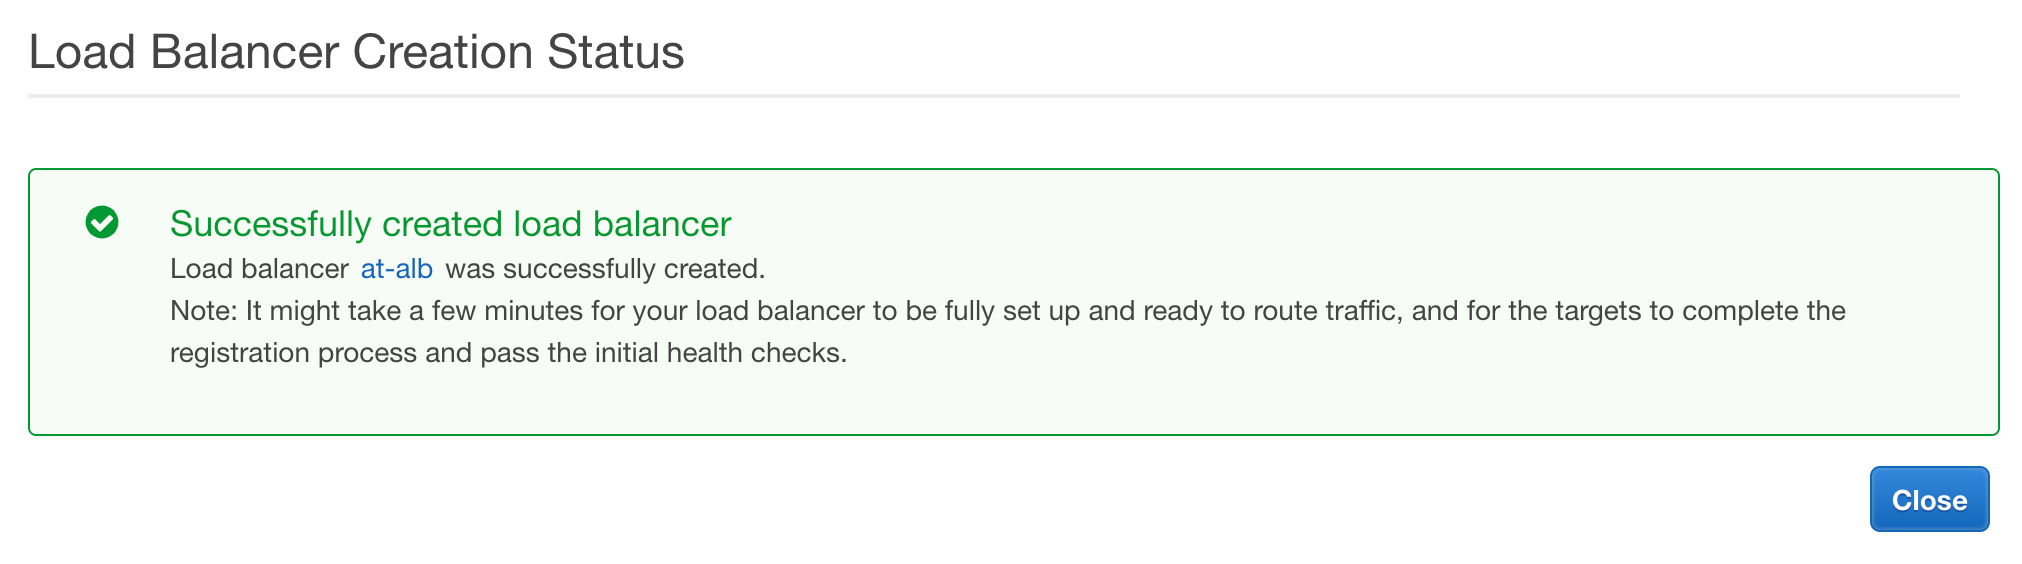
When we select the ‘Close’ button, we will be redirected back to the “Load Balancers” page. If we look at the ‘State’ column of our new service, we can see it has a state of ‘provisioning’. It takes a few minutes for our new load balancer to available for us to use. When the provision completes, the state will change to ‘active’.

With our new load balancer pointing to our Lambda function, we are one step closer to swapping out API Gateway.

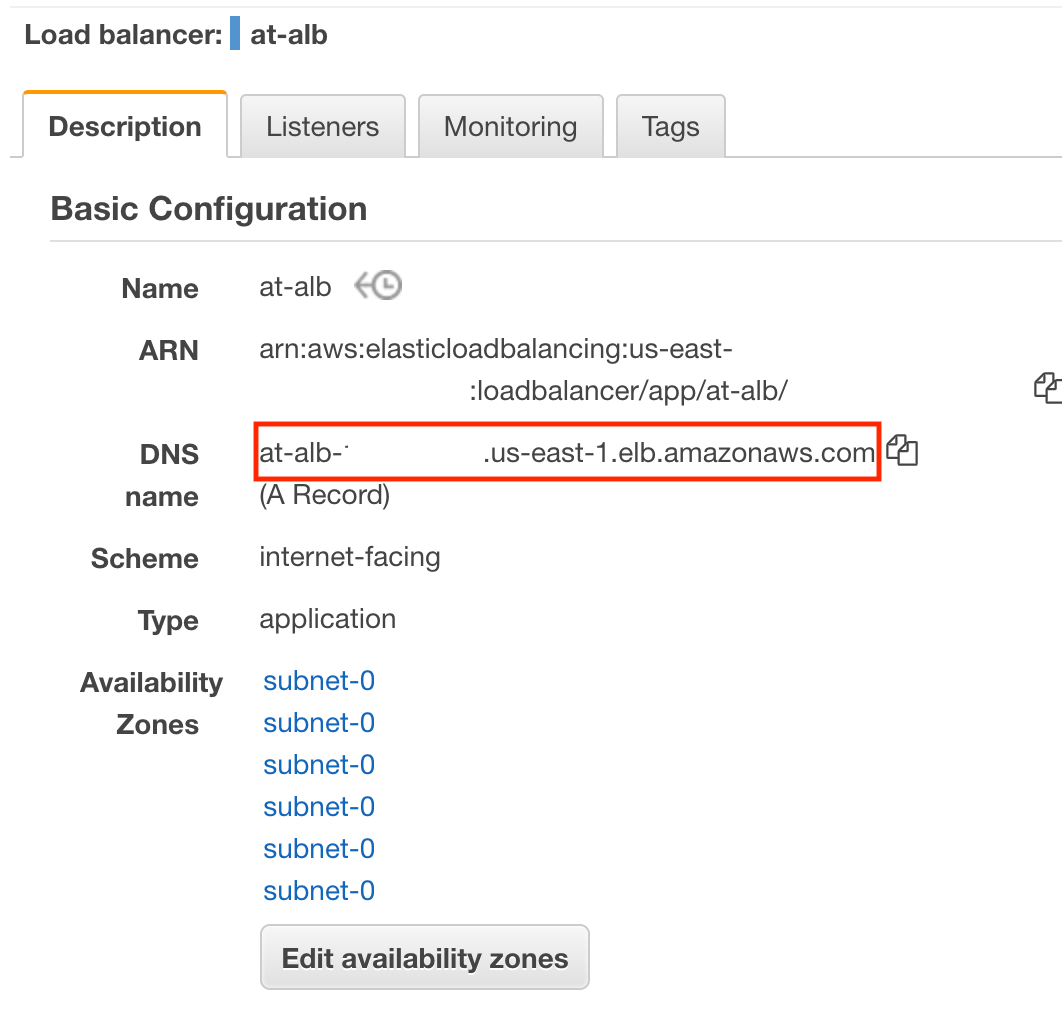
Before we leave, we should take note of one critical piece of information: the DNS name of our new load balancer. This is the address that lets us send our requests to our new load balancer. For now, copy this information to a safe place. We will need this when we return to Africa’s Talking.
With our load balancer set up, we have to make a couple of quick edits to our lambda function so that our load balancer knows how to handle our requests and responses.
Updating Lambda for Application Load Balancing
Let’s head back over to lambda and open our function. As a quick summary, we will need to add the formatting that was previously provided in our mapping templates used by API Gateway. These changes will affect both our request and our response. With, our Application load balancer, our event object in our lambda function will have the following json structure:
{
“requestContext”: {
“elb”: {
“targetGroupArn”: “arn:aws:elasticloadbalancing:region:123456789012:targetgroup/my-target-group/6d0ecf831eec9f09”
}
},
“httpMethod”: “GET”,
“path”: “/”,
“queryStringParameters”: {parameters},
“headers”: {
“accept”: “text/html,application/xhtml+xml”,
“accept-language”: “en-US,en;q=0.8”,
“content-type”: “text/plain”,
“cookie”: “cookies”,
“host”: “lambda-846800462-us-east-2.elb.amazonaws.com”,
“user-agent”: “Mozilla/5.0 (Macintosh; Intel Mac OS X 10_11_6)”,
“x-amzn-trace-id”: “Root=1-5bdb40ca-556d8b0c50dc66f0511bf520”,
“x-forwarded-for”: “72.21.198.66”,
“x-forwarded-port”: “443”,
“x-forwarded-proto”: “https”
},
“isBase64Encoded”: false,
“body”: “request_body”
}
By default, if our request has a content type of either text/*, application/json, application/javascript, or application/xml, then the body will be a string or json object. However, if we are receiving any other content type, such as application/x-www-form-urlencoded from our Africa’s Talking POST request, the body will be base64 encoded. This is something we will need to investigate further when we try to access the data sent to us from Africa’s Talking.
Additionally, the response from our Lambda function must include the Base64 encoding status, status code, status description, and headers. The body can be omitted, but we will use this to send our menu text back to Africa’s Talking. To create a valid response, we need to update the structure of our response to match the following:
{
“isBase64Encoded”: false,
“statusCode”: 200,
“statusDescription”: “200 OK”,
“headers”: {
“Content-Type”: “application/json”
},
“body”: “”
}
Lets update our lambda function to make sure our requests complete successfully:
const UssdMenu = require(‘ussd-menu-builder’);
// https://www.npmjs.com/package/ussd-menu-builder
var mysql = require(‘mysql’);
var connection = mysql.createConnection({
host: “your-host-here”,
user: “at_ussd_master”,
password: “your-password-here”,
database: “at”,
connectTimeout: 60 * 1000,
});
exports.handler = (event, context) => {
var response = {
“isBase64Encoded”: false,
“statusCode”: 200,
“statusDescription”: “200 OK”,
“headers”: {
“Content-Type”: “application/json”
},
“body”: “END Success”
}
connection.query(‘SELECT * FROM users’, function (error, results, fields) {
if (error) {
console.log(“Error: “, error);
connection.destroy();
throw error;
} else {
// connected!
console.log(“Results: “, results);
console.log(‘Fields: ‘, fields)
connection.end(function (err) {
console.log(“Connection ended”, err)
context.succeed(response);
});
}
});
};
The two things that have changed include declaring our response before the beginning of the database connection and returning it as the parameter to our context.succeed() method. We can now save our lambda function and test our response.
Testing in the browser
Before going through the process of updating our Africa’s Talking configuration, we can quickly check that our function is working by copying the DNS Name we saved from earlier into the address bar of our browser. If all goes well, we should see the value we returned in our body displayed in the returned page.

Here we can see the text that is going to power our Africa’s Talking menu. This indicates we are ready to test our new load balancer with Africa’s Talking.
Testing our Load Balancer in Africa’s Talking
To make sure that Africa’s Talking can still communicate with our application, we will need to update the ‘Callback URL’ that is associated with our service code.
Let’s navigate back to the ‘Service Codes’ section in Africa’s Talking USSD settings, and locate the service code we have been using with this application. Here we will want to select ‘Callback’ from the ‘Actions’ menu and provide our Load Balancer’s DNS Name.

Once we save this value, we will now have a complete flow through our new load balancer, breaking the connection to our API Gateway.

To test this change, we can open the simulator, type in our USSD short code, and we should see the result of all this hard work.
Whiew! What an accomplishment. While this did take quite a few extra steps, what we have now is an application that will reliably return the correct results regardless the status of our serverless application components.
Deactivating API Gateway
Before updating our menus to use our new database connection, let’s do a little housekeeping to ensure we are not billed for a service we no longer need. Open up Amazon’s API Gateway service and let’s select the API that we are no longer using. After selecting the ‘Actions’ menu, we want the ‘Delete API’ button at the bottom in red.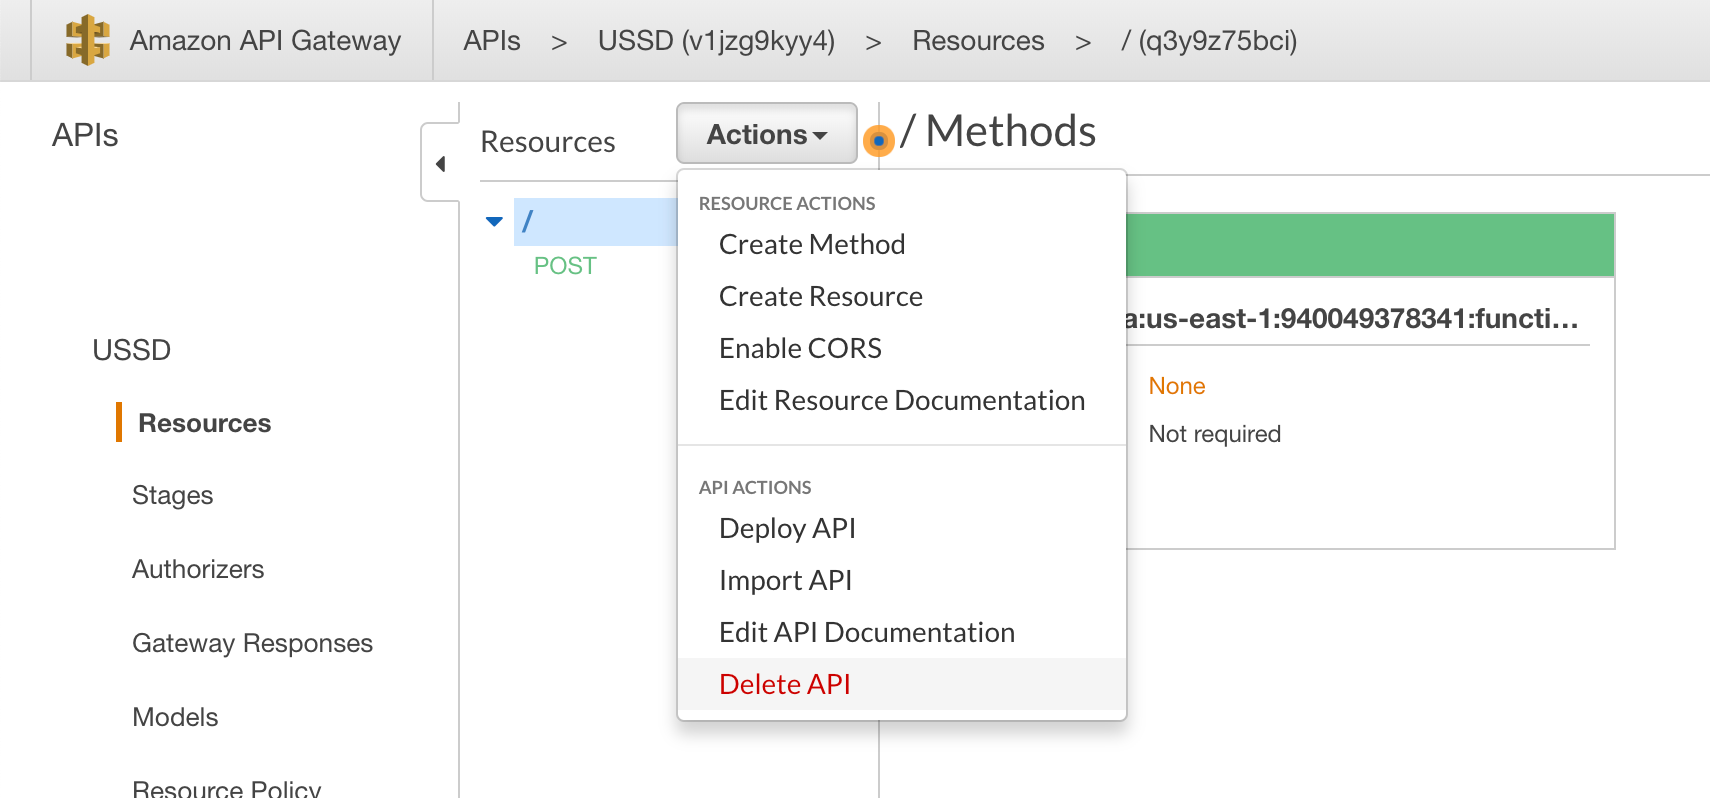
From here we must enter the name of the API to confirm we would like to delete it. Once entered, we can hit the “Delete” button.
With API Gateway now removed, our updated infrastructure should now match the outline we reviewed at the beginning of the article.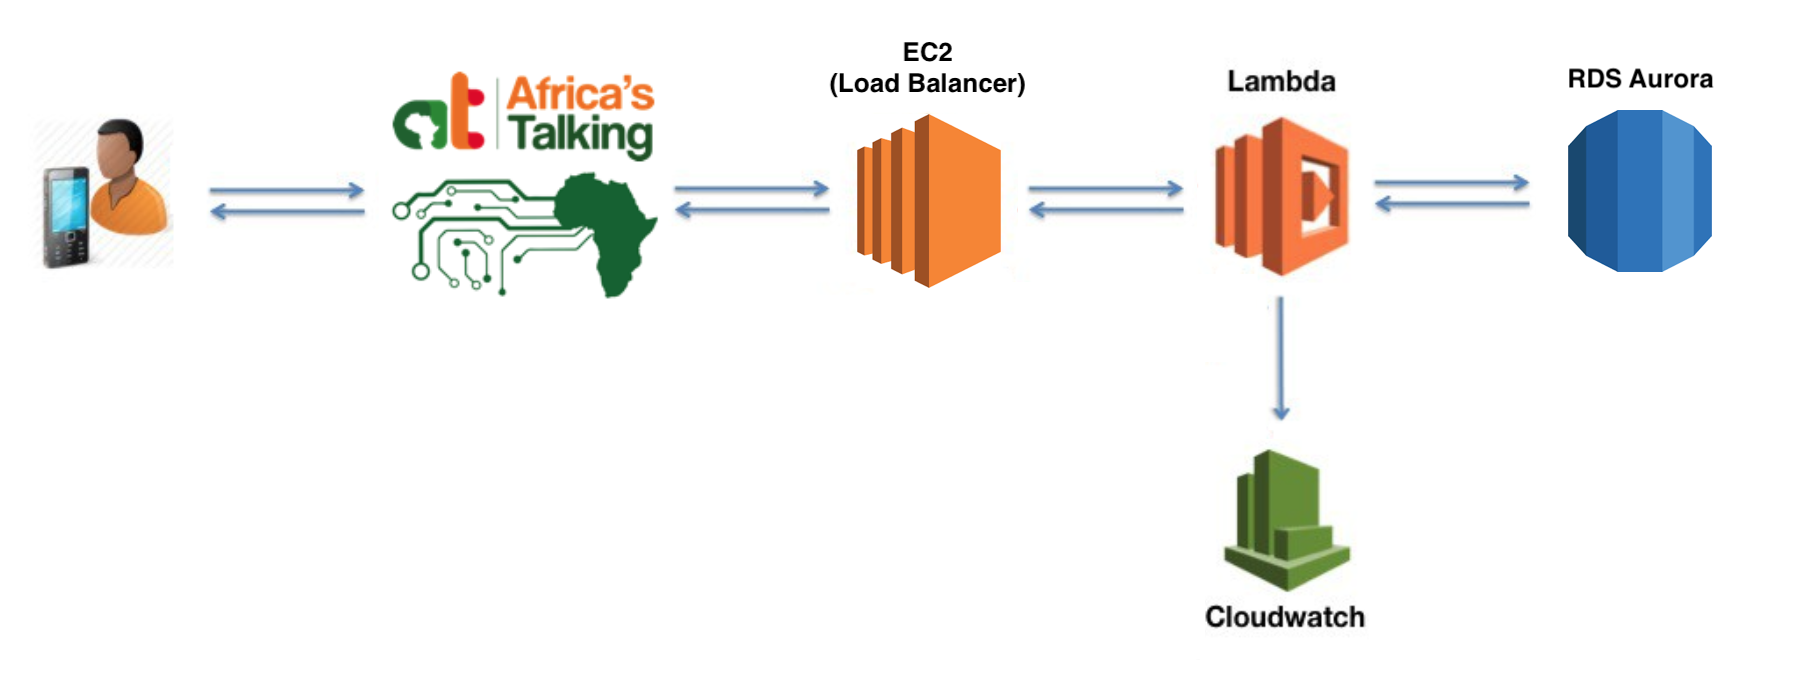
Using USSD-Menu-Builder with our Database Connection
Before we re-enable our USSD-Menu-Builder module, let’s take a look at what we are now getting back in our event obect from Africa’s Talking and our Load Balancer. Open up our Lambda function again, and this time let’s add console.log(‘event: ‘, event) to the top of our function.

Let’s save our function and re-run our USSD application via the Africa’s talking simulator. We will then open up CloudWatch to see the output of our most recent execution. When we unfold the ‘event’ log message, we will see the json structure we discussed earlier when switching to our load balancer plus our base64 encoded body due to the application/x-www-form-urlencoded content type.
2018-12-11T21:46:04.846Z 28c2f9f5-fd8e-11e8-87e1-4b2cc8fb6910 event {
requestContext: {
elb: {
targetGroupArn: ‘arn:aws:elasticloadbalancing:us-east-1:940049378341:targetgroup/at-ussd-tg/330ace88c04c0216’
}
},
httpMethod: ‘POST’,
path: ‘/’,
queryStringParameters: {},
headers: {
‘content-length’: ‘112’,
‘content-type’: ‘application/x-www-form-urlencoded; charset=UTF-8’,
host: ‘at-alb-187906883.us-east-1.elb.amazonaws.com’,
‘user-agent’: ‘akka-http/10.0.4’,
‘x-amzn-trace-id’: ‘Root=1-5c10301c-107711c02c4da1c02e365c40’,
‘x-forwarded-for’: ‘134.213.151.223’,
‘x-forwarded-port’: ’80’,
‘x-forwarded-proto’: ‘http’
},
body: ‘c2Vzc2lvbklkPUFUVWlkXzNhMmVhMzIwOGFhMzNkMmMwYzkyNTIxMDI5ZmYzZDM2JnNlcnZpY2VDb2RlPSUyQTM4NCUyQTAwOTk4OCUyMyZwaG9uZU51bWJlcj0lMkIxMzE0NTE3NDYwMiZ0ZXh0PQ==’,
isBase64Encoded: true
}
To be able to use our USSD-Menu-Builder module, we need to gain access to the Africa’s Talking data encoded in the body’s base64 string. To do that, we must decode this value by adding the following line:
et text = Buffer.from(event.body, ‘base64’).toString(“utf8”);
console.log(“Base 64 Decoded Text:”, text)
Let’s save our lambda function, rerun the USSD application in the simulator, and check our new log in CloudWatch (this requires re-navigating to the newest log group in CloudWatch). This time in addition to the base64 event output, we can also see our decoded text.
2018-12-11T22:06:00.391Z f153aa25-fd90-11e8-bc36-5555c60dcd31 Base 64 Decoded Text: sessionId=ATUid_7d7f61731aa08be2483f110ba1831e87&serviceCode=%2A384%2A009988%23&phoneNumber=%2B13145174602&text=
This is really close, as we can now see all of our keys sent from Africa’s Talking, such as sessionID, phoneNumber, and serviceCode. But, our non-html characters are still percent encoded.
To fix this, we need to parse these values using the querystring module. At the top of our function with the other require statements, let’s add the querystring module: const querystring = require(‘querystring’). Now below our base64 decoding, we can use the querystring module to parse our text.
let parsed = querystring.parse(text)
console.log(“Parsed: “, parsed)
Now, one more time, let’s save our lambda function, rerun the application in the simulator, and check our new log in CloudWatch.
2018-12-11T22:14:34.571Z 23aa35c4-fd92-11e8-94d0-af43652ded90 Parsed:
{
sessionId: ‘ATUid_05834cd1c3dcceff14f8b239838175d3’,
serviceCode: ‘*384*009988#’,
phoneNumber: ‘+11231231234’,
text: ”
}
With this, we now have access to the data that is sent by Africa’s Talking that is required by USSD-Menu-Builder. We can now add some template menu states that use our database connection to lookup a user, welcome them back if they are known, or give them the option to sign up if they are new.
const UssdMenu = require(‘ussd-menu-builder’); // https://www.npmjs.com/package/ussd-menu-builder
var mysql = require(‘mysql’); //https://github.com/mysqljs/mysql
const querystring = require(‘querystring’);
const dbConnectionConfig = {
host: “your-host-here”,
user: “at_ussd_master”,
password: “your-password-here”,
database: “at”,
connectTimeout: 60 * 1000,
}
exports.handler = (event, context) => {
const menu = new UssdMenu();
let connection = undefined;
let sessions = {};
let text = Buffer.from(event.body, ‘base64’).toString(“utf8”);
let args = querystring.parse(text)
console.log(“Args: “, args)
let unknownUserStartState = () => {
return {
run: () => {
menu.con(‘Welcome new user’ +
‘\n————–‘ +
‘\n1. Sign up’ +
‘\n0. Exit’);
},
next: {
‘1’: ‘sign-up’,
‘0’: ‘exit’
}
}
}
let knownUserStartState = (user) => {
return {
run: () => {
menu.con(‘Welcome back, ‘ + user.name + “!” +
‘\n————–‘ +
‘\n0. Exit’);
},
next: {
‘0’: ‘exit’
}
}
}
menu.state(‘exit’, {
run: () => {
menu.end(‘Thank you. Goodbye.’);
}
});
menu.state(‘sign-up’, {
run: () => {
menu.con(‘Enter your name:’);
},
next: {
‘*’: ‘sign-up-complete’
}
});
menu.state(‘sign-up-complete’, {
run: () => {
let name = menu.val;
connection = createConnection()
connection.query(‘INSERT INTO users (uuid, phone, name) VALUES (UUID(), ?, ?)’, [args.phoneNumber, name] , function (error, results, fields) {
if (error) {
console.log(“Error: “, error);
connection.destroy();
menu.end(‘An error has occured and we could not create your account. Goodbye.’);
throw error;
} else {
menu.end(‘Thank you for signing up, ‘ + name + ‘. Goodbye.’);
}
closeConnection(connection)
});
}
});
// database connection methods
let createConnection = () => {
return mysql.createConnection(dbConnectionConfig);
}
let closeConnection = (connection) => {
if (connection) {
connection.end(function (err) {
console.log(“Connection ended”, err)
});
}
}
let getUser = (callback) => {
connection = createConnection()
connection.query(‘SELECT uuid, phone, name FROM users WHERE phone = ? LIMIT 1’, args.phoneNumber, function (error, results, fields) {
let user = undefined
if (error) {
console.log(“Error: “, error);
connection.destroy();
throw error;
} else if (results.length > 0){ //User is known
user = results[0]
}
closeConnection(connection)
callback(user)
});
}
// Kickoff menus
getUser((user)=>{
let startState = (user) ? knownUserStartState(user) : unknownUserStartState()
menu.startState(startState)
menu.run(args, (resMsg) => {
console.log(resMsg);
context.succeed({
“isBase64Encoded”: false,
“statusCode”: 200,
“statusDescription”: “200 OK”,
“headers”: {
“Content-Type”: “application/json”
},
“body”: resMsg
});
});
})
};
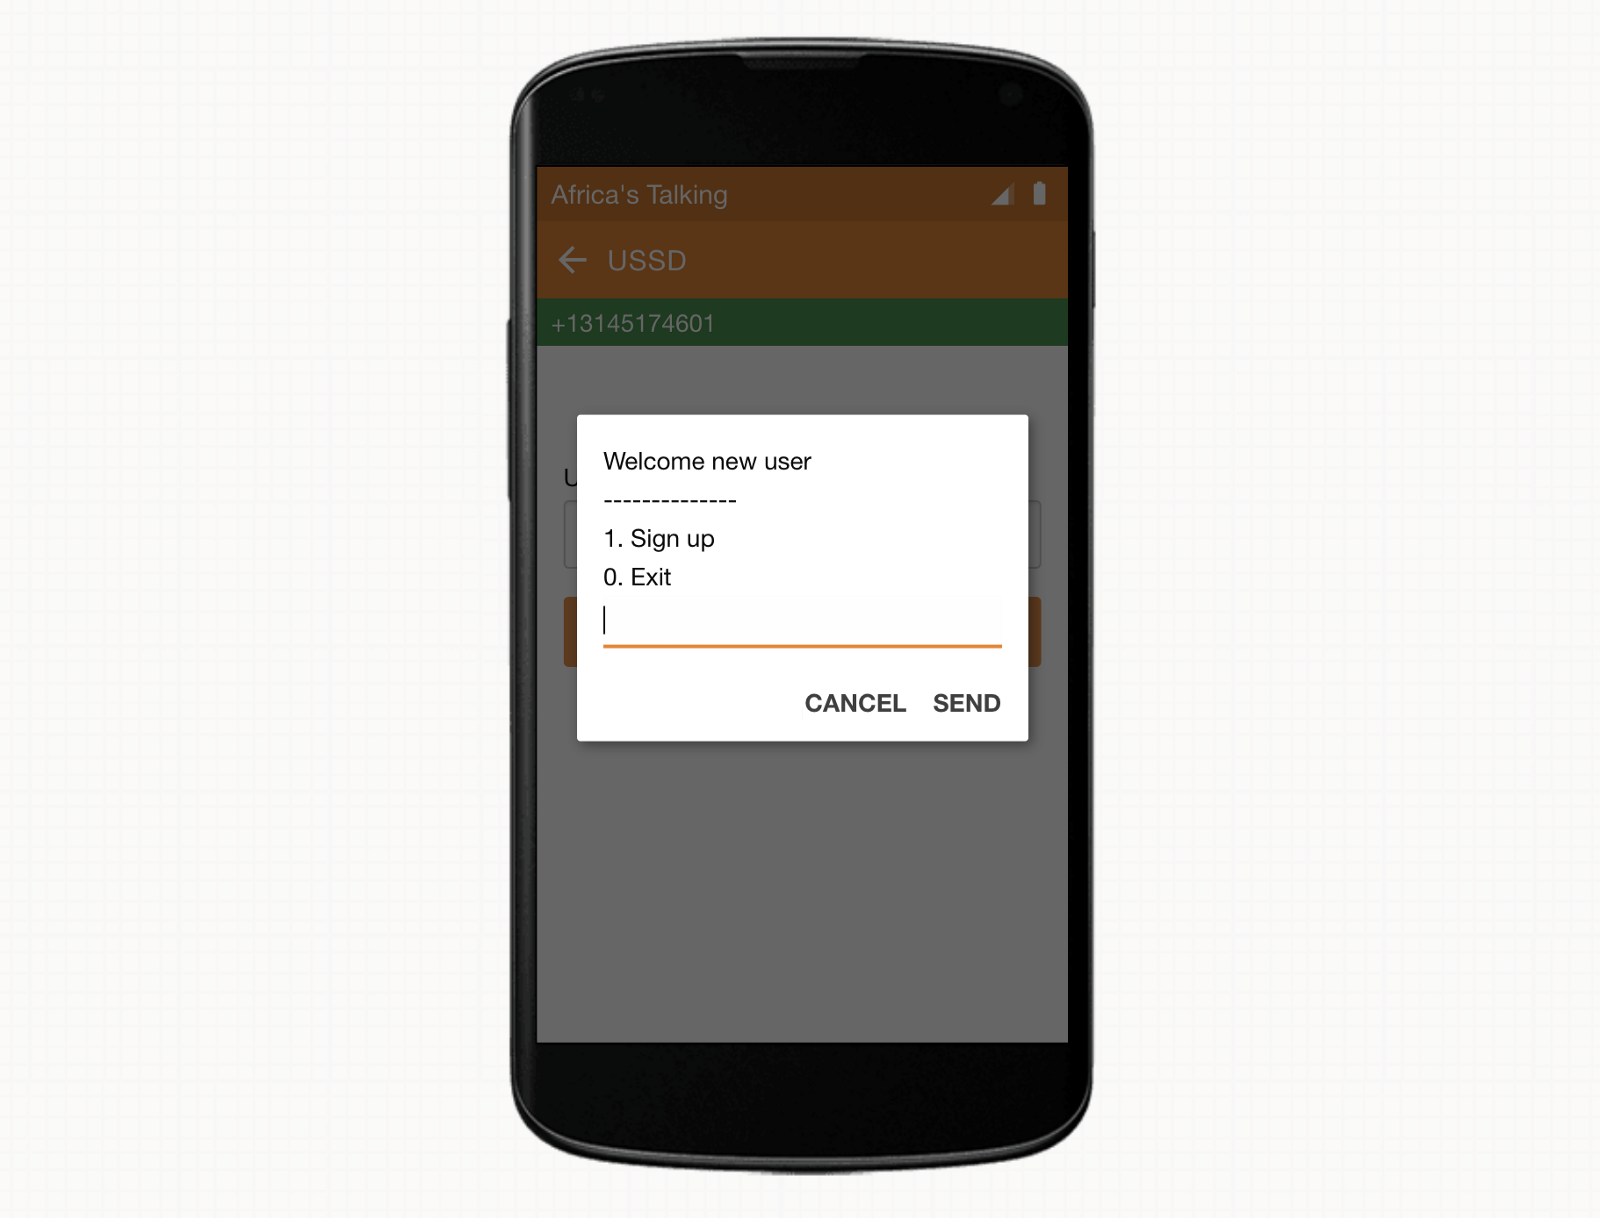
With this implementation, we should now be able to provide a new phone number and see the option to sign up.
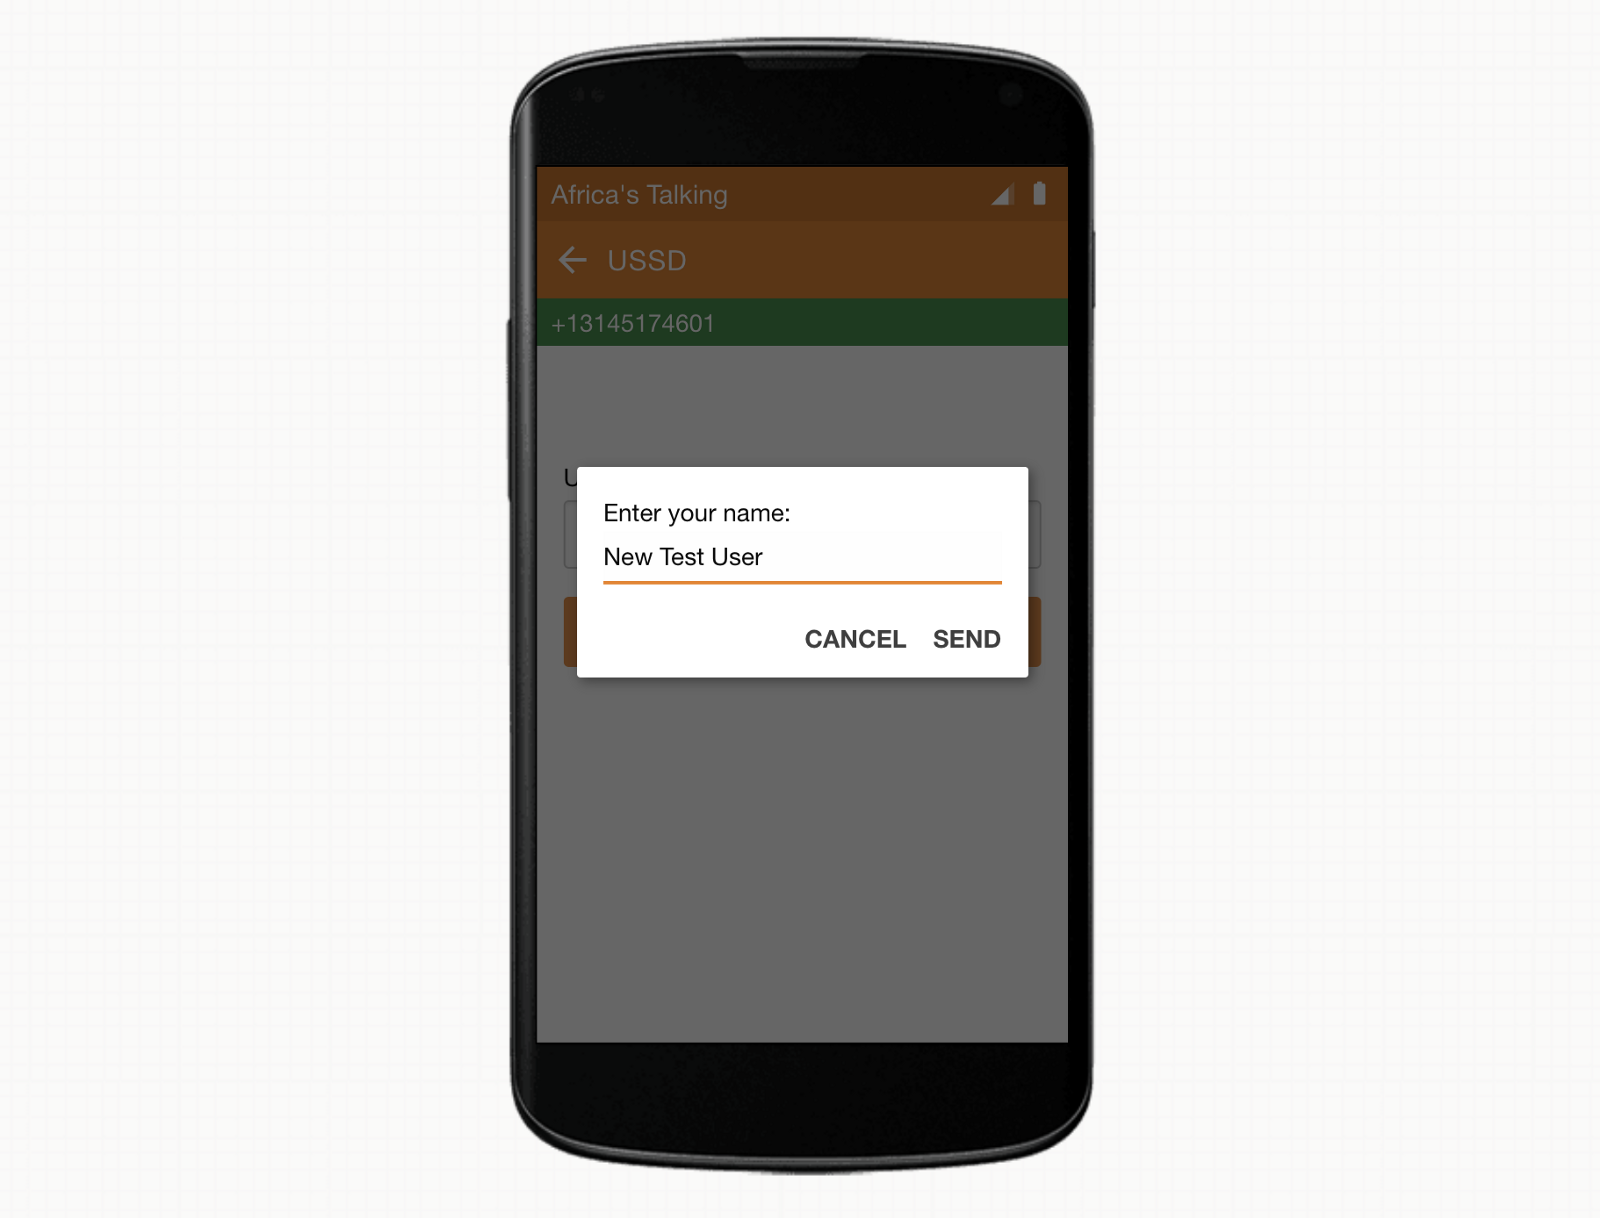
After selecting the first option, we can provide our new user’s name.
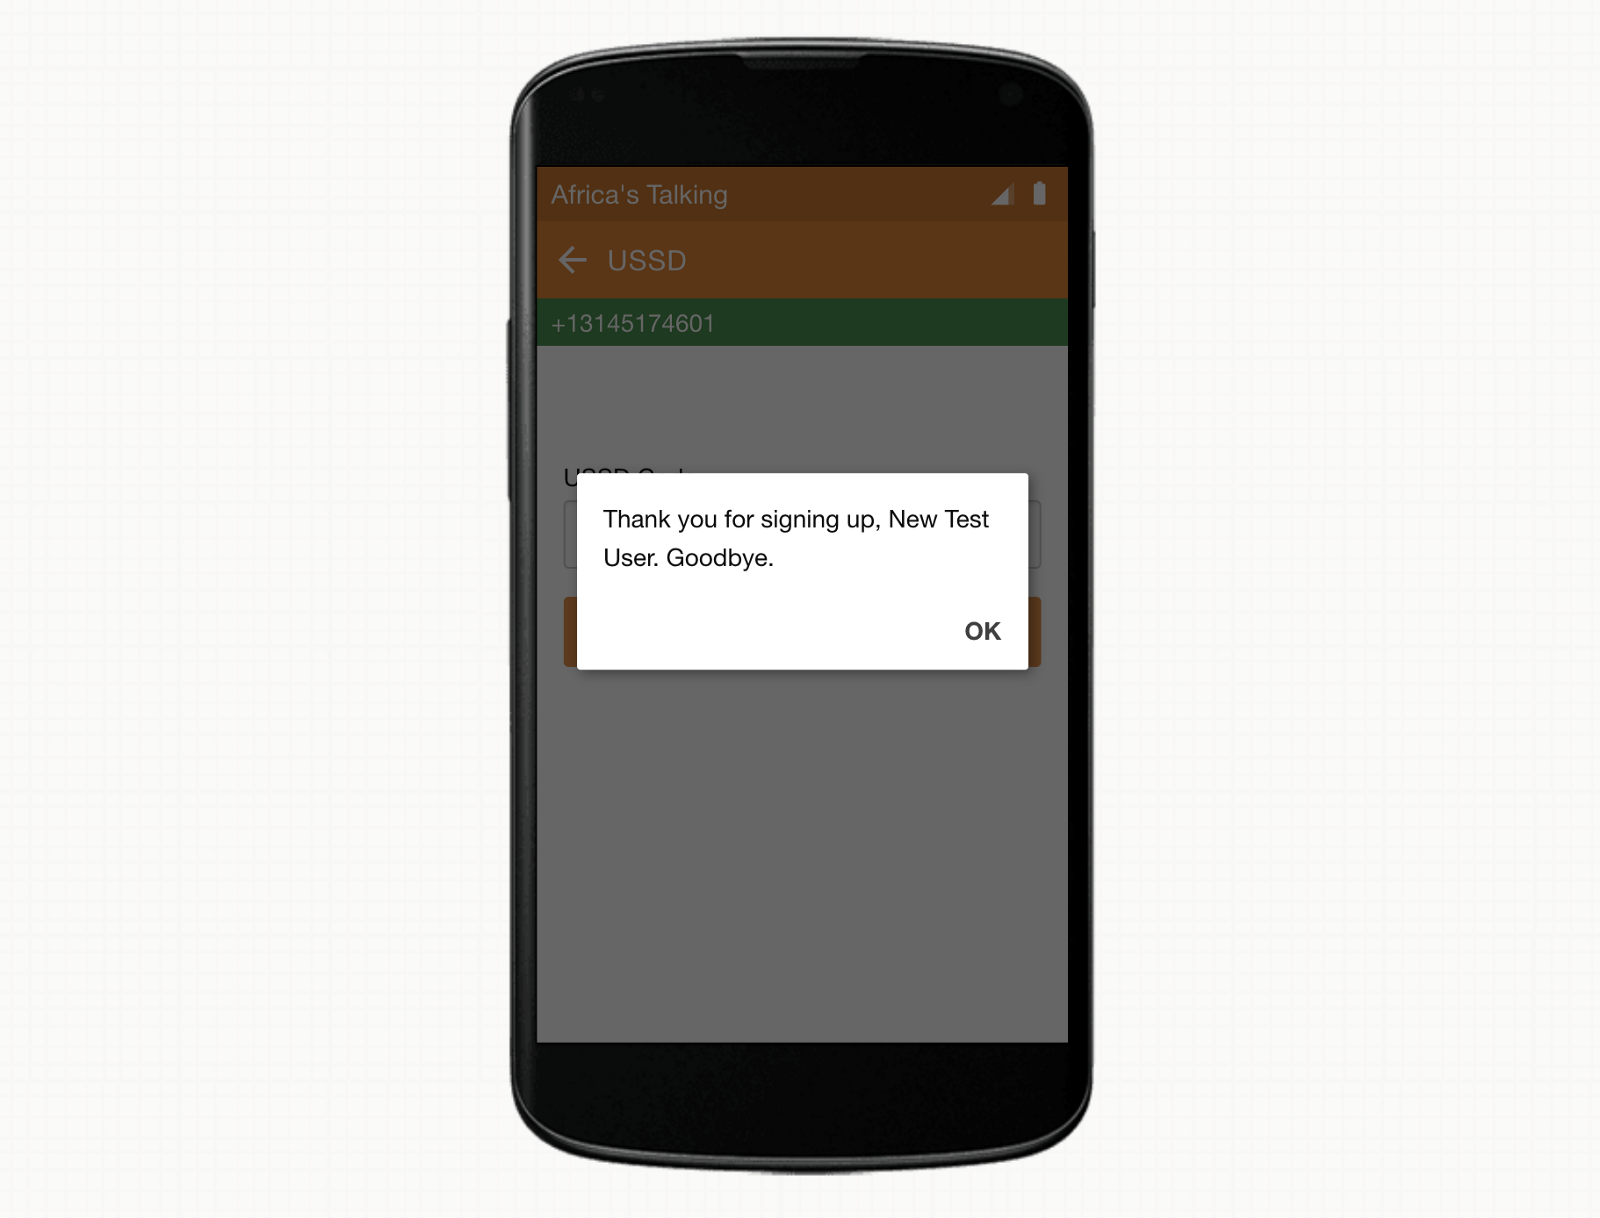
And observe that our new user was created successfully.
The next time that we dial our menu system, we can see that the app has recognized our phone number from when we just registered.

Be aware that while this is a great starting place, there are tons of optimizations that should be looked into if this were to go to a production environment. To mention a few, we are currently doing a database read for each menu when only the first state requires it, we are violating USSD best practices by asking for alpha characters during sign up, and we are missing error handling and validation of the new user information (database requires at least one character). But at this point, we have met our goals, so I will leave it to you to make these updates and build out any other functionality, user specific or otherwise, that you would require.
I hope this helps you on your way to using serverless architecture to provide USSD apps with user-specific functionality. Please leave a comment with any questions, feedback, or links to projects this guide helped to create.
Thanks for reading!
References:
- https://aws.amazon.com/getting-started/tutorials/configure-connect-serverless-mysql-database-aurora/
- https://dzone.com/articles/querying-rds-mysql-db-with-nodejs-lambda-function
- https://docs.aws.amazon.com/lambda/latest/dg/vpc-rds.html
- https://www.jeremydaly.com/aurora-serverless-the-good-the-bad-and-the-scalable/
- https://aws.amazon.com/about-aws/whats-new/2018/11/alb-can-now-invoke-lambda-functions-to-serve-https-requests/
- https://docs.aws.amazon.com/elasticloadbalancing/latest/application/lambda-functions.html